Little Box of Poems with a Raspberry Filling

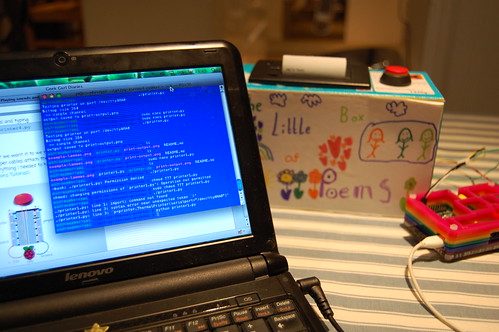
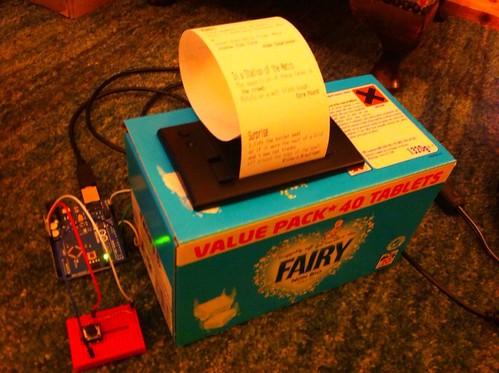
Back in October 2012 I made my first Little Box of Poems – this is a self-contained box that prints out a random short poem when you press a big red shiny button. I like having poems instead of receipts in my wallet. And it makes a good educational project combining physics (wiring), DT (making the box), ICT (programming) and English (writing or finding poems).

It was made using a little £40 Adafruit-type thermal printer and an Arduino microcontroller. I found that I could only get about a dozen short poems in the Arduino before it started spewing out gibberish, I guess because it ran out of memory. I could have claimed this as some sort of machine-generated found-poetry art project, but I wanted proper poems like what the poets originally wrote.

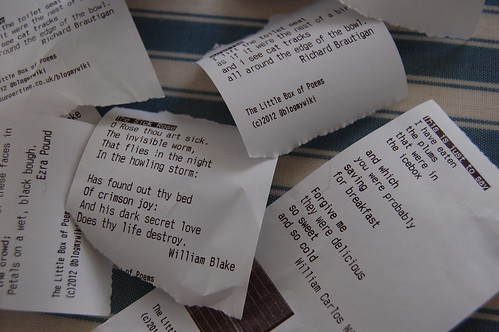
random poems

As luck would have it, my original Arduino-based Little Box of Poems inspired Carrie Anne Philbin to make The Little Box of Geek. This is another box that prints random stuff when you press a button – in this case random nuggets of geeky wisdom. Crucially, Carrie Anne used a Raspberry Pi instead of an Arduino. This means you can add much more stuff into your box, and also opens up the possibility of getting stuff off the internet. Do have a look at her blog and videos posted under the Geek Gurl Diaries banner – her aim is to get girls more engaged with IT and ICT in school.

Here, roughly, is how I made a Raspberry Pi-based little box of poems.

You will need:

  • A Raspberry Pi with bog-standard Raspbian OS installed.
  • A thermal printer like this: http://proto-pic.co.uk/thermal-printer/
  • Till roll for said printer
  • A big red button. It has to be red.
  • Some breadboard jumper wires
  • At least 5 female > male breadboard jumper wires to connect to the GPIO (general purpose input-output) pins on the Raspberry Pi. These are the prongs on your Pi that let you do cool stuff with things in the real world like you can with an Arduino.
  • A small breadboard
  • A 10k Ω resistor
  • A power supply for the Raspberry Pi
  • A hefty 1.5A power supply for the printer that gives between 5 and 9 volts.
  • While you’re building it, you’ll need a screen, keyboard and mouse for your Raspberry Pi – OR a computer, phone or tablet with an SSH client on it (any Mac or Linux box will work admirably). These aren’t needed once you’ve set it up.
  • An old Fairy washing tablet box or similar
  • Some short poems, haikus, limericks etc.

Circuit diagram

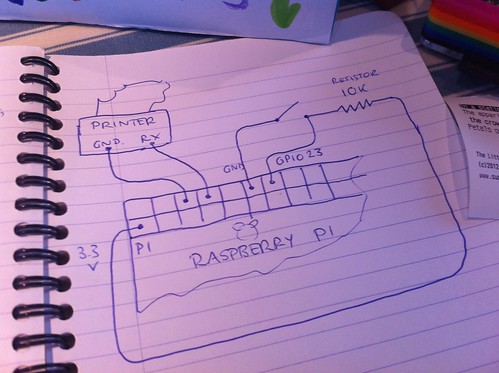
This is a simple diagram of the wiring needed. I had to buy some breadboard female to male leads from Maplin in order to get access to the GPIO pins on the Raspberry Pi – these meant I had to take the lid off my lovely PiBow case. If you had a proper ribbon connector this wouldn’t be a problem. Do NOT try to use an old hard drive IDE ribbon cable to connect to the GPIO pins – they short out certain pins and will likely Fry Your Pi:
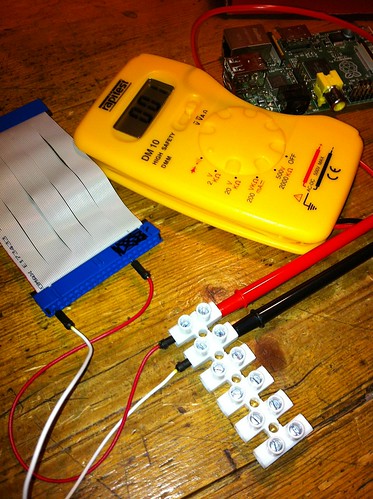
Testing shorts
proving an IDE cable has shorts and should not go anywhere near your Pi

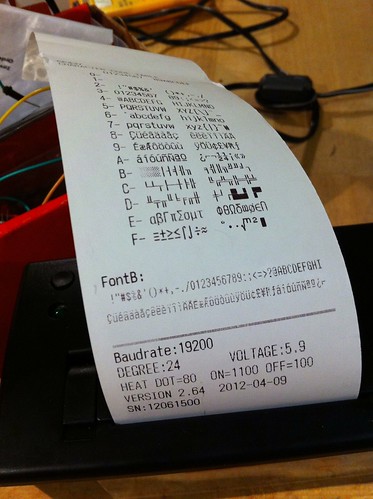
1) Fill your printer with till-roll and hold the printer button down while you connect it to that hefty 1.5A 5-9v power supply. A test sheet should come out looking like something like this:

It prints!

2) Connect your printer to the Raspberry Pi. The printer runs at 5 volts, your Pi mostly at 3.3 volts, so you need to be really careful here. Do not connect the TX pin of your printer (which may have a green wire) to the Raspberry Pi.

There’s a really useful diagram of the Raspberry Pi GPIO pins here: http://elinux.org/RPi_Low-level_peripherals

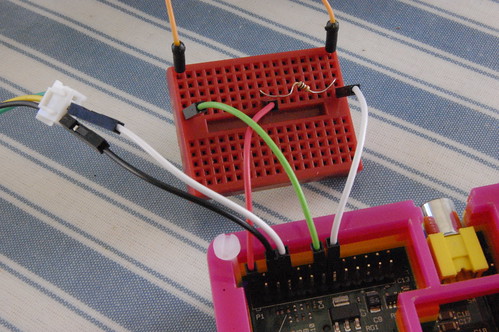
Connect the printer’s GND pin (which may have a black wire) to the pin 6 GND on the Pi. Connect the printer’s RX pin (which may have a yellow wire) to pin 8 (GPIO 14 TXD) on the Pi. That’s all you need to do for the printer.

_DSC1716

3) Then get the button wired up. Connect one side of the push button to pin 12 GND on the Raspberry Pi. Connect the the other side of the button to pin 14 on the Pi (GPIO 23). You also need to connect the same side of the switch that’s connected to GPIO 23 via a 10k ohm resistor to pin 1 of the Raspberry Pi (which supplies 3.3 volts of electricity).

4) Now you need to get some code on your Pi. Here I followed part 1 of the excellent Geek Gurl Diaries video and blog post: http://geekgurldiaries.blogspot.co.uk/2012/12/little-box-of-geek-project.html. Many, many thanks to Carrie Anne Philbin’s hard work on this stuff, which saved me a HUGE amount of time. Her instructions are excellent. Plug your Pi into the internet before you start.

5) Next set up the serial port on the Pi, install Git and the thermal printer library for Python. We’re going to use Python because it’s the default supplied programming language on the Raspberry Pi, there’s a themal printer library for it we can use, and there’s loads of help out there if you get stuck. Yes I’m afraid Python is named after Monty Python, but you can alleviate the shame of this somewhat by always sarcastically pronouncing it the American way: PIE-THONN.

This bit requires a few bits of command line geekery on the Pi. Either open up a terminal window on the Pi, or connect from another computer or phone by SSH (see end of this post for details). Follow all the steps in http://geekgurldiaries.blogspot.co.uk/2012/12/little-box-of-geek-project.html – though in the bit about removing the last line of /etc/inittab I would suggest that you comment the line out instead of deleting it, by putting a # (hash) sign at the start of the line.

6) Get on over to Part 2 of the Geek Gurl Diaries tutorial now: http://geekgurldiaries.blogspot.co.uk/2012/12/part-2.html. Have a read and a good look, play around but we’re not going to follow all of this, though, because we’re printing random poems that we are going to hard-code. It might not be the Cheese Shop, but it will be your very own Python script. Ahem. So ignore all the stuff about ‘fortune’ and instead write a file called poem.py that looks something like this:


# (c) 2012 Giles Booth @blogmywiki
# www.suppertime.co.uk/blogmywiki
# please credit me if you modify and/or use this code
# not for commercial use

import random
import printer

p=printer.ThermalPrinter(serialport="/dev/ttyAMA0")

# the poem titles, text and authors are in 3 separate lists
# you force a new line with \n and \ at the end of a line
# allows you to continue defining a string on a new line

poemtitle = ['In a station of the Metro', 'The Sick Rose', 'This is just to say', 'Surprise']

poemtext = ['The apparition of these faces in the crowd;\n\
Petals on a wet, black bough.', 'O Rose thou art sick.\n\
The invisible worm,\n\
That flies in the night\n\
In the howling storm:\n\n\
Has found out thy bed\n\
Of crimson joy:\n\
And his dark secret love\n\
Does thy life destroy.', 'I have eaten\n\
the plums\n\
that were in\n\
the icebox\n\n\
and which\n\
you were probably\n\
saving\n\
for breakfast\n\n\
Forgive me\n\
they were delicious\n\
so sweet\n\
and so cold', 'I lift the toilet seat\n\
as if it were the nest of a bird\n\
and i see cat tracks\n\
all around the edge of the bowl.']

poemauthor = ['Ezra Pound\n', 'William Blake\n', 'William Carlos Williams\n', 'Richard Brautigan\n']

# this chooses a random poem number between 0 and 3
# (in the poem lists the 1st poem is poem number 0)
poem = random.randrange(0,4)

p.bold_on()
p.inverse_on()
p.print_text(poemtitle[poem])
p.linefeed()
p.inverse_off()
p.bold_off()
p.justify("L")
p.print_text(poemtext[poem])
p.linefeed()
p.justify("R")
p.print_text(poemauthor[poem])
p.justify("L")
p.linefeed()

# THIS SHOULD PRINT A QR CODE BUT I HAVEN'T GOT IT WORKING YET
#import Image, ImageDraw
#i = Image.open("bmw-qr.png")
#data = list(i.getdata())
#w, h = i.size
#p.print_bitmap(data, w, h, True)
#p.linefeed()

#FONT B IS THE TINY FONT
p.font_b_on()
p.print_text("The Little Box of Poems\n(c)2012 @blogmywiki\nwww.suppertime.co.uk/blogmywiki")
p.font_b_off()
p.linefeed()
p.linefeed()
p.linefeed()

7) Follow the Geek Gurl Diaries bit on adding a button, making sure you modify the GPIO script to call your poem.py script when you press the big red shiny button. The line that reads:
os.system("/usr/games/fortune -s science | python ggd_printer4.py")
should be changed to read something like:
os.system("python poem.py")
When I did this I got an error saying ‘no module named RPi-GPIO’ (I may have skipped something earlier) so I had to do a bit of installing at the command line:

sudo apt-get update
sudo apt-get install python-dev
sudo apt-get install python-rpi.gpio

I also had to run the GPIO script calling poem.py as root (typing sudo before the command) otherwise I got an error saying no access to /dev/mem. I’ve not made it run automatically at startup yet, but the Geek Gurl Diaries blog tells you how to do that.

No TV? No problem!

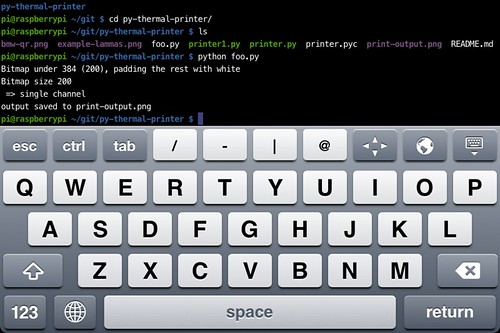
One of the problems with the Raspberry Pi is that you need a TV connected to it. In the school holidays the TV is in heavy demand from the kids, so as everything I need to do is on the command line anyway, I decided to plug the Pi into the house broadband router by ethernet and log into the Pi using SSH. You can do this, for example from the OS X terminal:

Injecting a Pi filling to my Box o'Poems

…or from an iPhone or iPad using an SSH client like Prompt (currently on sale at £1.49 in the iTunes store):

Controlling Raspberry Pi from iPhone SSH client 'Prompt' - currently on sale at £1.49

You need to know your Pi’s IP address in order to do this, though, so you may need a keyboard, mouse & screen to start with, or you can run a utility like IP Scan (OS X) to scan your network for devices. Then you should be able to log in to the Pi by typing, for example, at the OS X command line:
ssh pi@192.168.1.190
(your IP address will almost certainly be different) and enter raspberry as the password when prompted. Then you’re logged into your Pi from the comfort of your laptop, iPad, whatever. And the kids can watch the 2,000th episode of Tracy Beaker that day.

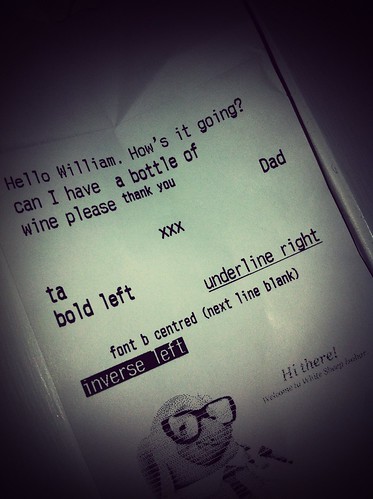
One other benefit of using SSH from a laptop or iPhone to a Pi/printer combo in the kitchen is that you can send orders to the staff:

Important use for thermal printer connected to a Raspberry Pi

To-do list

- Add more poems
- Get image printing to work so I can include a logo or QR code. I just got a black square with the QR code PNG I tried.
- Work out how to power printer and Pi off one power supply.

Posted in computers, ipad, iPhone, poetry, Raspberry Pi, Raspbian | Tagged , , , | 12 Comments

Kids in America: Newtown and Twitter

Watching Newtown unfold on Twitter was a strange experience. Like most news now, I first heard of it there, a colleague breaking the news in my timeline. I didn’t join in with RTs, and there was perhaps slightly less of the usual eager need to be the first to break the news than you sometimes get, certainly once it was clear that most of the dead were young children. Perhaps it was just too awful.

A respected journalist tweeted ‘you shouldn’t be on Twitter right now if you’re not tweeting about #Newtown’ – and I instantly felt bad about tweeting about being turned away from Pizza Express. Then I felt cross that someone was dictating the agenda for the whole of Twitter. Yes, the events were unimaginably awful – perhaps too awful to comprehend, and therefore there was, for someone so far away, some solace in the usual business of Twitter: sarcasm, funny pictures of cats and a well-refreshed Kim Wilde serenading fellow train passengers. ‘Kids in America’ – the dreadful irony didn’t even occur to me.

Part of me felt slightly detached from Newtown because I was not surprised. Have gun laws in the US changed since the last mass shooting? No? Well, there you go then. But I also felt a bit queasy watching my fellow Brits getting into arguments on Twitter with members of the NRA. I felt that it’s not our fight, the NRA are not likely to respond to foreigners telling them how to run their country. American citizens have to sort this out themselves.

So what can we do? We can share the unimaginable grief. We can wonder at some of the extraordinary acts of heroism. And we can share the experience of Dunblane and cold, hard statistical facts about deaths from handguns in countries like the United Kingdom which have far stricter gun control than the US.

Posted in grief, internet | Tagged , , , | Leave a comment

Making a media centre with a Raspberry Pi

RaspBMC on a RaspberryPi

Our kids have a multitude of gizmos, but still they fight over the TV; Kid A wants to watch something back off the PVR, while Kid B is playing on the Wii and Kid C wants to watch Strictly back on the iPlayer as we won’t have it on in the house and I can’t be wasting hard disk space on such flim-flammery.

We have a small Samsung TV in the small back room that just has Freeview – which apparently is not enough for today’s non-linear kids. So I decided to make use of our spare Raspberry Pi by sticking it in the unloved TV to make a media centre. This is very much a work in progress, just notes to myself to remind me what I did when I need to do it again. And if anyone else finds it useful, so much the better.

1) Our main computer is an iMac, and I followed these instructions to make an SD card with RaspBMC on it. RaspBMC is a version of the open source XBMC media centre optimised for the Raspberry Pi. I used a 4GB SanDisk card. http://www.raspbmc.com/wiki/user/os-x-linux-installation/. (I had to reformat the card in OS X disk utility as one 4GB DOS partition first as it had already been partitioned in three parts for a previous Raspberry Pi install, and it was impossible to pick the correct disk to over-write.)

2) I put the SD card in the Pi, plugged the Pi into internet by ethernet, connected to the TV by HDMI and powered it up. It updated, repartitioned, did all that groovy stuff – but when it was finally ready to rumble, the TV screen went black and the TV complained ‘mode not supported’. I half-expected this – this old Samsung LE19R86BD TV has caused problems before with its somewhat flaky HDMI support. I had to log into the Pi by SSH from the iMac to edit a config file. First, I found the IP address of the Pi by looking at the admin web page for my broadband router. Then in the OS X terminal I typed
ssh pi@192.168.1.72
(your IP address will be different). The default password is ‘raspberry’. This gives you command line access to the Pi.
I then navigated to /boot/ and typed
sudo nano config.txt
to edit the config file and added a line
hdmi_mode=20
and chose the ‘Just Scan’ picture size mode on the Samsung remote. Then I had a picture!

2017 UPDATE ON THE SAMSUNG TV SETTINGS
If you’ve found this page by googling ‘Samsung LE19R86BD TV Raspberry Pi HDMI’ then I should note that recently (summer 2017) I found I had to use slightly different settings in the /boot/config.txt file to get a picture.
I found I got a reasonable picture (letterbox but I think aspect ratio is ok) by using

hdmi_group=1
hdmi_mode=4

and I adjusted the left and right overscan by 16. You could probably adjust the top and bottom by -16 but you may get aspect ratio problems.

3) Next I got wifi working. I have an Edimax EW-7811UN Wireless 802.11b/g/n 150Mbps Nano USB Adaptor. Setting it up is easy in RaspBMC – with it still connected by ethernet, go to the Programs tab and add a new one called ‘Network Manager’. This allows you to configure the Edimax wifi dongle easily from a keyboard.

4) Couldn’t find any video to play off my Humax box – I think I need to buy an MPEG2 codec licence key from the good people at Raspberry Pi HQ. Airplay works though – I can play video off my iPhone onto the TV. I also got the BBC iPlayer working – and the ITV Player. There’s not much on ITV I want to watch, mind – apart from 31 episodes of The Professionals.
I followed these slightly confusing instructions: http://djb31st.co.uk/blog/catch-up-tv-on-raspberry-pi-raspbmc-bbc-iplayer/ – can’t get 4OD to work yet, but iPlayer does :)

I’ve not investigated pointing devices or remote controls yet – for now it’s working well with just an old USB keyboard.

So I got the iPlayer working on an old TV using: a Raspberry Pi, a £10 USB wifi adaptor, a Kindle power adaptor, a cheap 4GB SD card and a cheap HDMI lead.

Untitled

…well, what else was I going to watch after all that? Hello, Pond.

Posted in computers, Doctor Who, hardware, Linux, Raspberry Pi | Tagged , , , | 5 Comments

How to Build a Little Box of Poems

I wanted to build a little internet printer, spewing out weather and tweets and the like. When I was testing my thermal printer, however, I got bored reading sample text and replaced it with a short poem. And that gave me an idea: why not make a self-contained box that just prints a random poem when you press a button?

A few people seem to really like the idea, especially those working in education. It could be a great school project combining four different subjects: Science/Phyisics (the electronics and circuit wiring – why is a resistor needed? How can you supply the correct voltage & current to both Arduino and printer from 1 power supply?), ICT (programming the Arduino), DT (making the box) and English (get your class hunting for great, short poems, or better still get them writing their own Imagist poems, limericks or haikus).

You will need:

  • An Arduino Uno or similar. A starter kit would contain some of the other bits you need, eg http://proto-pic.co.uk/arduino-starter-kit/ (roughly £40 for a kit, about £20 for a bare Arduino)
  • A thermal printer such as http://proto-pic.co.uk/thermal-printer/ (about £40)
  • A 10 Ω resistor (may be in Arduino kit)
  • some wires (ditto)
  • a push button (ditto)
  • something to power the printer and the Arduino – the printer needs a hefty power supply that can provide between 5 and 9 volts at at least 1.5 amps. The Arduino needs a similar voltage but takes much less current.
  • a computer to program your Arduino running version 1.0 or above of the Arduino software, and a USB lead (only needed when you make it)
  • some till roll – either this http://proto-pic.co.uk/thermal-printer-paper-34/ or buy some from Ryman’s or another office supply store, and spool some off so the roll fits.
  • some short poems
  • a box to put it in – I used a Fairy washing tablet box made of strong cardboard.
  • Little Box of Poems - work in progress

When you get your printer, connect a suitable power supply insert the paper and test it by turning it on when you hold down the button. You should see a test pattern that tells you the baud rate of your printer. (Baud is a measure of how fast data is sent over a serial connection). It should look like this:

It prints!

If the baud rate is anything other than 19200 you need to tweak a number in my code, and in the Adafruit Thermal library – that’s a bunch of code that makes it easier to tell your printer what to do. They have instructions on their web site for how to install it. It’s essential.

Here’s how I wired it together, combining the sample Arduino button sketch with the Adafruit thermal printer example:

box-of-poems-diagram

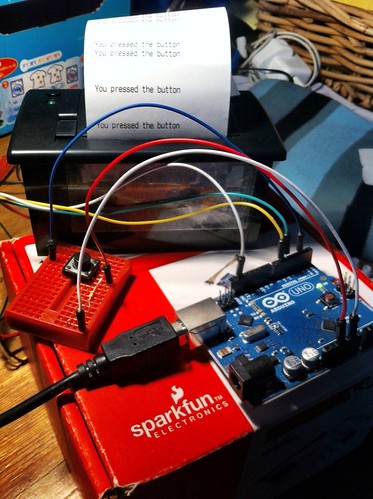
I used a tiny breadboard that I got with my Arduino kit to test the code – it connects a small black push button via a resistor. I later replaced the small black button with a huge red button that I fitted to the top of the box.

I powered my Arduino by USB, either from a computer or from an iPhone charger, and I used a separate 5v 2A power supply for the printer – I daresay they can be wired so only 1 plug is needed.

Print on button press proof of concept

You can download my Arduino source code here or read it below. There are three files in the zip, the main one is displayed at the foot of this blog post. The other 2 files are logos.

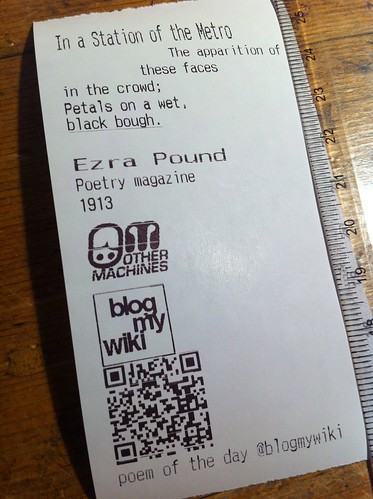
Pome printed by ArduinoFeel free to edit it with your own choice of poems – I’m not sure how many can be crammed into the Arduino’s tiny memory, but I daresay you can get more in if you remove the graphics – I have a little ‘Blog My Wiki’ logo and a QR code that links to this blog. I used the Adafruit instructions on how to make graphics for the printer – I have to say that using ‘Processing’ to make them worked much better for me than using LCD Assistant. I used a random free web site to make the QR code and carefully resized it in Photoshop and saved it as a PNG.

The poems are split into three arrays – one for title, one for the main text of the poem, and a third for the author. This is because I wanted to print headings, text and footers in diffrent styles, and this seemed the simplest way to do it. ICT challenge: is there a more efficient way to code this?

So wire up the printer and switch to your Arduino. Upload the code, and press. Hopefully you will get a random poem. Rip & read. Share & enjoy.

Injecting a Pi filling to my Box o'Poems

Post-script: December 2012

Thanks to Twitter, The Little Box of Poems inspired Carrie Anne Philbin’s Little Box of Geek – this is a project based on a Raspberry Pi rather than an Arduino. I’ve found that I can only get about a dozen short poems in the Arduino before it starts spewing out gibberish – I’m guessing because it’s running out of memory. Clearly the Raspberry Pi has much more storage by default and, crucially, is easy to get on the internet, so I’m rebuilding my Little Box of Poems with a Raspberry Pi filling. I’ll post my results when I get it working, which shouldn’t take too long thanks to Carrie Anne’s excellent blogposts and videos. Do visit her site and spread the word about her important work which is getting girls into IT. You can follow @GeekGurlDiaries on Twitter.

/*
 Little Box of Poems
 © 2012 Giles Booth
 
 http://www.suppertime.co.uk/blogmywiki
 @blogmywiki

 not for commercial use
 if you modify this code for edcuational or charitable use
 please credit Giles Booth and/or @blogmywiki in printouts
 */

const int buttonPin = 2;     // the number of the pushbutton pin - doesn't change
int currState = 0;           // set variables to hold the state of the button
int prevState = 0;

#include "SoftwareSerial.h"
#include "Adafruit_Thermal.h" // you need to download this and put it in your Arduino library
#include "bmw.h"              // BlogMyWiki logo
#include "qr2.h"              // QR code graphic for my web site
#include <avr/pgmspace.h>     // I have no idea what this does

int buttonState = 0;     // variable for reading the button status
int printer_RX_Pin = 5;  // This is the green printer wire
int printer_TX_Pin = 6;  // This is the yellow printer wire

Adafruit_Thermal printer(printer_RX_Pin, printer_TX_Pin);

void setup() {
  pinMode(buttonPin, INPUT);
  Serial.begin(19200);   // this is the baud rate of your printer - may vary
  pinMode(7, OUTPUT); digitalWrite(7, LOW);
  printer.begin();
}

void loop(){
  // read the state of the button:
  currState = digitalRead(buttonPin);
  if (currState != prevState)   // if something has changed, do something
{
  if (currState == HIGH) {
    printPoem();
  }
  else {
    // if you want something to happen when the button is released, put it here
    // such as a beep, or a display saying 'your poem is on its way'
  }
prevState = currState;
}
}

void printPoem(){

  // put poem titles in order in here  
  char* myTitles[]={"In a Station of the Metro","This is just to say","Surprise","Moment","The Sick Rose","Women, Wine and Snuff"};

  // put poems in here in order
  // they must all be on the same line, in double quotes, separated by commas
  // use \n for a new line and \" to escape a quotation mark
  char* myPoems[]={"The apparition of these faces in the crowd;\nPetals on a wet, black bough.", "I have eaten\nthe plums\nthat were in\nthe icebox\n\nand which\nyou were probably\nsaving\nfor breakfast\n\nForgive me\nthey were delicious\nso sweet\nand so cold", "I lift the toilet seat\nas if it were the nest of a bird\nand i see cat tracks\nall around the edge of the bowl.",
"Clear moments are so short.\nThere is much more darkness.More\nocean than terra firma. More\nshadow than form.", "O rose, thou art sick!\nThe invisible worm,\nThat flies in the night,\nIn the howling storm,\n\nHas found out thy bed\nOf crimson joy,\nAnd his dark secret love\nDoes thy life destroy.","Give me women, wine and snuff\nUntil I cry out,\n\"hold, enough!\"You may do so sans objection\nTill the day of resurrection;\nFor, bless my beard, they aye shall be\nMy beloved Trinity."};

  // put author names & dates here, in order
  char* myAuthors[]={"Ezra Pound","William Carlos Williams","Richard Brautigan","Adam Zagajewski","William Blake","John Keats"};

  int poemChoice = random(0, 6);  // choose a random poem number between 0 and 5

  printer.doubleHeightOn();
  printer.println(myTitles[poemChoice]);
  printer.doubleHeightOff();
  printer.boldOn();
  printer.println(myPoems[poemChoice]);
  printer.boldOff();
  printer.justify('R');
  printer.println(myAuthors[poemChoice]);
  printer.justify('L');

  printer.printBitmap(bmw_width, bmw_height, bmw_data);    // print Blog My Wiki logo    
  printer.printBitmap(qr2_width, qr2_height, qr2_data);    // print QR code graphic
  printer.boldOn();
  printer.println("The Little Box of Poems");
  printer.boldOff();
  printer.setSize('S');     // Setting the size adds a linefeed
  printer.println("www.suppertime.co.uk/blogmywiki");
  printer.println("@blogmywiki");
  printer.feed(3);

  delay(2000);   // 2 second pause to help prevent multiple presses     
}
Posted in Arduino, education, ICT, literature, poetry | Tagged | 6 Comments

Little Box of Poems

Pome printed by Arduino

Anyone who’s unfortunate enough to follow me on Flickr knows that I’ve become a bit obsessed by till-roll lately. I bought a tiny thermal till-roll printer to hook up to my Arduino or RaspberryPi, the idea being to make a cheap version of the Berg Little Printer – which is a nice idea, but way too expensive for me. I decided instead to make one of these: http://gofreerange.com/hello-printer, only possibly with a RaspberryPi controlling it, instead of an Arduino.

I got my £40 printer from Proto-Pic, realised I’d forgotten to order paper, ran out to Rymans to buy thermal till-roll, spent ages winding it onto a small spool, and chucked at my oh-so-meta receipt. I had to butcher an old camera power supply to get 5 volts at 2 amps to the printer – it’s a thermal printer, it needs current to get hot. Soon I got bored printing test patterns, so I replaced the default test text with a short Imagist poem by Ezra Pound.

Then I had an idea.

Instead of making an internet-connected printer spewing out tweets and weather, why not make a totally self-contained gadget that simply prints a random short poem when you press a button? I have a big, red shiny button in my drawer of electrical bits. This could be good. A little box of poems. Put it in your school. Put it in your workplace. Press the button. Rip & read. Pass them on. I’ve been handing little poems to all sorts of people today. It’s a nice thing to do.

Little Box of Poems - work in progress

So I need your suggestions for great short poems, please. I’m kind of drowning in William Carlos Williams at the moment. Which is fine, but some others would be good. So far only one person has suggested any, so I am starting to wonder if I am crazy. I want to see how many poems I can cram into the Arduino’s tiny ZX Spectrum-sized memory.

UPDATE: I’ve now given my Little Box of Poems a Raspberry Pi filling!

Posted in Arduino, hardware, literature, poetry | Tagged , , | 3 Comments