A tiny screen for a Raspberry Pi

I have a few old Raspberry Pis lying around, including a Model B Rev 1 running Raspberry Pi OS Buster lite. I use it to serve up my simple MUD game. It has no wi-fi so it’s connected by ethernet to my router which also gives it power over USB. I really must write that up some time.

Anyway, I have a whole bunch of cheap, tiny 1306 i2c OLED 128×64 pixel displays so I thought it might be fun to see if I could use one as a little shell display so I could do some basic admin on the headless Pi locally, just with a USB keyboard.

It took way longer than I expected, especially given I found someone had already done this, but it works. Here’s how I did it. Please bear in mind… my Pi is very old, I’m using Buster Lite as my OS, my OLED display’s address is 0x3C, it’s set to auto login to a command prompt, no GUI – your mileage may well vary!

It’s based on this project: https://github.com/satoshinm/oledterm – however, that was written in Python 2, uses a newer Pi, uses an spi not i2c interface, and because the OLED display libraries now only work in Python 3, I couldn’t get it to work. Issue #4 on that repo was the key to solving this, but I thought I’d summarise how I got this to work.

First, I connected the display. GND on the display to GND on the Pi, VCC to +3.3v on the Pi, SDA to Raspberry Pi pin 3, SCL to Pi pin 5 – remember this is an old Raspberry Pi original model B!

I installed git and downloaded oledterm:
git clone https://github.com/satoshinm/oledterm

This wouldn’t run for various reasons – not least because I needed to install luma.core to drive the OLED display, and I needed to install pip to install that:
sudo apt install python3-pip
sudo -H pip3 install --upgrade luma.oled

Then I copied the Python 3 version of oledterm from here and saved it as a file called oledterm3.py

I then edited /etc/rc.local to add this:
sudo python3 /home/pi/oledterm/oledterm3.py --display ssd1306 --interface i2c --i2c-port 0 &
exit 0

I also edited go.sh the same way. Let me explain the options in more detail. My display type is set to ssd1306, this is a very common kind of small OLED display. If my display’s i2c address were not 0x3c, I’d have needed to add an option to change that here. I specify the interface as i2c, rather than SPI as used in oledterm, and because I have a very old Pi I need to specify the i2c port as 0. With a newer Pi you could probably omit –i2c-port, or set it to 1.

I then unplugged the HDMI display, and rebooted – and lo! I could just about see a tiny shell and use my USB keyboard to type instructions! I could even edit text in nano – just about! Who needs more than 31 columns and 9 rows of text, anyway!?

If you like this, you may also like my adventures with using OLED displays in Arduino-based TinyBASIC computers, a micro:bit pulse oximeter, air quality sensor, or playing ArduBoy games on a BBC micro:bit.

Python 3 version of oledterm by Krizzel87

#!/usr/bin/env python
# -*- coding: utf-8 -*-
# based on:
# Copyright (c) 2014-17 Richard Hull and contributors
# See LICENSE.rst for details.
# PYTHON_ARGCOMPLETE_OK

import os
import time
import sys
import subprocess
from luma.core import cmdline
from luma.core.virtual import terminal
from PIL import ImageFont

VIRTUAL_TERMINAL_DEVICE = "/dev/vcsa"
ROWS = 9
COLS = 31

# based on demo_opts.py
from luma.core import cmdline, error
def get_device(actual_args=None):
    """
    Create device from command-line arguments and return it.
    """
    if actual_args is None:
        actual_args = sys.argv[1:]
    parser = cmdline.create_parser(description='luma.examples arguments')
    args = parser.parse_args(actual_args)

    if args.config:
        # load config from file
        config = cmdline.load_config(args.config)
        args = parser.parse_args(config + actual_args)

    # create device
    try:
        device = cmdline.create_device(args)
    except error.Error as e:
        parser.error(e)

    #print(display_settings(args))

    return device

# based on luma.examples terminal
def make_font(name, size):
    font_path = os.path.abspath(os.path.join(
        os.path.dirname(__file__), 'fonts', name))
    return ImageFont.truetype(font_path, size)

def main():
    if not os.access(VIRTUAL_TERMINAL_DEVICE, os.R_OK):
       print(("Unable to access %s, try running as root?" % (VIRTUAL_TERMINAL_DEVICE,)))
       raise SystemExit

    fontname = "tiny.ttf"
    size = 6

    font = make_font(fontname, size) if fontname else None
    term = terminal(device, font, animate=False)

    term.clear()
    for i in range(0, ROWS):
        term.puts(str(i) * COLS)
    term.flush()
    #time.sleep(1)

    while True:
        # Get terminal text; despite man page, `screendump` differs from reading vcs dev
        #data = file(VIRTUAL_TERMINAL_DEVICE).read()
        data = subprocess.check_output(["screendump"])
	#print [data]
        # Clear, but don't flush to avoid flashing
        #term.clear()
        term._cx, term._cy = (0, 0)
        #term._canvas.rectangle(term._device.bounding_box, fill=term.bgcolor)
        term._canvas.rectangle(term._device.bounding_box, fill="black")

        # puts() flushes on newline(), so reimplement it ourselves
        #term.puts(data)

        for char in data:
            if '\r' in chr(char):
                term.carriage_return()
            elif chr(10) in chr(char):
                #term.newline()
                # no scroll, no flush
                term.carriage_return()
                x = 0
                term._cy += term._ch
            elif '\b' in chr(char):
                term.backspace()
                x =- 1
            elif '\t' in chr(char):
                term.tab()
            else:
                term.putch(chr(char))

        term.flush()
        time.sleep(0.01)
        #print "refresh"
        #print data

if __name__ == "__main__":
    os.system("stty --file=/dev/console rows %d" % (ROWS,))
    os.system("stty --file=/dev/console cols %d" % (COLS,))
    try:
        device = get_device()
        main()
    except KeyboardInterrupt:
        pass
Posted in computers, Raspberry Pi, Raspbian | Tagged , , , | Leave a comment

Streaming internet radio on FM

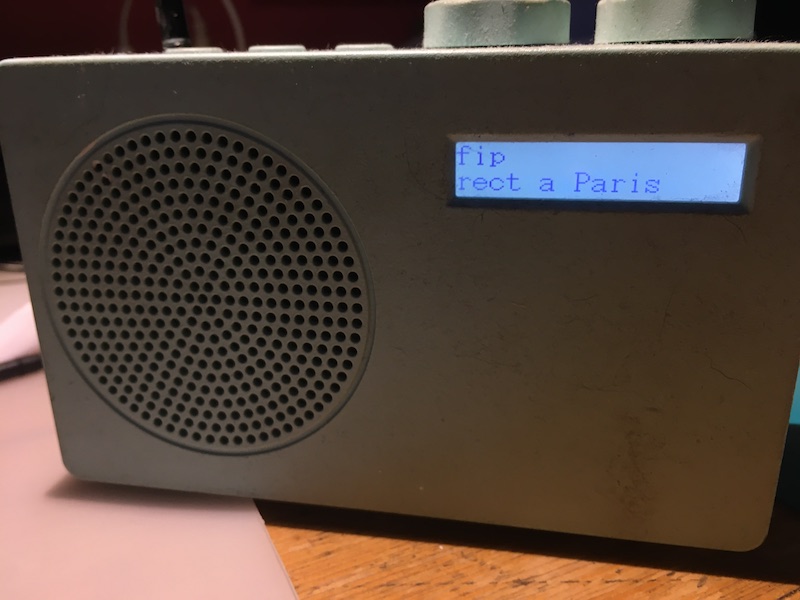
An FM radio showing RDS radio station name 'fip'Years ago I remember thinking how amazing it was that the Raspberry Pi could be turned into an FM radio transmitter with nothing more than a short piece of wire and some code. Back then you could only transmit audio files in a very particular format and it very much seemed like a novelty.

Fast forward to 2022 and it seems things have moved on a bit. Reading a blog post about reviving old radio pagers, I finally caught up with rptix. This suite allows you to turn an old Raspberry Pi into a little radio transmitter that can broadcast in a stunning range of formats and frequencies: FM, AM and SSB radio, slow-scan TV, pager data and many, many more.

Now you probably won’t be doing this as it’s probably illegal to broadcast on most frequencies where you live, and if you find a legal frequency you’d need to add some filtering before attaching any kind of physical antenna, or indeed a wire, to pin 4. The only other things you’d need are an old Raspberry Pi, an internet connection and an old FM radio (with RDS if you have one).

Years ago in Brighton, I’m told, someone used to illegally rebroadcast my favourite radio station, the French music station fip, on FM. I was curious to know if a Raspberry Pi could do the same trick, albeit on a much smaller scale, within a couple of rooms.

I didn’t do this, of course, but if you were so minded, it looks like this is, hypothetically, possible. You could even broadcast RDS station name and text too. This is what you might, hypothetically, do:

Install rpitx per the instructions at https://github.com/F5OEO/rpitx

Install sox:

sudo apt-get install sox

Install lame and some associated tools for handling mp3 streams:

sudo apt-get install lame
sudo apt-get install libsox-fmt-mp3
sudo apt install libsox-fmt-all

At the command line, navigate to the rpitx directory, and type this to pipe the output of the fip internet stream to rpitx:

sox -t mp3 http://icecast.radiofrance.fr/fip-midfi.mp3 -t wav
 - | sudo ./pifmrds -freq 107.5 -ps fip -rt 'en direct a Paris' -audio -

This would stream fip radio and broadcast it on FM on 107.5 MHz FM, with the RDS station name ‘fip’ and the scrolling text ‘en direct a Paris’ (You could try an accented à but it doesn’t seem to support unicode!).

All very, very hypothetically of course.


Posted in computers, hardware, radio, Raspberry Pi | Tagged , , | Leave a comment

Emojify your Python

Screen shot of Emojifier

I’ve been thinking of ways of sharing Python programs on Twitter and I’ve come up with something a bit crazy, but which might have other uses.

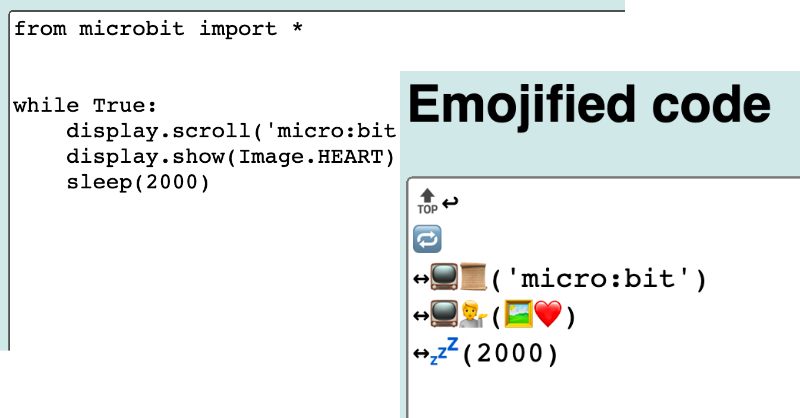
The micro:bit Python emojifier encodes and condenses Python programs using emojis. It also decodes them too, and turns strings of emojis back into full Python programs.

Many keywords are tokenised, in effect, into a single character. This means the programs take up less space, and so you could, for example, share longer programs in a tweet. I used carefully-chosen emojis so even the encoded programs can be read by humans. Our old friend the teleporting duck:

from microbit import *
import radio
radio.config(group=23)
radio.on()

while True:
    message = radio.receive()
    if message:
        display.show(Image.DUCK)
    if accelerometer.was_gesture('shake'):
        display.clear()
        radio.send('duck')

becomes:

🔝
📲📻
📻⚙(👥=23)
📻🔛↩
🔁
〰message = 📻.📥
〰❓message:
〰〰📺💁(🖼🦆)
〰❓📳.was_🤟('🥤'):
〰〰📺🚿
〰〰📻.📤('duck')

I think this might have other uses.

It may also encourage reluctant students to engage with coding concepts by presenting them in a new, but familiar visual language. The emojis are, in effect, a visual abstraction of programming concepts.

Programs written pictorially could appeal to those who struggle with reading or find large blocks of text hard to process, in a way not even block coding can manage,

Maybe students could even write Python programs using emojis. It might make Python more accessible to those who only have mobile devices.

This is very much optimised for Python on the BBC micro:bit, but perhaps it could be applied to other languages.

What do you think? Let me know!

Posted in computers, microbit | Tagged , , , | Leave a comment

micro:bit numbers station

Numbers stations are / were spooky shortwave radio stations, best known from the Cold War, which broadcast human voices reading numbers, usually in groups of five. It’s widely assumed these were / are used by many nations for communicating with secret agents in foreign countries, using an unbreakable one-time pad cipher.

You can spook yourself by listening to The Conet Project.

Or you can code a BBC micro:bit to be come your very own numbers station!

Use one of the micro:bit Python editors (such as the lovely new official online one) to flash the program below on to a micro:bit. If you have a micro:bit V2 you can hear the numbers from the built-in speaker, otherwise attach some headphones or an amplified speaker to pin 0 and GND.

If someone can add some code to play The Lincolnshire Poacher as well, I’d be very happy indeed.

from microbit import *
import speech
import random

numbers = ['zero', 'won', 'too', 'three', 'for',
          'five', 'six', 'seven', 'ate', 'nine']

while True:
    for i in range(5):
        speech.say(random.choice(numbers))
        sleep(500)
    sleep(1000)
Posted in computers, microbit | Tagged , , , , | Leave a comment

micro:bit Wordle game

screenshot of micro:bit Wordle game

I made a Wordle-like game in Python for the BBC micro:bit.

The code is pretty compact and easy to understand, so I think getting students to create their own version of this popular game or pick apart this one would make a nice activity. There are plenty of opportunities to improve it.

You could use it to:

  • teach some Python
  • learn about functions
  • learn about using global variables in functions
  • learn about slicing strings
  • use imports – I hide the word list in an import
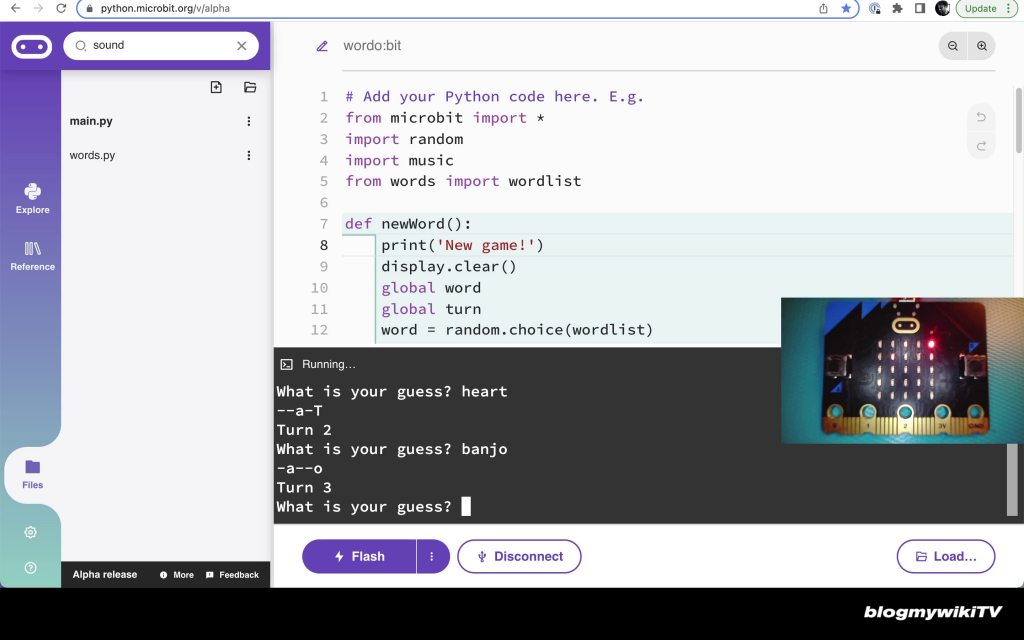
  • experiment with the serial console in the new alpha micro:bit Python editor

You’ll need a micro:bit and a Chrome or Edge browser as it uses webUSB – you interact with the micro:bit using your computer’s keyboard and screen.

You get 5 guesses. It shows your progress on the micro:bit’s LED display: a bright LED means the right letter in the right place, a dim LED means the right letter in the wrong place.

It also prints out your progress in the serial console. Capital letters are in the right place, lower case in the wrong place: So

--a-T

means the word ends in T and has an ‘a’ in 1st, 2nd or 4th place.

You can download a hex file to flash direct onto a micro:bit or drag and drop onto the Python editor, plus the raw Python files over on GitHub: https://github.com/blogmywiki/wordobit.

You’ll probably want to add more words to words.py. You could also improve the program in lots of ways, for example add some simple encryption like ROT13 to the word list or add more word checking.

I also made a video to explain how it works and how to play it:

main.py code

from microbit import *
import random
import music
from words import wordlist

def newWord():
    print('New game!')
    display.clear()
    global word
    global turn
    word = random.choice(wordlist)
    turn = 0

newWord()

while True:
    print('Turn',turn+1)
    if turn > 4:
        print('You lose. Your score is X/5. The word was ' + word)
        music.play(music.POWER_DOWN)
        sleep(5000)
        newWord()
    guess = input('What is your guess? ')
    if len(guess) != 5:
        print('Not a 5 letter word!')
    else:
        progress = ''
        for a in range(5):
            if guess[a] in word:
                if guess[a] == word[a]:
                    display.set_pixel(a,turn,9)
                    progress = progress + guess[a].upper()
                else:
                    display.set_pixel(a,turn,4)
                    progress = progress + guess[a].lower()
            else:
                progress = progress + '-'
        print(progress)
        turn += 1
        if guess == word:
            print('Congratulations! Your score is ' + str(turn) + '/5')
            music.play(music.POWER_UP)
            sleep(5000)
            newWord()

words.py code

# List of 5 letter words hidden from main Python program view
wordlist = ['heart', 'aloft', 'float', 'banjo', 'scoop']
Posted in Uncategorized | Tagged , , , , | Leave a comment