Python & Scratch Bubble sorts for KS3

Here’s a bubble sort I knocked up to help teach bubble sorts in Year 9. Before we get to this point we will have looked at Hungarian folk-dancing bubble sorts, done a bubble sort ourselves in class with human numbers and planned one out in a flow chart.

There are loads of Python bubble sort code examples online, but to be honest, none of them made much sense to me. The one thing I discovered doing this was that the best way to learn how to code a bubble sort, is to code your own. And the same must surely apply to my students…

Note this code is Python 2 (or Python 2 and a half) – I had to take the brackets out of the print statement on line 16 to get it to work in Trinket. The code below works in Python 3.

Click on the ‘play’ button to see it run, change the numbers, have a play…

This is probably not a ‘pure’ bubble sort – it stops as soon as it runs through the line of numbers without making any swaps. I think a pure bubble sort just keeps chugging though every line until every possible pair has been swapped, like the first example here. But I like teaching the point of the computer knowing when to stop.

You could also use this for teaching Boolean variables as it uses
sorted = False
while not sorted:

It will keep looping until sorted = True. I think this is nice, readable English-like example of this kind of iteration and control.

It works like this: as long as the list of numbers is ‘not sorted’, it keeps scanning through the list comparing every pair of numbers. If it finds that the first number in the pair, numberList[i], is bigger than the next, numberList[i+1], it swaps them over. When it finds it can run through the list without making a single swap, the list becomes sorted and the program stops.

This is how it works in more detail:

numberList = [89, 23, 56, 45, 17, 42, 100, 76, 1, 34]
sorted = False
while not sorted:

These lines set up the list of numbers – you can use any list of any length and it should still work. Try it! It sets a Boolean variable called sorted to have the value False (as the list is not sorted, or we don’t know it’s sorted). Then it starts a loop running which keeps going until the sorted variable is True.

    swaps = 0
    for i in range(len(numberList)-1):

This sets a variable called swaps to 0 at the start of each scan of the list. We use it to count how many swaps have been made on each run through the numbers. Line 14 starts a ‘for loop’ running that will have the variable i acting as an index for the numbers of the list we’re going to compare. We could go through it 9 times, but we want this code to work for a list of any length, so the number of comparisons to make is set by using len(numberList) – the length of the list, minus 1 because we don’t want to compare the 10th and 11th numbers when there’s no 11th number.

        if numberList[i] > numberList[i+1]:
            temp = numberList[i]
            numberList[i] = numberList[i+1]
            numberList[i+1] = temp
            swaps = swaps + 1

Lines 17 to 22 are where the comparison happens. If a number is bigger than the following number, they are swapped. I think in Python you can directly swap variables or items in a list, but for readability and my sanity, I’ve stored the 1st number in a temporary variable called temp. Then the second number gets written into the first number’s place in the list, and the temp variable (holding the first number) gets written into the second number’s place. As we’ve made a swap, the swaps counter gets increased by 1. That line could also read swaps += 1.

    if swaps == 0:
        sorted = True

Line 26 tests, at the end of a run through the list, if no swaps were made. If so, the list must be sorted, so we set sorted to be True and the while not sorted: loop magically vanishes in a puff of logic. The program then says the list is sorted, prints the shiny new list and stops running. Phew!

It’s got loads of extra lines to show the sort in progress, and it’s slowed down by pausing half a second per comparison. You can strip those lines out for students to type their own shorter version like this:

Compare the two to see just how fast the sort really is.

You could also get students to add code to count how many passes, swaps or comparisons are made, then see how bubble sorts behave with different types of lists: a reversed list, a random list, a nearly-sorted list. Then they could move on to comparing bubble sort with other sort algorithms.

And if you want to show a bubble sort in Scratch, try this one I made. It makes a very satisfying ‘pop’ sound when it makes a swap, so you can hear the smaller numbers bubbling to the top of the list:

The Scratch web site also has some other types of sort here.

Posted in computers, education, ICT | Tagged , , , | 3 Comments

Python CoolPlay for OS X

Update – a new version of PyPlay is now on GitHub. It has pretty colours and gives you the out time and everything.

PyPlayCoolPlay is a very useful Windows program that plays audio files. So what? Lots of programs do that. CoolPlay is useful in radio (and theatre too I’d imagine) because it plays a file in a playlist – and then stops. It waits until you press play again before going on to the next track – important if you need to talk between items and play them in on cue.

I did some work to get CoolPlay running in OS X using WineBottler, but the resulting file is huge and it’s far from flawless – it does work, though.

I’d really like to write a native OS X or Linux version of CoolPlay, but that’s beyond my coding skills at the moment. I have been learning a fair bit of Python lately, however, and I’ve been mucking about with a Python script that will do something similar on a Mac.

It’s VERY early days, but I present a prototype PyPlay! It needs to be in the same directory as your audio files and needs a pre-existing M3U playlist file (as used by CoolPlay, VLC, iTunes and other audio players). It should play any audio file format that OS X can natively play, including M4A, MP3 and WAV.

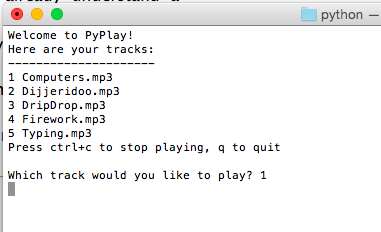
It reads the M3U playlist into an array (list) and strips out metadata and leaves it with a list of audio files. You can then pick a file to play by number, press ctrl-c to stop it and type ‘q’ to quit the program. It doesn’t do ANY of the useful things CoolPlay does, like show you elapsed and remaining play time, durations, allow you to manipulate the playlist etc. But it does play any audio files, one at a time.

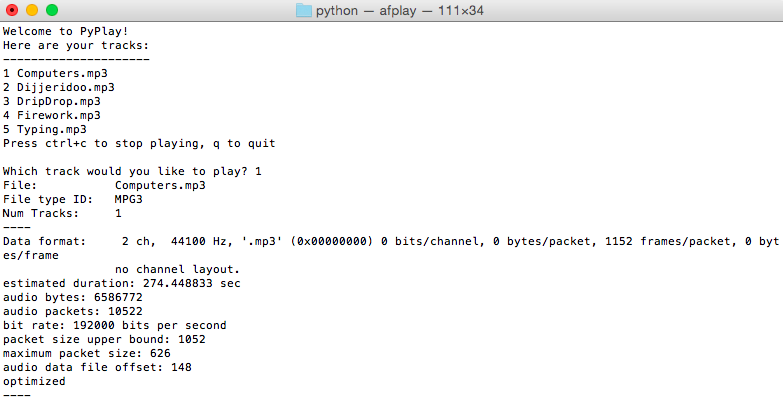
It only works on Macs because it uses afplay to play the audio – a Linux version would be possible using VLC or similar… I’ll work on that. And track duration info should be easy to display using afinfo – indeed, if you uncomment a couple of lines in the code you can get a heap of info displayed as you play…

verbose PyPlay

It’s also written in Python2 not Python3 as that’s what comes bundled with OS X and I want it to run without installing any extra software. And you’ll need to run it from the Terminal by saving it as a file called PyPlay.py and typing python PyPlay.py

Next thing I’d like to do is have an option to build and change playlists (perhaps make one automatically from any audio files found in the directory), or move up and down an existing playlist, and show file durations. I think displaying elapsed and remaining time may be too much of a challenge, but displaying an ‘out time’ (the clock time when the file will finish playing) shouldn’t be too hard.

# PyPlay radio playout script by Giles Booth @blogmywiki
# written in Python2 to run on MacOS X without installing Python3
# only works in OS X as uses afplay to play audio files
# requires an M3U playlist file called playlist.m3u
# and audio files in same directory

import os
playlist = ""

def showTracks():
    os.system('clear')
    print 'Welcome to PyPlay!'
    print 'Here are your tracks:'
    print '---------------------'
    for x in range(len(trackArray)):
        print x+1, trackArray[x]
    print 'Press ctrl+c to stop playing, q to quit'

def playTrack(track):
    song = trackArray[track-1]
    # uncomment next 2 lines if you want track info shown
    # infoString = "afinfo " + song
    # os.system(infoString)
    trackString = "afplay " + song
    os.system(trackString)

playlist = open('playlist.m3u')

trackArray = playlist.readlines()

# iterate over list in reverse order deleting unwanted items
for i in range(len(trackArray)-1,-1,-1):
    # strip out \n characters at end of line
    # and strip out empty lines or metadata
    if trackArray[i].startswith('\n') or trackArray[i].startswith('#'):
        trackArray.pop(i)
    temp = trackArray[i].strip()
    trackArray[i] = temp

while True:
    showTracks()
    trackNo = raw_input('\nWhich track would you like to play? ')
    if trackNo == 'q':
        break
    elif int(trackNo) <1 or int(trackNo) > len(trackArray):
        print 'Not a valid track number'
    else:
        playTrack(int(trackNo))
Posted in MacOS X, radio | Tagged , , , | 3 Comments

Scratch vs Python

scratch-python-fightWhich is better for teaching coding in KS3: Scratch or Python? There’s only one way to find out!

But seriously… I love Scratch. I think it’s a great tool for getting children interested in computing, and I do think there’s a role for it in secondary schools too. “It’s a bad workman who blames his tools,” I say to myself. You can do some quite sophisticated things with Scratch, like bubble sorts and Caesar cyphers. Ah, Caesar cyphers.

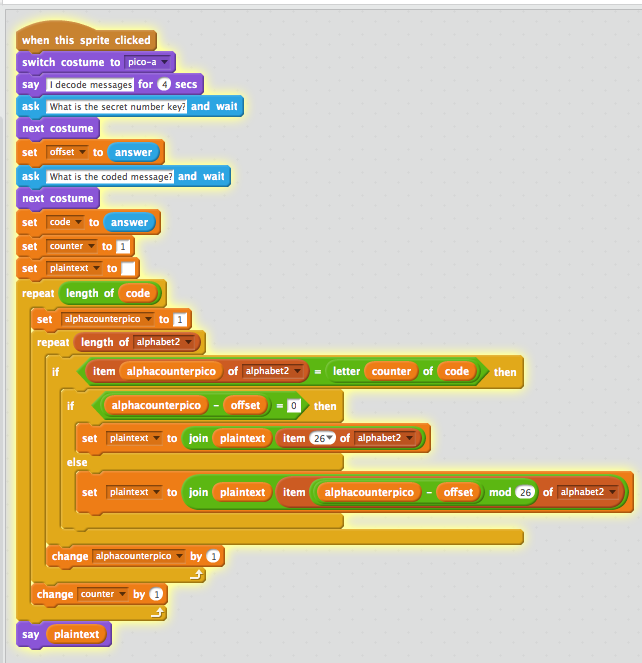
I was all set to use Scratch and cyphers as an entry to programming with my Year 7 students, and I made a working Scratch project that looked a bit like this:

Caesar cypher in Scratch

There may be a much easier way of doing this, but at least I understood how it worked, and it worked.

Then I set about planning a lesson to teach this. Some of my pupils have never used Scratch before; some have, but I need to keep everyone more or less on the same page. Two hours into typing up a work sheet for building a highly simplified version of the code above, I started to have serious misgivings about using Scratch for this. Try explaining – to someone unfamiliar with Scratch – precisely how to build this block:

mod block

There are a lot of blocks-within-blocks there, including two that are the same colour, and hence very difficult to see. It should be do-able for children familiar with Scratch, but even then it’s very fiddly, and I don’t know how to explain it simply to a novice.

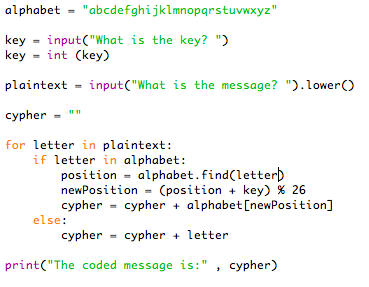
Compare this with the same sort of code in Python:

Caesar cypher in Python

Now, this may be an unfair comparison, some programming languages are better suited to certain tasks; for example, today I was on a Python course run by an exam board and learned that Python isn’t really suitable for certain controlled assessment tasks that require storing and sorting data (such as exam results). There was also a useful nugget about discouraging students from searching for solutions on StackOverflow (or similar); solutions can be confusing, over-elaborate, over-esoteric or just plain wrong. Plus such forums tends to involve a certain amount of men trying to show they can pee higher, or in a more elaborate way than anyone else.

But I’m impressed with the brevity and elegance of the Python code – and my hunch is that it would be easier to teach. I could, in extremis, dictate or get my pupils to copy the code out and run it, mistype it, break it, fix it. Even if they don’t know what it all does, they could get something working quite quickly and, possibly, learn a bit of Python by jumping in at the deep end (much as people of my generation did with BASIC on early home computers, typing programs out of magazines).

The other thing drawing me to Python is that it could level the playing field with my Year 7s; some have done loads of Scratch and Kodu, some have done none (and some have never even done any ICT!). But I suspect none of them has done any Python, making it easier for me to teach and less bewildering for those who feel they are behind.

I also learned today that some exam boards are outlawing Scratch from GCSE course work – another nudge for me down the Python route.

So after half term, I shall be throwing my Year 7s in at the deep end with Python – after a brief ‘hello world I am the greatest’ intro to IDLE. I’ll let you know if we sink or swim…

Posted in computers, education, ICT | Tagged , , , | 4 Comments

Raspberry Pi traffic light project, part 2

Playing with GPIO Zero

In the first part of this project, we made some traffic lights out of LEDs attached to a Raspberry Pi computer, and we wrote code to make them light in sequence using the Python programming language.

This was made really easy because we used a Python library called GPIO Zero. Now we’re going to add a button to simulate a pedestrian crossing, and we’ll see just how incredibly easy that is, thanks again to GPIO Zero.

First, we need to find a switch and connect it to the Raspberry Pi. I used a tiny button that fits on my breadboard, but you can use any button as long as it’s ‘fleeting’ – that means it should pop back out when you let your finger off it.

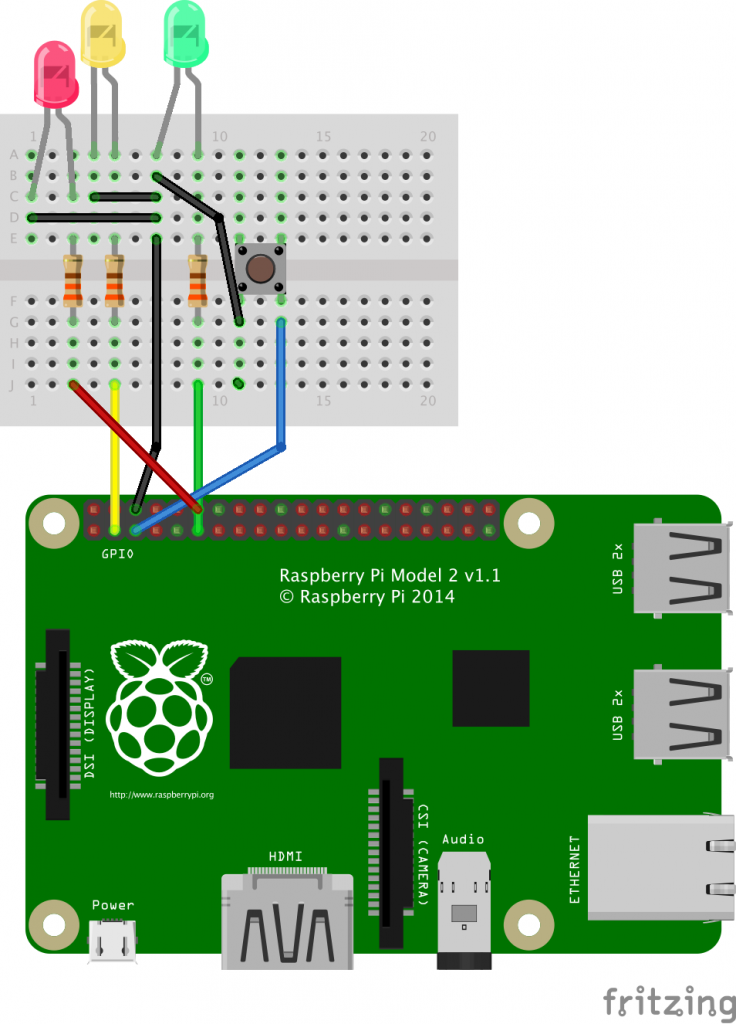
I wired up one side of my button to GPIO 3 (that’s the blue wire in the diagram below), and the other side back to our common earth / GND (that’s column 7 A-E on my little breadboard). The wiring diagram now looks something like this:

Adding a button

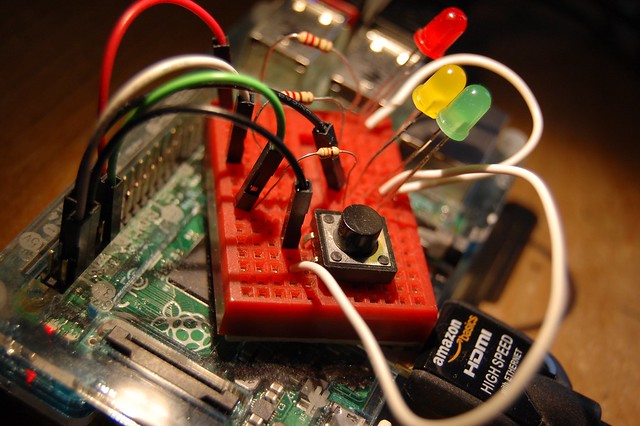
In real life, it looks something like this:

Raspberry Pi adevntures in physical computing

Open Python 3 / IDLE, and edit the traffic-lights.py code from last time, to look like this:

button code

You can copy and paste the code from here:

from gpiozero import LED, Button
from time import sleep

red = LED(18)
amber = LED(2)
green = LED(17)
button = Button(3)

print("Press the button when you want to cross.")

green.on()
amber.off()
red.off()

while True:
    print("Wait")
    button.wait_for_press()
    green.off()
    amber.on()
    sleep(5)
    amber.off()
    red.on()
    print("Cross now.")
    sleep(10)
    amber.on()
    sleep(5)
    green.on()
    amber.off()
    red.off()

Now when you run the code (press F5), the traffic lights should stay green, until you press the button. This is like the button on a pedestrian crossing. Then the lights should change and you get a message in the console window telling you to cross – when the traffic light is red.

Let’s look at some new instructions we’ve used here.

from gpiozero import LED, Button

Here we’ve imported the ‘Button’ function (as well as the ‘LED’ one we used before) from the GPIO Zero library.

button = Button(3)

This tells the Raspberry Pi that we’ve connected a button to GPIO pin 3.

print("Press the button when you want to cross.")

This prints a message in the console window. That’s how we know when to cross.

button.wait_for_press()

This is a really, really clever instruction. It pauses our code until you press the button – useful because we want the traffic lights to stay green, until we want to cross the road.

So that’s it – you’ve made a working pedestrian crossing – sort of!

If you want to take this project further, here are a few ideas:

  • Instead of printing ‘wait’ and ‘cross now’ in the console, add red and green LEDs for a separate set of lights for the pedestrian. Build them into a box with the button, perhaps using an old soap box.
  • Add a buzzer to go BEEP BEEP BEEP when you can cross.
  • Add another button for the other side of the road. Can you make the WAIT lamp light on the other side when a pedestrian presses the button to cross?
  • Add another set of traffic lights for cars, and build them into cardboard tubes like toilet roll holders.
Posted in computers, Raspberry Pi | Tagged , | 3 Comments

First physical computing project with Python on Raspberry Pi

I’m really excited about a Python library called GPIO Zero. This makes it very easy to use the Raspberry Pi’s GPIO pins to do some physical computing in the Python programming language. The GPIO pins are how you connect your Pi to the real world, and their accessibility is what makes the Rapsberry Pi such an exciting device for so many people.

Here’s a simple traffic light project you could use to introduce Python and physical computing at the same time. You can get ready-made traffic light kits, but you make this one yourself.

Aim
In this project you will make a pedestrian crossing with 1 set of traffic lights and a push button, and learn how to connect your Raspberry Pi to lights and switches, and also learn some simple concepts of the Python programming language.

You will need:

  • A Raspberry Pi (any model should do) with a recent version of Raspbian OS and the GPIO pins physically accessible – the Pibow Coupé case is good for this.
  • An internet connection to install the GPIO Zero Python library (not needed thereafter).
  • 3 LED lights, preferably red, yellow and green.
  • A small breadboard (I used a tiny one I got with an Arduino kit).
  • Some female – male jumper wires to connect to your Pi.
  • Some male-male jumper wires to connect things on your breadboard to each other.
  • 3 x 270Ω (or similar) resistors.
  • A push button switch – any kind will do, as long as it’s a fleeting switch that pops back up after you press it, and you can connect it to your breadboard.

Getting ready
First, install GPIO Zero. You can find instructions here. I got some error messages when I did this, but it still seems to work ok.

Next, choose some GPIO pins on your Pi to use. You can use others, but I used pins 17, 18 and 2 using the BCM numbering system. (There are two different ways of numbering the Raspberry Pi pins; GPIO Zero uses the BCM / Broadcom system, which is how the pins are labeled on the Pibow Coupé case). If you’re not sure which pin is which, look at this incredibly clever & comprehensive interactive guide by Gadgetoid.

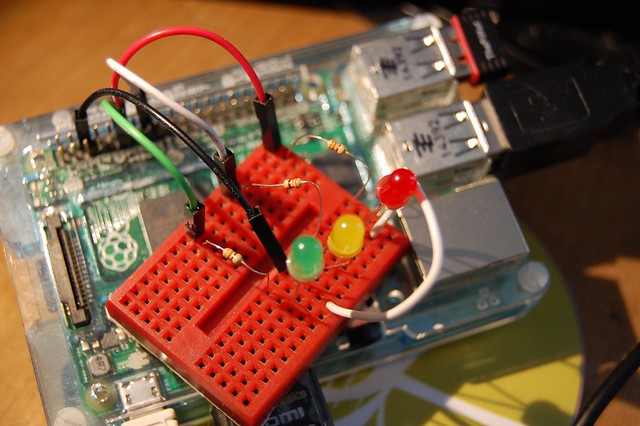
With your Pi turned off, wire up some light bulbs before we get programming. Use 4 female-male jumper wires to connect BCM pins 17, 18, 2 and a GND (ground/earth) pin – I used physical pin 6 as my GND, though there are others – to separate rows on your breadboard. It could look something like this:

Playing with GPIO Zero

I used the GND pin as a common earth for all the LEDs. When you wire up a light bulb in school, you need to complete a circuit by connecting it back to the negative terminal on a battery, and this is the same – completing the circuit by connecting it back to GND. We can use the same GND for all our LEDs to make our wiring simpler.

The basic idea is that you connect GPIO Pin 17 on the Raspberry Pi to a 270Ω or 330Ω resistor – this is to stop the LED taking too much current from the Pi. You then connect the other side of the resistor to the long leg of the LED, and the short leg of the LED back to the GND pin on the Pi. You do the same for the other LEDs, all using the same GND pin.

The wiring looks a bit like this:

Now turn the Raspberry Pi on and test the LEDs and wiring. Open the Python IDLE editor (Menu > Programming > Python 3):

opening Python

and enter the following Python code in the shell:

from gpiozero import LED
green = LED(17)
red = LED(18)
amber = LED(2)
green.on()
amber.on()
red.on()

That’s all the code you need to start lighting the LEDs. It should light each LED in turn. If they don’t all light, check your wiring and check the LEDs are the right way round – they only work one way.

Have a play around, turning the LEDs off and on, and see if you can make them blink:

typing in the python shell

Let’s look at these instructions line-by-line to understand what they do:

from gpiozero import LED

Python uses libraries of useful code that lots of people want to use. Here we are importing the ‘LED’ statement from the ‘GPIO Zero’ library, which makes physical computing in Python really easy to code.

green = LED(17)
red = LED(18)
amber = LED(2)

The next 3 lines then tell the RaspberryPi that we have connected some LEDs to pins 17, 18 and 2 and that we’re going to call them red, amber and green – you could pick any names you want.

The last 3 lines turn the lights on:

green.on()
amber.on()
red.on()

So far we’ve been typing commands straight into the Python ‘shell’, or command line. It’s useful to be able to save sets of instructions in a text file so they can be run over and over again, without having to retype the code each time. So, next open a new file and save it as traffic-lights.py:

Then type in the following, save it again, and run it by pressing F5. Your LEDs should now light in a sequence like a set of real traffic lights: green, amber, red, red & amber together, and then green again.

from gpiozero import LED
from time import sleep

red = LED(18)
amber = LED(2)
green = LED(17)

green.on()
amber.off()
red.off()

while True:
    sleep(10)
    green.off()
    amber.on()
    sleep(5)
    amber.off()
    red.on()
    sleep(5)
    amber.on()
    sleep(5)
    green.on()
    amber.off()
    red.off()

Notice we’ve got some new Python commands here. We have imported ‘sleep’ from the time module – sleep(10) pauses for 10 seconds, sleep(5) for 5 seconds.

We’ve also used ‘while True:’ – this is like the ‘forever’ block in Scratch. The code that follows while True: will keep on running until you close Python.

Notice as well that the code that follows is all indented by 4 spaces at the start of each line. These spaces at the starts of lines are important in Python, as we will see in the next part when we will add a push-button to make a pedestrian crossing…

Massive thanks to Ben Nuttall and the rest of the folk at the GPIO Zero project for building such a great Python library that, I think, makes physical computing with Python actually easier to learn that Scratch! My code is rather similar to theirs, but I wrote it even before I realised they had a traffic light project too – check it out!

Posted in computers, Raspberry Pi | Tagged , | Leave a comment