BETT 2016 Review

My first visit to BETT, and although I knew it was large, I wasn’t quite prepared for the sheer scale and sensory overload. I did, however, manage to come away with some very interesting ideas for hardware, software and methods that we can apply, not just in teaching Computing, but in other subject areas as well. The most fruitful areas were:

  • Meeting lovely and incredibly helpful people from the Raspberry Pi Foundation.
  • Talking to a developer of education screen kits for the Raspberry Pi.
  • A talk by Miles Berry, principal lecturer and the subject leader for Computing Education at the University of Roehampton.

There were also a lot of demonstrations of the BBC Microbit device, but as the roll-out of this is already much-delayed and I’ve already done a day’s training on it, I decided to concentrate on software and hardware that is actually available right now, or about to be.

Raspberry Pi Foundation

The Raspberry Pi is a £30 computer that has captured the imagination of many young people, including some Year 6 girls at my school. It encourages exploration of computing through programming in Scratch and Python, especially in connecting computers with devices in the real world: physical switches, lights, temperature sensors etc. It also allows you to manipulate the popular Minecraft game through Python programming.

Carrie Anne Philbin
The inspirational author of Adventures in Raspberry Pi and Education Pioneer at the Raspberry Pi Foundation; she has worked particularly to encourage girls to get involved in computing.

It was a huge thrill to finally meet Carrie Anne, whom I’ve know via social media for some time, and indeed we have adapted each other’s projects. Several years ago she took my Arduino microcontroller-based ‘Little Box of Poems’ and adapted it to work with the Raspberry Pi. She gave me good advice about harnessing the enthusiasm we have in Y6 for programming through school clubs and advised me about good hardware set-ups: we could get a small set of Raspberry Pis and screens, say 3 or 4, for use in coding clubs, which would also allow us to evaluate their potential for wider use in the teaching of Computing without committing to a large spend. She also introduced me to…

Sam Aaron
Research Associate, Raspberry Pi Team, Cambridge University – and author of ‘Sonic Pi’.

Sam Aaron performing music with live coding Sonic Pi

Talking to Sam and watching his demonstration of Sonic Pi was the stand-out moment at BETT – possibly life-changing! Sonic Pi enables the teaching of Computing though music. With a very few lines of code, children can make music in a staggering range of genres (classical, jazz, many modern genres), and through this learn about sophisticated concepts like iteration and threading. He made a powerful point that teaching looping or sorting, for example, in itself is boring; if you teach looping to repeat melodies or beats, children can instantly see an application in a creative way.

Sonic Pi is totally free, includes built-in tutorials, examples and an excellent bank of sound samples. As well as being bundled with the Raspberry Pi, it is also available for Windows and Mac.

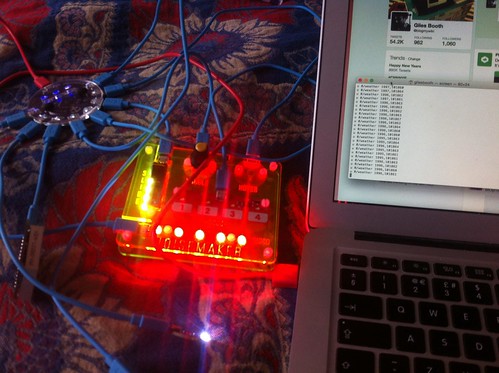
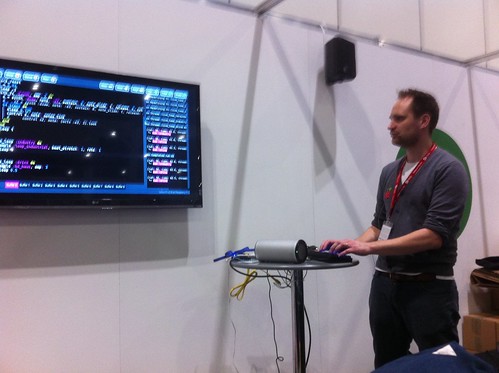
It’s hard to describe how impressive this software is – Sam’s demo (see photo above) had him performing music by editing code live – something he also does in night clubs and music venues. I would love to arrange a demonstration to the music department at my school to explore future cross-curricular music & computing lessons. I’ve subsequently tested it on our Windows virtual desktops and it ran for an hour an a half with many simultaneous loops running – rock solid!

As I parted from Sam I expressed doubts at my ability to teach with SonicPi as “I’m not a musician”. Sam replied “Yet.” Genius!

And here’s some of my SonicPi noodling, based on Sam’s Steve Reich-style loops:

David Honess
Education Resource Engineer at the Raspberry Pi Foundation. Again I’ve known David for a while via social media, and he worked with my eldest son on a BBC School Report project to prototype a Raspberry Pi weather station.

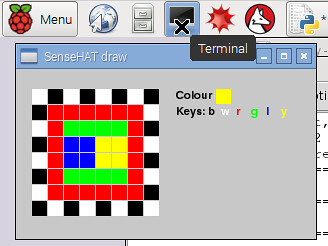
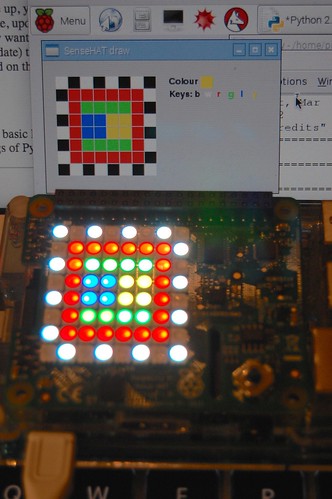
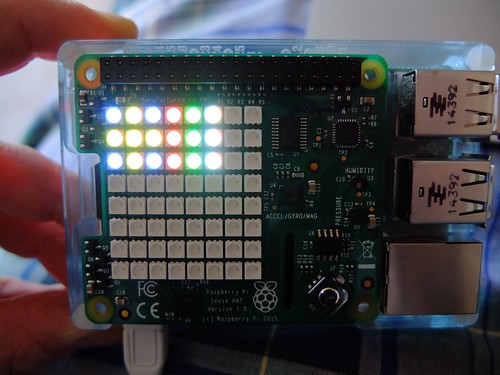
He’s currently working on the ‘Astro-Pi’ project. Tim Peake has two Raspberry Pis on the International Space Station running experiments designed by school children. This uses an extra device plugged into the Raspberry Pi called a ‘SenseHAT’ – I have been experimenting with this device in recent months. It has sensors for things like air pressure, temperature and an accelerometer which can measure gravity.

I talked to him about data handling – all the data that the ‘AstroPis’ are gathering in space will be made available for schools to download. This could make a great data-handling project – importing data into Excel or a Python program, for example to locate the ‘South Atlantic Radiation Anomaly’ by cross-referencing location data with points where the Raspberry Pi was forced to reboot by the strong radiation. We could also do some local environmental data capture, such as air pressure and design experiments around it. David says there is potential also for science teaching with this device – what is pressure? What is gravity?

I also saw the official Raspberry Pi weather station kit, which is being tested in schools at the moment. I was told they may be going on general sale soon – perhaps in time for the next academic year. This is a ‘big data’ project with Oracle where meteorological data is uploaded and shared publicly to build up a big picture. They were able to advise me about ways of making a simple project to measure, for example, temperature and light in the mean time, and there’s great potential for cross-curricular links with DT (build a weather-resistant encloure), physics (electronics) and geography (weather patterns & data).

Pi-top CEED

The RaspberryPi may be cheap, but you still need a screen. They can be plugged into our classroom projectors in our ICT suites, and a cheap adaptor will allow them to work with the screens in our senior school ICT room, but our Junior School lacks free-standing screens. One possible solution, recommended by Raspberry Pi themselves, is the PiTop.

This is a £99 device that includes a screen, Raspberry Pi and power supply – you just add your own keyboard, mouse and wifi dongle. It allows easy access to the pins to attach physical devices and can be stored easily, taking up minimum space. It is future-proof, working with any model of Raspberry Pi, plus other tiny computers and the BBC Microbit. These will be available in April. (They also make a lovely £199 RaspberryPi-based laptop, but I think the £99 screen is better value).

Miles Berry
Principal lecturer and the subject leader for Computing Education at the University of Roehampton. He also led work on the excellent Rising Stars ‘Switched on Computing’ SOW which we are about to start using in KS1 and KS2.

Miles’s talk about ‘Computing – what’s working in schools’ was superb, I could have listened to him talk for another hour (though I doubt his voice would have lasted!). He listed several strands for good practice in the the teaching of Computing, all of which will impact my short-term and long-term planning. In brief:

It’s not about the code – think before you click
Programming / coding is just a means to the end of computational thinking.

It’s easier to read code than to write code.
Give children a sample bit of code and ask them to predict what it will do before running it. Then edit, tinker. It’s easier to edit code that to start from a blank screen

Making things matters
Children learn by creating things to show others rather than just following instructions (which I have been guilty of!) – don’t program children, get them to program computers.

Pair programming is powerful
Many schools did paired work because of lack of computers – but Miles says even if you have enough machines, paired work is good: it’s more like the way software is written in the real world (collaboratively); children spot each other’s mistakes; you get better code.

Debugging helps grow mindsets
Equip children with tools to solve problems when faced with error messages, not giving up. I will now teach discrete lessons just on debugging.

Go for depth not breadth
Keep the main principles of computational thinking in mind. We don’t really need more programming languages – the ones we have like Scratch, Snap! or Python are enough. Concentrate on doing 1 language well, rather than having a smattering of lots.

Nurture curiosity
Give children a better mental model of what a computer is. Teach them how to learn (flipped learning) so they may leave KS2 having taught themselves something really quite hard.

Look for interesting contexts
Get children involved in events like Young Rewired State – solving non-trivial problems in a team.

This is for everyone
Make it inclusive – do not say ‘this is too hard for some’. Get children to think about how they can adapt their projects for the visually-impaired, the deaf. Consider changing the language in Scratch to French, for example (plus it occurs to me there may be cross-curricular language lessons here!)

‘Year 8 is too late’ (for girls). I am lucky in a girls’ school that there is less peer pressure to drop STEM subjects, but even so I need to harness the enthusiasm in Y6 & 7 – my own questionnaires show many girls in Y7 are obsessed with Minecraft, but by Y9 such computer games have become something their younger siblings or brothers do.

Posted in computers, education, Raspberry Pi | Tagged , | Leave a comment

Fake anaglyph 3D photos in GIMP

It’s quite easy to make fake 3D anaglyph images in Photoshop, the kinds of images you view with red-blue 3D glasses. Here’s a guide for example, and here’s an image I made years ago with text in Photoshop:

3d-test - don your glasses, please

But can you do this with GIMP? Well, I think it’s quite hard but can be done. I’m not a big fan of GIMP, but it is free and it’s very cross-platform. And free is my favourite price.

I started with this image of my dog Ellie, and thought I’d have a go at making her stand out from the background:

I opened it in GIMP and then went to Colours > Components > Channel mixer.

I then isolated the red channel by picking each channel and turning green and blue down to 0% and leaving red at 100%. You seem to have to do this 3 times, once for every output channel.

I then exported this as a new image, ‘ellie red.png’

Then I did the same to create a cyan image, by having red at 0% in each channel, just green at 100% in the green channel, and just blue at 100% in the blue channel, and exported this as ‘ellie cyan.png’

I then went File > Open as layers and opened the red and cyan images:

If you then have the red layer on top and you change the mode of the red, top layer to difference, you should then see a full colour image made from your red and cyan layers:

Now if you move the red layer left and right, you can experiment with creating a 3D effect.

Moving layers is annoying in GIMP – you select the move tool, fair enough – but then you have to ensure you have the layer button selected (highlighted with red oval below):

Don your 3D specs! If you move the red layer left you should see the whole image move backwards behind your computer screen! We want our dog to stand out, so I moved the red layer right instead, and got something like this:

When your happy with the 3D effect go to Layer > Merge down in the menu.

Now we have a 3D image that should stand out from your computer screen, but I want the dog alone to stand out. The way I did this was to open the original full-colour image as a new layer and move it to the bottom. The mode of the top layer should be normal.

Then, using the eraser tool, I turned off visibility for the bottom, full-colour layer and roughly erased all the background parts of the anaglyph-coloured shifted image layer:

Then when you turn the visibility of the full-colour layer back on, you should see something like this:

The background should remain unshifted and Ellie the dog should be standing out.

If there’s a simpler way of shifting colour channels in GIMP, please let me know!

Posted in Uncategorized | Tagged , , , | 2 Comments

NaNoWriYo

I’ve written before about how badly I got on with NaNoWriMo – National Novel Writing Month. Each November loads of people sign up to a challenge to write a 50,000 word novel in a month. I wonder what proportion succeed. I’m guessing it’s a pretty low number.

Anyway, while social media is awash with New Year’s Resolutions, which I hate almost as much as New Year’s Eve, I had an idea: I have loads of ideas and unfinished novels, so what about trying to write a novel not in a month, but in a YEAR.

It works out to 137 words a day. Much more realistic than NaNoWriMo’s 1613 words a day. And this is a leap year, so you can take a whole day off. Call that New Year’s Day and you can start tonight.

With NaNoWriYo you write 600 fewer words in a week than NaNoWriMo would have you write in a day.

Sure, a year sounds like a long time, but it’s about 7 years since I actually completed any proper fiction writing, so what’s another year?

C’mon we can do this! Fire up your word processor, get typing. Then stop almost immediately. It’ll feel great. I’ve even knocked up a web page to show how many words you should have written on any particular day of the year.

Off we go…

Posted in fiction, literature | Tagged , , , | Leave a comment

Flotilla hacking with a Mac

Inspired by http://www.sniff.org.uk/2015/12/hacking-pimoroni-flotillla.html I plugged Flotilla into my Mac. I browsed my /dev/ folder and took a guess that the Flotilla dock was ‘tty.usbmodem1421′ – which proved correct. Then I typed
screen /dev/tty.usbmodem1421 9600
at the Terminal prompt, and wiggled a few controls.

This is what I saw >

Straight away you can see values from named devices as I turned the dial and moved the slider. The 4 numbers on ‘touch’ seem to register 1 or 0 for each of the 4 buttons pressed, and the ‘colour’ values (judging from what I placed the colour sensor on) seem to be red, green, blue and overall brightness.

As per the Sniff article, I managed to get my LED strip to light red by typing
s 7 255,0,0
with the LEDs plugged into socket 1 on the dock – odd indeed that the port numbering is reversed.

Flotilla hacking

I also managed to list all the devices that came with my Large Starter Kit by typing ‘d’ for debug:

# Debug information:
#    Resources:
#       SRAM free: 1362 bytes
#    Load:
#       Main loop duration: 6ms (0us)
#       Main loop cycles per second (fps): 148
#    Channels:
#       0 - weather (0x77)
#       1 - motion (0x1d)
#       2 - slider (0x16)
#       3 - touch (0x2c)
#       4 - dial (0x15)
#       5 - matrix (0x60)
#       6 - colour (0x29)
#       7 - rainbow (0x54)
u 0/weather 1964,101878
u 0/weather 1964,101883
u 0/weather 1964,101877

You can see some weather data there too – I thought this was pressure then temperature, but reading the Sniff article again I suppose it’s more likely to be 19.65 degrees C and 1018 millibars of air pressure.

Next step is to play with some proper OS X terminal software rather than using screen, and try to work out what parameters need passing to the LED matrix display – but looks promising that Flotilla can be made to work with other operating systems and computers aside from the Raspberry Pi.

Posted in MacOS X | Tagged , , | 4 Comments

SenseHAT paint

SenseHAT paint

Here’s a very simple ‘paint’ project for the RaspberryPi SenseHAT. I was trying to draw icons for a graphical weather project, and I felt the need of some kind of paint program that would allow me to draw on the computer screen and light pixels on the SenseHAT.

SenseHAT paint

Here’s my attempt. I almost hesitate to post it, as it’s coded with brute force and ignorance. There may already be a better paint program for the SenseHAT. There may be a way of doing it in 5 lines of code. But here’s my (ham-fisted) attempt.

To use it, you pick a colour by pressing a keyboard letter – b is black, w is white, r red, g green, y yellow and, confusingly, L is blue. You could easily add more colours. The selected colour is shown on the right. You then click in the squares to light the pixels your chosen colour. You then have 2 other buttons – ‘clear’ clears the screen, and the beautifully-named ‘dump’ dumps the pixel values into the console, so you can copy and paste them and use them in another project. My next step is probably to allow you to save the images to a file – and possibly load images as well, not in PNG format but as a list of tuples (threeples?)

SenseHAT paint

It uses PyGame, so you’ll need to use Python 2 not 3 – just open it in IDLE for Python 2 on your Raspberry Pi. I did look at Tkinter, but decided I didn’t have time to learn enough of it. PyGame is much easier to get going with. I probably should have used sprites, but instead I just draw coloured rectangles and then check to see if each mouse click falls in the area for that square, and then light the appropriate light. Very inefficient coding, but it seems to work.

You can see it in action in this exciting video:

This is what the image in the video looked like on the SenseHAT:

SenseHAT paint

Here’s the rotten code. Read it and weep! You can also download it here.

# SenseHAT paint by Giles Booth / @blogmywiki
# www.suppertime.co.uk/blogmywiki
# This work is licensed under a Creative Commons
# Attribution-NonCommercial 4.0 International License.

from sense_hat import SenseHat
import pygame, sys
from pygame.locals import *

sense = SenseHat()

b = [0, 0, 0]
green = [0, 255, 0]
red = [255, 0, 0]
white = [255, 255, 255]
yellow = [255, 255, 0]
blue = [0, 0, 255]

def clearscreen():
    sense.clear()
    global pixels
    pixels = [
    b,b,b,b,b,b,b,b,
    b,b,b,b,b,b,b,b,
    b,b,b,b,b,b,b,b,
    b,b,b,b,b,b,b,b,
    b,b,b,b,b,b,b,b,
    b,b,b,b,b,b,b,b,
    b,b,b,b,b,b,b,b,
    b,b,b,b,b,b,b,b,
    ]

clearscreen()

sense.set_pixels(pixels)

pygame.init()

screen = pygame.display.set_mode((300,170))
pygame.display.set_caption('SenseHAT paint')
font = pygame.font.Font(None,16)
screen.fill((200,200,200))

inklabel = font.render("Colour", 1, (0,0,0))
screen.blit(inklabel, (160,20))
keylabel = font.render("Keys: b", 1, (0,0,0))
screen.blit(keylabel, (160,36))
keylabel = font.render("w", 1, white)
screen.blit(keylabel, (205,36))
keylabel = font.render("r", 1, red)
screen.blit(keylabel, (220,36))
keylabel = font.render("g", 1, green)
screen.blit(keylabel, (235,36))
keylabel = font.render("l", 1, blue)
screen.blit(keylabel, (250,36))
keylabel = font.render("y", 1, yellow)
screen.blit(keylabel, (265,36))
pygame.draw.rect(screen, b, (160,55,45,15))
keylabel = font.render("Clear", 1, white)
screen.blit(keylabel, (163,55))
pygame.draw.rect(screen, b, (220,55,45,15))
keylabel = font.render("Dump", 1, white)
screen.blit(keylabel, (223,55))

def drawink():
    pygame.draw.rect(screen, ink, (200,20,15,15))
    pygame.display.update()

def drawgrid():
    z = 0
    xpos = 0
    ypos = 20

    for colours in pixels:
        z = z + 1
        if z == 9:
            xpos = 0
            ypos = ypos + 16
        if z == 17:
            xpos = 0
            ypos = ypos + 16
        if z == 25:
            xpos = 0
            ypos = ypos + 16
        if z == 33:
            xpos = 0
            ypos = ypos + 16
        if z == 41:
            xpos = 0
            ypos = ypos + 16
        if z == 49:
            xpos = 0
            ypos = ypos + 16
        if z == 57:
            xpos = 0
            ypos = ypos + 16
        xpos = xpos + 16
        pygame.draw.rect(screen, colours, (xpos,ypos,15,15))
    pygame.display.update()

#pygame.draw.rect(windowObj, r, (10,10,20,20))

ink = white

drawgrid()
drawink()

while True:
    for event in pygame.event.get():
        if event.type == pygame.QUIT:
            sys.exit()
        elif event.type == pygame.KEYDOWN:
            if event.key == pygame.K_w:
                ink = white
            elif event.key == pygame.K_b:
                ink = b
            elif event.key == pygame.K_y:
                ink = yellow
            elif event.key == pygame.K_r:
                ink = red
            elif event.key == pygame.K_g:
                ink = green
            elif event.key == pygame.K_l:
                ink = blue
            drawink()
##        elif event.type == pygame.MOUSEMOTION:
##            print (pygame.mouse.get_pos())
        elif event.type == pygame.MOUSEBUTTONDOWN:
            x, y = event.pos
#           1st row
            if (x>15 and x<30) and (y>20 and y<35):
                pixels[0] = ink
                sense.set_pixels(pixels)
                drawgrid()
            elif (x>31 and x<46) and (y>20 and y<35):
                pixels[1] = ink
                sense.set_pixels(pixels)
                drawgrid()
            elif (x>47 and x<62) and (y>20 and y<35):
                pixels[2] = ink
                sense.set_pixels(pixels)
                drawgrid()
            elif (x>63 and x<78) and (y>20 and y<35):
                pixels[3] = ink
                sense.set_pixels(pixels)
                drawgrid()
            elif (x>79 and x<94) and (y>20 and y<35):
                pixels[4] = ink
                sense.set_pixels(pixels)
                drawgrid()
            elif (x>95 and x<110) and (y>20 and y<35):
                pixels[5] = ink
                sense.set_pixels(pixels)
                drawgrid()
            elif (x>111 and x<126) and (y>20 and y<35):
                pixels[6] = ink
                sense.set_pixels(pixels)
                drawgrid()
            elif (x>127 and x<142) and (y>20 and y<35):
                pixels[7] = ink
                sense.set_pixels(pixels)
                drawgrid()
#           2nd row
            if (x>15 and x<30) and (y>36 and y<51):
                pixels[8] = ink
                sense.set_pixels(pixels)
                drawgrid()
            elif (x>31 and x<46) and (y>36 and y<51):
                pixels[9] = ink
                sense.set_pixels(pixels)
                drawgrid()
            elif (x>47 and x<62) and (y>36 and y<51):
                pixels[10] = ink
                sense.set_pixels(pixels)
                drawgrid()
            elif (x>63 and x<78) and (y>36 and y<51):
                pixels[11] = ink
                sense.set_pixels(pixels)
                drawgrid()
            elif (x>79 and x<94) and (y>36 and y<51):
                pixels[12] = ink
                sense.set_pixels(pixels)
                drawgrid()
            elif (x>95 and x<110) and (y>36 and y<51):
                pixels[13] = ink
                sense.set_pixels(pixels)
                drawgrid()
            elif (x>111 and x<126) and (y>36 and y<51):
                pixels[14] = ink
                sense.set_pixels(pixels)
                drawgrid()
            elif (x>127 and x<142) and (y>36 and y<51):
                pixels[15] = ink
                sense.set_pixels(pixels)
                drawgrid()
#           3rd row
            if (x>15 and x<30) and (y>52 and y<67):
                pixels[16] = ink
                sense.set_pixels(pixels)
                drawgrid()
            elif (x>31 and x<46) and (y>52 and y<67):
                pixels[17] = ink
                sense.set_pixels(pixels)
                drawgrid()
            elif (x>47 and x<62) and (y>52 and y<67):
                pixels[18] = ink
                sense.set_pixels(pixels)
                drawgrid()
            elif (x>63 and x<78) and (y>52 and y<67):
                pixels[19] = ink
                sense.set_pixels(pixels)
                drawgrid()
            elif (x>79 and x<94) and (y>52 and y<67):
                pixels[20] = ink
                sense.set_pixels(pixels)
                drawgrid()
            elif (x>95 and x<110) and (y>52 and y<67):
                pixels[21] = ink
                sense.set_pixels(pixels)
                drawgrid()
            elif (x>111 and x<126) and (y>52 and y<67):
                pixels[22] = ink
                sense.set_pixels(pixels)
                drawgrid()
            elif (x>127 and x<142) and (y>52 and y<67):
                pixels[23] = ink
                sense.set_pixels(pixels)
                drawgrid()
#           4th row
            if (x>15 and x<30) and (y>68 and y<83):
                pixels[24] = ink
                sense.set_pixels(pixels)
                drawgrid()
            elif (x>31 and x<46) and (y>68 and y<83):
                pixels[25] = ink
                sense.set_pixels(pixels)
                drawgrid()
            elif (x>47 and x<62) and (y>68 and y<83):
                pixels[26] = ink
                sense.set_pixels(pixels)
                drawgrid()
            elif (x>63 and x<78) and (y>68 and y<83):
                pixels[27] = ink
                sense.set_pixels(pixels)
                drawgrid()
            elif (x>79 and x<94) and (y>68 and y<83):
                pixels[28] = ink
                sense.set_pixels(pixels)
                drawgrid()
            elif (x>95 and x<110) and (y>68 and y<83):
                pixels[29] = ink
                sense.set_pixels(pixels)
                drawgrid()
            elif (x>111 and x<126) and (y>68 and y<83):
                pixels[30] = ink
                sense.set_pixels(pixels)
                drawgrid()
            elif (x>127 and x<142) and (y>68 and y<83):
                pixels[31] = ink
                sense.set_pixels(pixels)
                drawgrid()
#           5th row
            if (x>15 and x<30) and (y>84 and y<99):
                pixels[32] = ink
                sense.set_pixels(pixels)
                drawgrid()
            elif (x>31 and x<46) and (y>84 and y<99):
                pixels[33] = ink
                sense.set_pixels(pixels)
                drawgrid()
            elif (x>47 and x<62) and (y>84 and y<99):
                pixels[34] = ink
                sense.set_pixels(pixels)
                drawgrid()
            elif (x>63 and x<78) and (y>84 and y<99):
                pixels[35] = ink
                sense.set_pixels(pixels)
                drawgrid()
            elif (x>79 and x<94) and (y>84 and y<99):
                pixels[36] = ink
                sense.set_pixels(pixels)
                drawgrid()
            elif (x>95 and x<110) and (y>84 and y<99):
                pixels[37] = ink
                sense.set_pixels(pixels)
                drawgrid()
            elif (x>111 and x<126) and (y>84 and y<99):
                pixels[38] = ink
                sense.set_pixels(pixels)
                drawgrid()
            elif (x>127 and x<142) and (y>84 and y<99):
                pixels[39] = ink
                sense.set_pixels(pixels)
                drawgrid()
#           6th row
            if (x>15 and x<30) and (y>100 and y<115):
                pixels[40] = ink
                sense.set_pixels(pixels)
                drawgrid()
            elif (x>31 and x<46) and (y>100 and y<115):
                pixels[41] = ink
                sense.set_pixels(pixels)
                drawgrid()
            elif (x>47 and x<62) and (y>100 and y<115):
                pixels[42] = ink
                sense.set_pixels(pixels)
                drawgrid()
            elif (x>63 and x<78) and (y>100 and y<115):
                pixels[43] = ink
                sense.set_pixels(pixels)
                drawgrid()
            elif (x>79 and x<94) and (y>100 and y<115):
                pixels[44] = ink
                sense.set_pixels(pixels)
                drawgrid()
            elif (x>95 and x<110) and (y>100 and y<115):
                pixels[45] = ink
                sense.set_pixels(pixels)
                drawgrid()
            elif (x>111 and x<126) and (y>100 and y<115):
                pixels[46] = ink
                sense.set_pixels(pixels)
                drawgrid()
            elif (x>127 and x<142) and (y>100 and y<115):
                pixels[47] = ink
                sense.set_pixels(pixels)
                drawgrid()
#           7th row
            if (x>15 and x<30) and (y>116 and y<131):
                pixels[48] = ink
                sense.set_pixels(pixels)
                drawgrid()
            elif (x>31 and x<46) and (y>116 and y<131):
                pixels[49] = ink
                sense.set_pixels(pixels)
                drawgrid()
            elif (x>47 and x<62) and (y>116 and y<131):
                pixels[50] = ink
                sense.set_pixels(pixels)
                drawgrid()
            elif (x>63 and x<78) and (y>116 and y<131):
                pixels[51] = ink
                sense.set_pixels(pixels)
                drawgrid()
            elif (x>79 and x<94) and (y>116 and y<131):
                pixels[52] = ink
                sense.set_pixels(pixels)
                drawgrid()
            elif (x>95 and x<110) and (y>116 and y<131):
                pixels[53] = ink
                sense.set_pixels(pixels)
                drawgrid()
            elif (x>111 and x<126) and (y>116 and y<131):
                pixels[54] = ink
                sense.set_pixels(pixels)
                drawgrid()
            elif (x>127 and x<142) and (y>116 and y<131):
                pixels[55] = ink
                sense.set_pixels(pixels)
                drawgrid()
#           8th row
            if (x>15 and x<30) and (y>132 and y<147):
                pixels[56] = ink
                sense.set_pixels(pixels)
                drawgrid()
            elif (x>31 and x<46) and (y>132 and y<147):
                pixels[57] = ink
                sense.set_pixels(pixels)
                drawgrid()
            elif (x>47 and x<62) and (y>132 and y<147):
                pixels[58] = ink
                sense.set_pixels(pixels)
                drawgrid()
            elif (x>63 and x<78) and (y>132 and y<147):
                pixels[59] = ink
                sense.set_pixels(pixels)
                drawgrid()
            elif (x>79 and x<94) and (y>132 and y<147):
                pixels[60] = ink
                sense.set_pixels(pixels)
                drawgrid()
            elif (x>95 and x<110) and (y>132 and y<147):
                pixels[61] = ink
                sense.set_pixels(pixels)
                drawgrid()
            elif (x>111 and x<126) and (y>132 and y<147):
                pixels[62] = ink
                sense.set_pixels(pixels)
                drawgrid()
            elif (x>127 and x<142) and (y>132 and y<147):
                pixels[63] = ink
                sense.set_pixels(pixels)
                drawgrid()
            elif (x>160 and x<205) and (y>55 and y<70):
                clearscreen()
                drawgrid()
            elif (x>220 and x<265) and (y>55 and y<70):
                print
                print pixels

pygame.quit()
Posted in Raspberry Pi | Tagged , , , | 1 Comment