First week class teaching BBC microbit – reflection

I’ve introduced 3 year 7 classes to the BBC micro:bit this week – here are some thoughts.

  • Organise your kit. I strongly recommend individually numbering each micro:bit, especially if you are keeping them in school in term time, and logging which pupil has each device. This will save arguments if they are lost or damaged and they’ll get their code on the micro:bit next lesson.
  • Allow plenty of time for packing away. The supplied boxes seem to prove a challenge for many Year 7s, though mine were getting better by the end of the week. Get a bigger box? Also, keeping track of the USB leads is going to be a challenge. I can see these getting lost.
  • The Technology Will Save Us demo supplied on each device is a great opening lesson. I used it to familiarise the pupils with the handling requirements, they didn’t even need to log in, just turn their computers on to provide USB power.
  • They want to take them home. But the micro:bits are so late arriving we will only get 3 full lessons out of them – some sets will only get TWO! Part of me wants to hold on to them and let them next term (in Year 8) get proper use out of them and take them home at Christmas. What is anyone else doing? Did the BBC want them to be used for only 2 lessons in class?
  • I have had a lot of failures with demo units – so far, as far as I know, only 1 died this week. It was mine. I was demonstrating it in front of the class and it utterly died, about 5 minutes after I plugged it in. I was handling it carefully – indeed that’s what I was demonstrating. I must be cursed!
Posted in computers, education, ICT | Tagged | 1 Comment

First whole-class micro:bit lesson – reflection

I did my first whole-class lesson with the BBC micro:bit in a Year 7 class today – here are my impressions.

It was a very short lesson so I just used the Technology Will Save Us demo that comes on box-fresh micro:bits as a starter to allow Year 7s to get to grips, literally and metaphorically, with the device.

I gave a LONG talk about safe handling – you can see my slides here – and explained that I’d had several fail because of static shocks given to them by children touching the gold pads on the back of the A button when they are plugged in.

I then gave the pupils USB extension leads to unravel and plug in (our base units are buried inside their desks, and the supplied micro:bit leads are far too short) and got them to plug the micro:bits in to the extensions and see what happened.

There was a very mixed response in this group. I gave minimal input, I just wanted to see what they would discover – some sailed though the demo so quickly I had to give them the heart easter egg to unlock the Snake game (you knew about that, right?).  One girl was frozen in terror by my safety lecture, too scared to push the A button.  A few got totally foxed by Chase the Dot – they needed others to tell them to tilt the micro:bit, though when I quizzed them after, they ALL said they’d played iPhone / iPad games that you tilt to play. We had a discussion about what an accelerometer does, and one girl said “is it a sensor?” which led on to talking about other things the micro:bit can sense.

I have to say I think the handling requirements – earth yourself, don’t touch the back when it’s plugged in, hold it by the edges – are unrealistic. Despite my dire warnings, I saw several violations. It’s really hard to give kids a new toy with shiny lights to explore, then expect them not touch the back when pressing the buttons (which really is the natural thing to do).

Next time we will do my Python intro lesson using the excellent standalone Mu editor. I found that the Microsoft Block Editor does not work at all well on our Virtual Desktops, and Nicholas Tollervey kindly did lots of work with us to get Mu to work well with the Citrix VDI. It makes transferring the code to the micro:bit much simpler than the browser-based coding platforms. You just click the ‘flash’ button and it copies it across.

The other huge challenge which I did not allow enough time for was packing them away. I have numbered each device and made a note of which pupil has each unit. This is partly because I am keeping them in school for now and I think it’s best they have the same unit with their code on. Also it’s to try to avoid arguments if they break. And I have had a high failure rate in testing, so I am braced for this possibility.

Already several pupils have asked about having them at home in the summer, which is great, but I have mixed feelings. They arrived so late, and we have trips and all sorts going on this short half term, we will be lucky to get even 2 or 3 full lessons out of them. I kind of want to hold on to them and teach more in the Autumn term with the same pupils, who will then be in Year 8, and let them take them home at Christmas.  I can’t see them all coming back to school after the summer hols…  one to ponder.


Posted in computers, education, ICT | Tagged | 3 Comments

Wireless remote data logging with the BBC micro:bit

I was quite astonished to stumble upon this today – it really is relatively simple to use use the BBC micro:bit to log data remotely, indeed wirelessly.

The micro:bit can log several kinds of data including accelerometer readings in 3 dimensions, magnetic force readings, light levels, compass bearings and temperature (this is I think internal to the board, but may be indicative of the environment).

Here’s what you need:

  • 2 BBC micro:bits, one to act as the logger, one as the receiver.
  • A computer with Python and pySerial installed.
  • A battery pack for the logging micro:bit.

I used a MacBook that already had Python 3 / IDLE installed on it, though I had to install pySerial following the instructions here: http://pyserial.readthedocs.io/en/latest/pyserial.html

I then followed the instructions here: https://github.com/gbaman/microbit-experiments/tree/master/Wireless-CSV

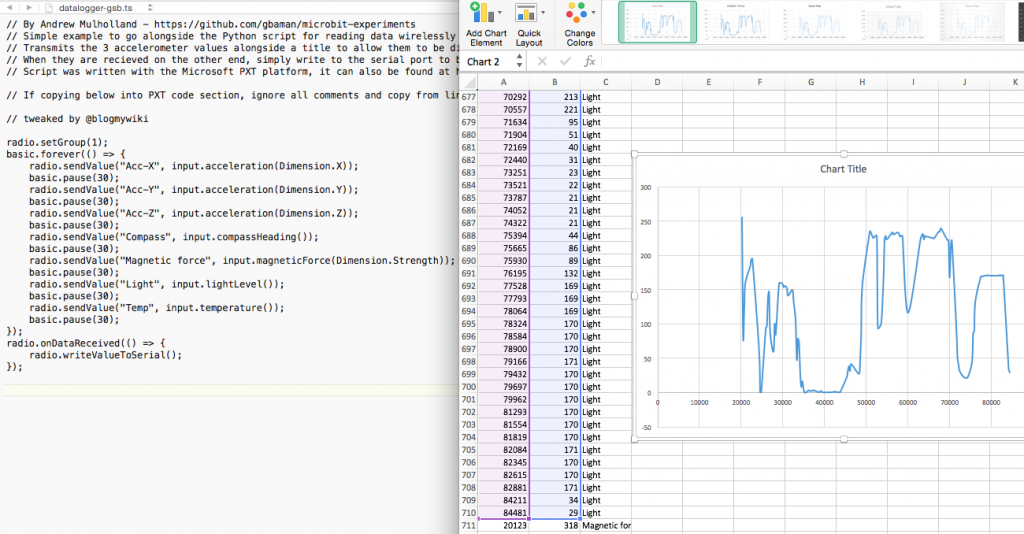
You put the same code on the logging micro:bit and the receiver.  This uses the Microsoft PXT platform. I found the PXT editor didn’t work properly in Safari, so I used Firefox instead. I also tweaked the code so it logged more than just the accelerometer readings (see below).

You compile the code in the web-based editor, download the HEX file and drag it onto your micro:bits.  Send one of them off on its way with a battery pack, and keep one plugged in to your computer.  Then you need to run the Python script on your computer – this collects data and writes it to a CSV file which you can open in a spreadsheet program like Excel or Open Office.  I think it might be better to log time before the other data, and it would be nice if the Python script displayed some data as it comes in – I thought it wasn’t working, as the micro:bits don’t light up as they are running.

My script logs loads of data so I sorted it in Excel and then made some charts to show temperature changes.  See if you can spot when I breathed on it, and when I took it outside:

And from the light levels when I put it in the cupboard under the stairs, and when it went outside:

I can see plenty of uses for this as the micro:bit devices themselves are relatively inexpensive – science experiments spring to mind.  Attach other sensors? Could this even be the basis of a weather station? Attach one to a robot, a drone, perhaps even an animal?!  I’m not sure what the range is, but it’ll be fun finding out!

Here’s my tweaked code that logs way too much data:

// By Andrew Mulholland - https://github.com/gbaman/microbit-experiments
// Simple example to go alongside the Python script for reading data wirelessly using 2 BBC micro:bits.
// Transmits the 3 accelerometer values alongside a title to allow them to be distinguished later.
// When they are recieved on the other end, simply write to the serial port to be picked up by the Python Script.
// Script was written with the Microsoft PXT platform, it can also be found at https://m.pxt.io/vxdmdu.

// If copying below into PXT code section, ignore all comments and copy from line below.

// tweaked by @blogmywiki

radio.setGroup(1);
basic.forever(() => {
    radio.sendValue("Acc-X", input.acceleration(Dimension.X));
    basic.pause(30);
    radio.sendValue("Acc-Y", input.acceleration(Dimension.Y));
    basic.pause(30);
    radio.sendValue("Acc-Z", input.acceleration(Dimension.Z));
    basic.pause(30);
    radio.sendValue("Compass", input.compassHeading());
    basic.pause(30);
    radio.sendValue("Magnetic force", input.magneticForce(Dimension.Strength));
    basic.pause(30);
    radio.sendValue("Light", input.lightLevel());
    basic.pause(30);
    radio.sendValue("Temp", input.temperature());
    basic.pause(30);
});
radio.onDataReceived(() => {
    radio.writeValueToSerial();
});
Posted in computers, education, ICT | Tagged , | 6 Comments

micro:bit Morse code transmitter

Here’s a pretty simple, and I think fun, way to introduce some quite sophisticated computing concepts with a few lines of Python, 2 BBC micro:bits and a crocodile clip lead or two (as you’d find in a Makey Makey box).

2021 update
I’ve since written new wired and wireless Morse projects here: https://github.com/blogmywiki/Morse


With a few trivial lines of code you can teach:

  • drawing an image on the LED screen
  • variables
  • if/else conditional branching
  • infinite loops
  • controlling GPIO pins
  • physical networking and protocols

This takes the excellent Morse code program included with the micro:bit Python documentation and makes a simpler transmitter that is compatible with it. My simple code only works as a transmitter but:

  • it’s easier for children to type in
  • it’s easier for them to understand
  • it makes it physically easier to send the Morse code by standardising the duration of dots and dashes, using the A button to send a dot, the B button to send a dash.

Here’s what you might do in a lesson:

Get the class into pairs. Using Mu or the online Python editor, Child 1 (who will be the receiver) copies and pastes the original Morse code program onto her micro:bit and tests it – or uses my simpler receiver code at the foot of this blog post. Child 2 (the transmitter) types in my transmitter code below and flashes it onto her micro:bit.

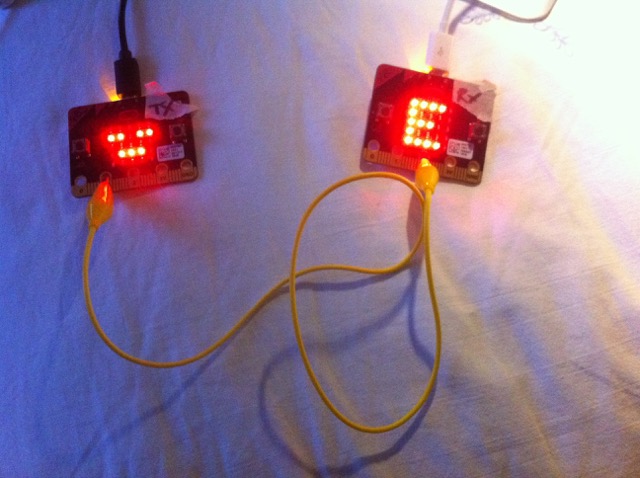
Unplug them both and carefully connect pin 1 on the transmitter to pin 2 on the receiver using wire with crocodile clips. If both microbits are powered off the same computer’s USB sockets, you can probably stop there. If, however, you are using battery packs attach another wire joining the two microbits’ GND pins together to complete the circuit:
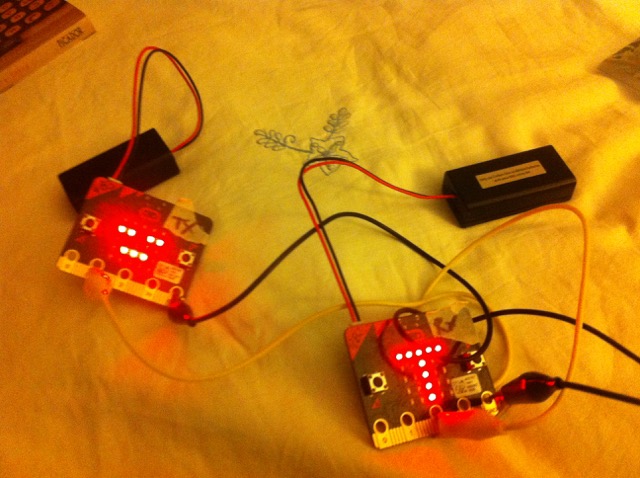
Children will have to be very careful not to short pins when they do this, so it might be wise to physically inspect them before they plug them back in.

Now power them back up. Child 2 should be able to send a Morse code message to child 1 using combinations of A and B button presses – A for dot, B for dash. It takes a bit of practice but my hunch is this is easier than holding down a button for the right length of time. The sender has to be pretty snappy and pay attention to what she’s doing, sending the next dot or dash as quickly as she can otherwise the decoder will think it’s the end of a letter.

There’s no sound, alas – perhaps someone can suggest a way round this. Making a beep of the appropriate duration slows the code down too much. I don’t think this is too much of a drawback as I think wiring up headphones or speakers is a step too far in a lesson anyway.

There’s lots of scope to pick apart my script – and the much more sophisticated original which encodes AND decodes, makes sound AND stores messages. And you could see how far you can send a message this way – perhaps join loads of croc clip leads together. Mmm, I may have to try that later…

See if you can send and decode this message:

.  -    .--.  ....  ---  -. .   ....  ---  -- .

Here’s the Python transmitter code…

# @blogmywiki's simplest microbit Morse code transmitter
# Press A for .       Press B for -

from microbit import *

DOT = Image("00000:"
            "00000:"
            "00900:"
            "00000:"
            "00000:")

DASH = Image("00000:"
             "00000:"
             "09990:"
             "00000:"
             "00000:")

# durations made a bit shorter than 250ms for a dot
# durations made a bit shorter than 500ms for a dot
DOT_DURATION = 230
DASH_DURATION = 470

while True:
    if button_a.is_pressed():
        display.show(DOT)
        pin1.write_digital(1)
        sleep(DOT_DURATION)
        pin1.write_digital(0)
        sleep(50) # little sleep added to debounce
    elif button_b.is_pressed():
        display.show(DASH)
        pin1.write_digital(1)
        sleep(DASH_DURATION)
        pin1.write_digital(0)
        sleep(50) # little sleep added to debounce
    else:
        display.show(Image.ASLEEP)

…and here’s my simplified receiver code:

# simple microbit Morse receiver based on
# http://microbit-micropython.readthedocs.io/en/latest/tutorials/network.html

from microbit import *

# A lookup table of morse codes and associated characters.
MORSE_CODE_LOOKUP = {
    ".-": "A",
    "-...": "B",
    "-.-.": "C",
    "-..": "D",
    ".": "E",
    "..-.": "F",
    "--.": "G",
    "....": "H",
    "..": "I",
    ".---": "J",
    "-.-": "K",
    ".-..": "L",
    "--": "M",
    "-.": "N",
    "---": "O",
    ".--.": "P",
    "--.-": "Q",
    ".-.": "R",
    "...": "S",
    "-": "T",
    "..-": "U",
    "...-": "V",
    ".--": "W",
    "-..-": "X",
    "-.--": "Y",
    "--..": "Z",
    ".----": "1",
    "..---": "2",
    "...--": "3",
    "....-": "4",
    ".....": "5",
    "-....": "6",
    "--...": "7",
    "---..": "8",
    "----.": "9",
    "-----": "0"
}

DOT = Image("00000:"
            "00000:"
            "00900:"
            "00000:"
            "00000:")

DASH = Image("00000:"
             "00000:"
             "09990:"
             "00000:"
             "00000:")             

def decode(buffer):
    # Attempts to get the buffer of Morse code data from the lookup table. If
    # it's not there, just return a question mark.
    return MORSE_CODE_LOOKUP.get(buffer, '?')

# detetct a DOT if incoming signal is less than 250ms.
DOT_THRESHOLD = 250
# detect a DASH if incoming signal is less than 500ms.
DASH_THRESHOLD = 500

# Holds the incoming Morse signals.
buffer = ''
# Holds the translated Morse as characters.
message = ''
# The time from which the device has been waiting for the next event.
started_to_wait = running_time()

while True:
    # Work out how long the device has been waiting for a signal.
    waiting = running_time() - started_to_wait
    # Reset the timestamp for the key_down_time.
    key_down_time = None
    # If pin2 (input) is getting a signal, start timing
    while pin2.read_digital():
        if not key_down_time:
            key_down_time = running_time()
    # Get the current time and call it key_up_time.
    key_up_time = running_time()
    # If there's a key_down_time (created when signal detected)
    if key_down_time:
        # ... then work out for how long it was pressed.
        duration = key_up_time - key_down_time
        # If the duration is less than the max length for a "dot" press...
        if duration < DOT_THRESHOLD:
            # ... then add a dot to the buffer containing incoming Morse codes
            # and display a dot on the display.
            buffer += '.'
            display.show(DOT)
        # Else, if the duration is less than the max length for a "dash"
        # (but longer than that for a DOT ~ handled above)
        elif duration < DASH_THRESHOLD:
            # ... then add a dash to the buffer and display a dash.
            buffer += '-'
            display.show(DASH)
        # Otherwise, any other sort of keypress duration is ignored (this isn't
        # needed, but added for "understandability").
        else:
            pass
        # The button press has been handled, so reset the time from which the
        # device is starting to wait for a signal.
        started_to_wait = running_time()
    # check there's not been a pause to indicate an end of the
    # incoming Morse code character. The pause must be longer than a DASH
    # code's duration.
    elif len(buffer) > 0 and waiting > DASH_THRESHOLD:
        # There is a buffer and it's reached the end of a code so...
        # Decode the incoming buffer.
        character = decode(buffer)
        # Reset the buffer to empty.
        buffer = ''
        # Show the decoded character.
        display.show(character)
        # Add the character to the message.
        message += character
    # Finally, if button_b was pressed while all the above was going on...
    if button_b.was_pressed():
        # ... display the message,
        display.scroll(message)
        # then reset it to empty (ready for a new message).
        message = ''
Posted in computers, education, ICT | Tagged , , , | Leave a comment

UPDATED roundup of Python micro:bit resources

Here’s a summary of my Python resources and projects for the BBC micro:bit which you may find useful… you’ll need the Mu editor to flash some of these, especially the ones that use the radio module.

Posted in BBC, computers, education, ICT, microbit | Tagged , | Leave a comment