Send the time from a watch to a BBC micro:bit

Previously I got a BBC micro:bit sending temperature data to my BangleJS watch by Bluetooth. I did this using a very simple, but deprecated, Eddystone beacon radio protocol.

I thought it would be interesting to send data the other way, from the watch to a micro:bit. What does a watch have that micro:bit doesn’t? A real time clock! So I modded this demo in a couple of ways.

First, the demo is for the Pixl.js board, which is a similar device to the BangleJS watch, but the code for drawing menus has changed since that demo was created. So I tweaked the JavaScript program for the watch to use showMenu() instead of Pixl.menu().

I also modified the program to send the time instead of the words ‘A test’.

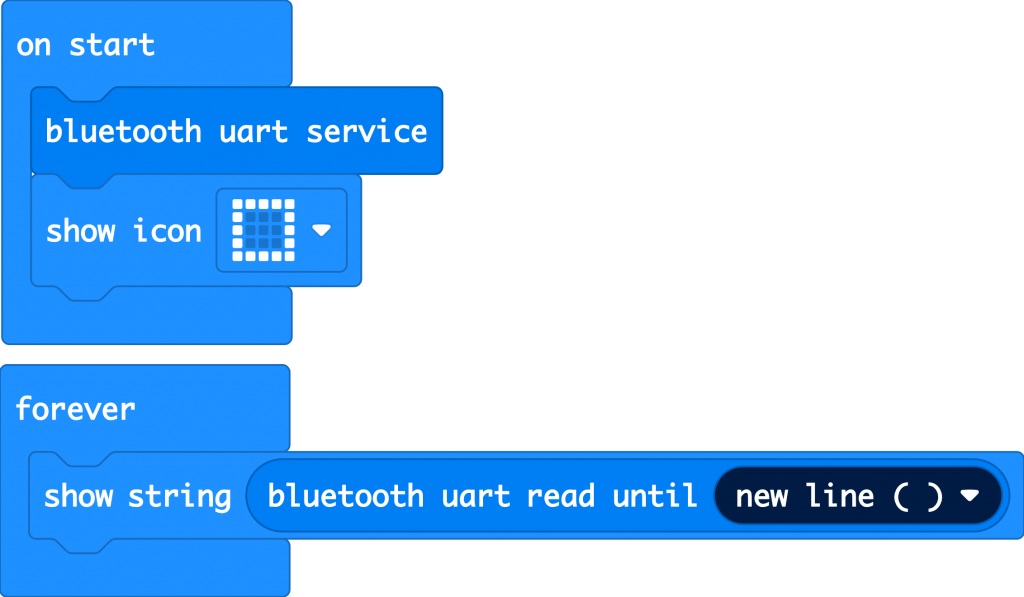
MakeCode blocks to show text received by Bluetooth on a micro:bit

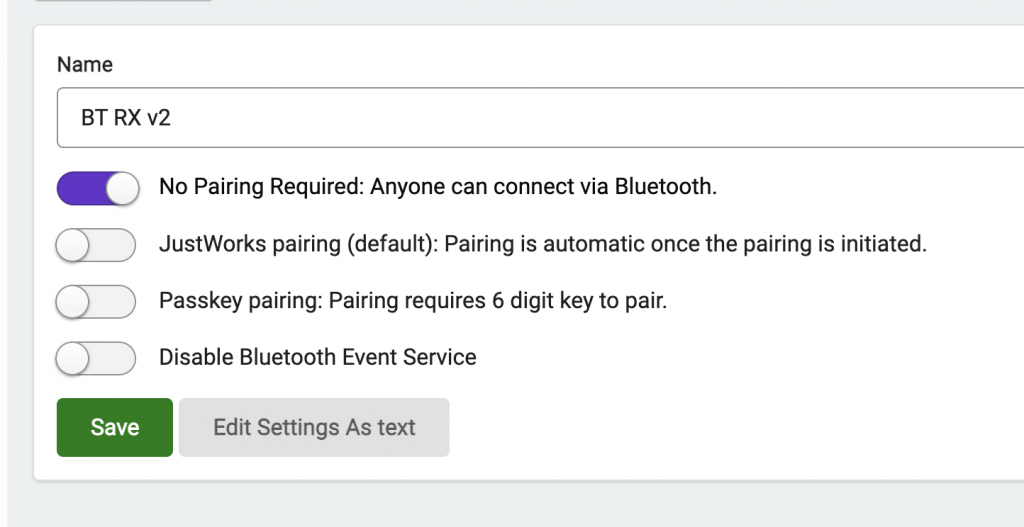
On the micro:bit side, I had a bit of trouble getting the code to work – this may be because I did not switch on ‘No Pairing Required: Anyone can connect via Bluetooth’ in the MakeCode project settings before I started creating it. In any case, I recreated the project in the old V0 MakeCode editor, downloaded the HEX file, loaded it in the current editor, and downloaded a new HEX file which runs on a V2 micro:bit – it works!

The MakeCode setting to allow any device to connect

To use it, transfer the JavaScript program to the watch, and flash the HEX file to a micro:bit. No pairing should be required on the micro:bit – it should just advertise its ‘friendly name’ (like ‘zavov’) and you should see it listed on your watch. Tap on the name to select it, then choose a message to send.

You can find the code and HEX files for both V1 and V2 micro:bits over on my GitHub: https://github.com/blogmywiki/bangle-microbit-time

Let me know if you think of any other uses for this – perhaps to put accurate times in a data logging program, or to make a micro:bit clock.

Posted in computers, microbit | Tagged , , , , | Leave a comment

Use a micro:bit as remote Bluetooth temperature sensor

BangleJS2 watch receiving temperature data by radio from BBC micro:bit

I love my BangleJS2 watch – it’s an inexpensive smart watch with custom firmware that allows you easily to write your own apps using JavaScript. I’ve already made a couple of watch faces for it, but I was keen to see if I could get it to talk to a BBC micro:bit over Bluetooth radio.

This radio voting project using micro:bits and an Espruino Pixl.js board suggested it should be possible, so I had a go.

This uses the Eddystone beacon protocol which has now been dropped by Google. If you try and follow that voting project, when you go to code the micro:bit, you’ll find that the ‘bluetooth advertise URL’ block you need is missing from Microsoft MakeCode even after adding the Bluetooth radio extension.

However, the underlying code to make it work is still there, so you have a couple of options. You can open this published project. Or you can just switch to JavaScript (Typescript) mode in the MakeCode editor and paste this code in:

loops.everyInterval(60000, function () {
    basic.showIcon(IconNames.Heart)
    bluetooth.advertiseUrl(
    "https://microbit.org#" + convertToText(input.temperature()),
    7,
    false
    )
    basic.clearScreen()
})

…then switch back to blocks:
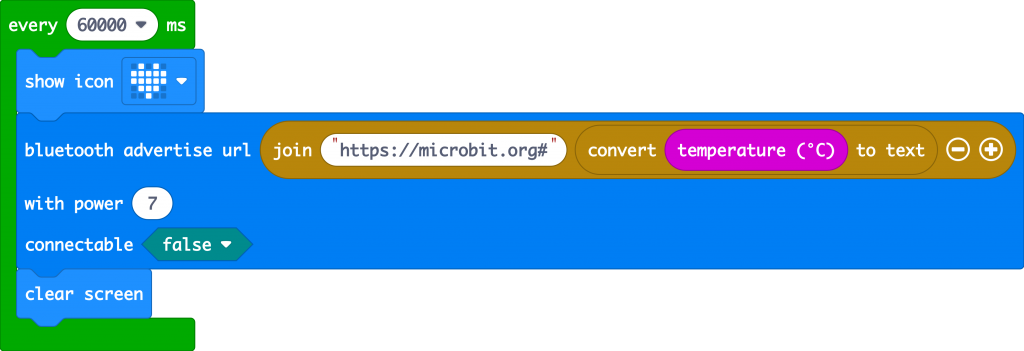
MakeCode blocks to send temperature data as Eddystone beacon signal

You can see that the code you need on the micro:bit is really very, very simple.

What this simplified project does is just send the current temperature from the micro:bit once a minute. A heart flashes on the LED display so you know it’s working.

You then need to put some code on your BangleJS watch (or other Espruino device) – the code it listed at the foot of this blogpost. It’s not too complex either – and possibly could be made simpler, I modified the voting project code to make this.

I can think of a few uses for this – using two micro:bits to sense indoor and outdoor temperatures which I can easily read on my watch. And as I explore communication the other way, from the watch to the micro:bit, perhaps use the watch to send real clock time data to a micro:bit for data logging or to make a clock, or perhaps add an audible alarm to the watch.

If you think of any other uses for wireless communication between micro:bits and watches, let me know.

The code and hex file are also on GitHub: https://github.com/blogmywiki/bangle-microbit-temp

And if you fancy sending data the other way, perhaps send the time from a watch to a micro:bit, maybe for data logging, maybe for a clock project, check out this blog post!

// List of eddystone devices
var eddystone = {};
var temp;

// Start scanning for devices
NRF.setScan(function(dev) {
  if (dev.serviceData && dev.serviceData.feaa)
    eddystone[dev.id] = dev;
});

setInterval(function() {
  for (var id in eddystone) {
    var dev = eddystone[id];
    if (!dev.age) dev.age=0;
    dev.age++;
    // only use data from devices we heard from recently
    if (dev.age < 40) {
      // if the URL contains a hash, the temperature is what comes after
      var url = E.toString(dev.serviceData.feaa).substr(3);
      var hash = url.lastIndexOf("#");
      if (hash) {
        temp = url.substr(hash+1);
        print(temp);
      }
    }
  }
  // now display on the screen
  g.clear();
  g.setFontVector(40);
  g.setFontAlign(0,0);
  g.drawString("Temp: ", g.getWidth()/2, (g.getHeight()/2)-20);
  if (temp) {
  g.drawString(temp+ "°C", g.getWidth()/2, (g.getHeight()/2)+20);
  }
  g.flip();
}, 500);
Posted in computers, education, ICT, microbit | Tagged , , , , , , , , | Leave a comment

Collect and graph micro:bit data on a Raspberry Pi

Using a BBC micro:bit, an old Raspberry Pi and a surprisingly small amount of code, you can log sensor data in a simple CSV (comma separated values) text file and plot it on an interactive graph you can access from any device on your local network.

Of course, you can connect sensors direct to a Raspberry Pi, but using a micro:bit means it’s easy to code and it gives you access to all its built-in sensors: temperature, light, 3 dimensional accelerometer and magnetometer and sound on the micro:bit V2. Even if you don’t have access to an external temperature sensor, as I explain in the video above, the micro:bit’s on-board temperature sensor is still useful for measuring temperature changes over time.

The micro:bit also has a beautifully simple radio protocol, so you could collect data from micro:bits in other rooms and outside, collate the data on a micro:bit connected to a Raspberry Pi just using a USB cable, and plot it all on a single graph or dashboard.

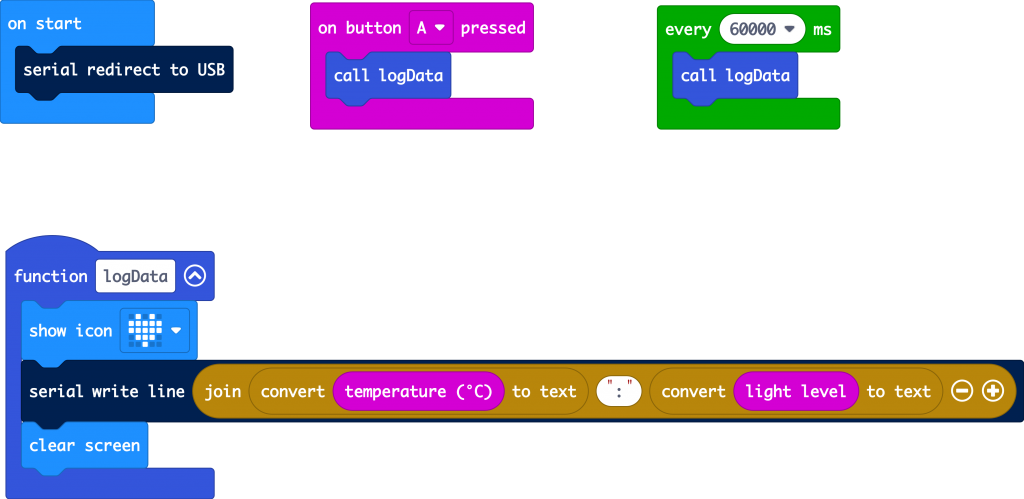
Here’s how it works. I used a simple MakeCode program on the micro:bit to send sensor data in a string as serial data over USB to the Raspberry Pi. The two values are separated by a colon:

MakeCode blocks

Over on the Raspberry Pi, a Python program polls the USB port once a second. When it gets some data, it splits the numbers and logs them with a short timestamp to a CSV file.

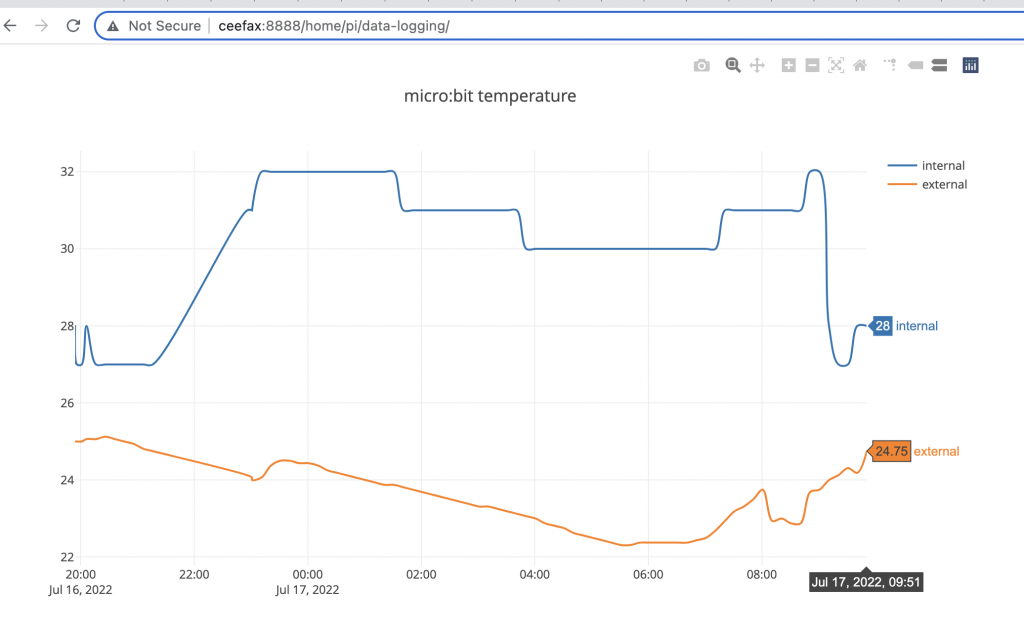
An HTML file uses the Plotly JavaScript library to read the CSV file and turn it into an interactive graph:

Screenshot of temperature graph

The graph is then served up on a web page on your local network using a simple built-in Python web server.

You can test out a sample graph here: http://suppertime.co.uk/microbit/data/

And you can get all the code you need and more detailed build instructions over on my Github: https://github.com/blogmywiki/microbit-pi-data

All you need is a BBC micro:bit and an old Raspberry Pi!

Update – long term use

After around 4 days’ use, logging data every 10 minutes, this system failed. I think the SD card got corrupted. So, for long term use you’d need to find another solution. Perhaps use a RAM disk and send the CSV file somewhere by FTP. Or use external USB storage, although that’s not an option with this set-up with a very old Pi as both USB ports are in use, one for Wi-Fi and one for talking to the micro:bit. It would be possible to use serial communication between the micro:bit and the Pi, for example, but I like the simplicity of USB.

Also when trying to fix this, I could not get my USB Wi-Fi dongles working with Raspberry Pi OS Bullseye Lite. I had previously been using Buster.

micro:bit data logging feature

If don’t have a Raspberry Pi to hand, but you do have a micro:bit V2, you can use it on its own to log data that stays on the micro:bit when the power is disconnected, and which you can view direct from the micro:bit in an interactive graph and table. Find out more here: https://microbit.org/get-started/user-guide/data-logging/. You can also view a sample set of data collected on a micro:bit here – it’s the data set I used comparing readings from the micro:bit’s onboard temperature sensor with a more granular external temperature probe – click on ‘visual preview’ to see the interactive graph. It’s easy to copy and paste data into a spreadsheet and export the data as a CSV file.

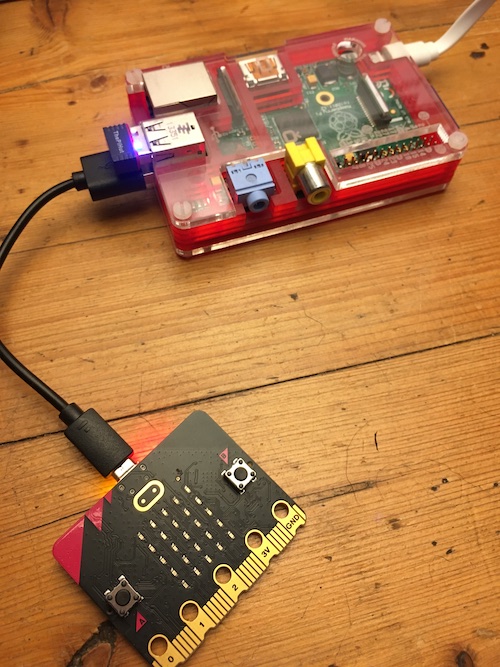
micro:bit and Raspberry Pi

Posted in microbit, Raspberry Pi | Tagged , , , , | Leave a comment

Classic 68k Mac watch face

photo of the Mac watch face on a watch

Back in November 2021, I got a BangleJS2 hackable smart watch, having backed it on Kickstarter. It’s no Apple Watch, for sure, but it’s much cheaper and you can write your own apps for it really rather easily, in JavaScript. I particularly like the always-on display which is readable in direct light, especially in dark mode, and also has a backlight. It’s built on top of an inexpensive generic smart watch, the Shenzhen Smart Care Technology SMA Q3. You may think the BangleJS2 has a bit of hefty mark-up, but you’re getting a watch modified with new firmware making it easy to program, plus a community of support and a huge range of apps to download.

I said back in November that I wanted to get Susan Kare’s classic 1984 Macintosh font Chicago working on it. Well, I’ve now made a watch face inspired not just by the font, but by her whole design for the original Macintosh Finder desktop. I’m grateful to @peerdavid for helping me improve the code so that the time displayed was more accurate, widgets still run in the background and getting it to work when your watch is in dark mode, which normally looks much better.

Let me know if you have ideas for how to improve it. My ideas include showing seconds when you unlock the watch, some way of including widgets, text dates, and maybe showing some other data when you tap the window.

If you have a BangleJS2, you can download the app here. And if you haven’t got one of the watches yet, you can still run the clock in the emulator and have it on your desktop.

You can also buy a BangleJS right here: https://shop.espruino.com/banglejs2

Posted in computers | Tagged , , , | Leave a comment

A tiny screen for a Raspberry Pi

I have a few old Raspberry Pis lying around, including a Model B Rev 1 running Raspberry Pi OS Buster lite. I use it to serve up my simple MUD game. It has no wi-fi so it’s connected by ethernet to my router which also gives it power over USB. I really must write that up some time.

Anyway, I have a whole bunch of cheap, tiny 1306 i2c OLED 128×64 pixel displays so I thought it might be fun to see if I could use one as a little shell display so I could do some basic admin on the headless Pi locally, just with a USB keyboard.

It took way longer than I expected, especially given I found someone had already done this, but it works. Here’s how I did it. Please bear in mind… my Pi is very old, I’m using Buster Lite as my OS, my OLED display’s address is 0x3C, it’s set to auto login to a command prompt, no GUI – your mileage may well vary!

It’s based on this project: https://github.com/satoshinm/oledterm – however, that was written in Python 2, uses a newer Pi, uses an spi not i2c interface, and because the OLED display libraries now only work in Python 3, I couldn’t get it to work. Issue #4 on that repo was the key to solving this, but I thought I’d summarise how I got this to work.

First, I connected the display. GND on the display to GND on the Pi, VCC to +3.3v on the Pi, SDA to Raspberry Pi pin 3, SCL to Pi pin 5 – remember this is an old Raspberry Pi original model B!

I installed git and downloaded oledterm:
git clone https://github.com/satoshinm/oledterm

This wouldn’t run for various reasons – not least because I needed to install luma.core to drive the OLED display, and I needed to install pip to install that:
sudo apt install python3-pip
sudo -H pip3 install --upgrade luma.oled

Then I copied the Python 3 version of oledterm from here and saved it as a file called oledterm3.py

I then edited /etc/rc.local to add this:
sudo python3 /home/pi/oledterm/oledterm3.py --display ssd1306 --interface i2c --i2c-port 0 &
exit 0

I also edited go.sh the same way. Let me explain the options in more detail. My display type is set to ssd1306, this is a very common kind of small OLED display. If my display’s i2c address were not 0x3c, I’d have needed to add an option to change that here. I specify the interface as i2c, rather than SPI as used in oledterm, and because I have a very old Pi I need to specify the i2c port as 0. With a newer Pi you could probably omit –i2c-port, or set it to 1.

I then unplugged the HDMI display, and rebooted – and lo! I could just about see a tiny shell and use my USB keyboard to type instructions! I could even edit text in nano – just about! Who needs more than 31 columns and 9 rows of text, anyway!?

If you like this, you may also like my adventures with using OLED displays in Arduino-based TinyBASIC computers, a micro:bit pulse oximeter, air quality sensor, or playing ArduBoy games on a BBC micro:bit.

Python 3 version of oledterm by Krizzel87

#!/usr/bin/env python
# -*- coding: utf-8 -*-
# based on:
# Copyright (c) 2014-17 Richard Hull and contributors
# See LICENSE.rst for details.
# PYTHON_ARGCOMPLETE_OK

import os
import time
import sys
import subprocess
from luma.core import cmdline
from luma.core.virtual import terminal
from PIL import ImageFont

VIRTUAL_TERMINAL_DEVICE = "/dev/vcsa"
ROWS = 9
COLS = 31

# based on demo_opts.py
from luma.core import cmdline, error
def get_device(actual_args=None):
    """
    Create device from command-line arguments and return it.
    """
    if actual_args is None:
        actual_args = sys.argv[1:]
    parser = cmdline.create_parser(description='luma.examples arguments')
    args = parser.parse_args(actual_args)

    if args.config:
        # load config from file
        config = cmdline.load_config(args.config)
        args = parser.parse_args(config + actual_args)

    # create device
    try:
        device = cmdline.create_device(args)
    except error.Error as e:
        parser.error(e)

    #print(display_settings(args))

    return device

# based on luma.examples terminal
def make_font(name, size):
    font_path = os.path.abspath(os.path.join(
        os.path.dirname(__file__), 'fonts', name))
    return ImageFont.truetype(font_path, size)

def main():
    if not os.access(VIRTUAL_TERMINAL_DEVICE, os.R_OK):
       print(("Unable to access %s, try running as root?" % (VIRTUAL_TERMINAL_DEVICE,)))
       raise SystemExit

    fontname = "tiny.ttf"
    size = 6

    font = make_font(fontname, size) if fontname else None
    term = terminal(device, font, animate=False)

    term.clear()
    for i in range(0, ROWS):
        term.puts(str(i) * COLS)
    term.flush()
    #time.sleep(1)

    while True:
        # Get terminal text; despite man page, `screendump` differs from reading vcs dev
        #data = file(VIRTUAL_TERMINAL_DEVICE).read()
        data = subprocess.check_output(["screendump"])
	#print [data]
        # Clear, but don't flush to avoid flashing
        #term.clear()
        term._cx, term._cy = (0, 0)
        #term._canvas.rectangle(term._device.bounding_box, fill=term.bgcolor)
        term._canvas.rectangle(term._device.bounding_box, fill="black")

        # puts() flushes on newline(), so reimplement it ourselves
        #term.puts(data)

        for char in data:
            if '\r' in chr(char):
                term.carriage_return()
            elif chr(10) in chr(char):
                #term.newline()
                # no scroll, no flush
                term.carriage_return()
                x = 0
                term._cy += term._ch
            elif '\b' in chr(char):
                term.backspace()
                x =- 1
            elif '\t' in chr(char):
                term.tab()
            else:
                term.putch(chr(char))

        term.flush()
        time.sleep(0.01)
        #print "refresh"
        #print data

if __name__ == "__main__":
    os.system("stty --file=/dev/console rows %d" % (ROWS,))
    os.system("stty --file=/dev/console cols %d" % (COLS,))
    try:
        device = get_device()
        main()
    except KeyboardInterrupt:
        pass
Posted in computers, Raspberry Pi, Raspbian | Tagged , , , | Leave a comment