Rediscovering Flotilla

Back in 2015 I backed Pimoroni’s Flotilla modular physical computing devices on Kickstarter and got an early set. I had some fun exploring it, but the software and support materials weren”t quite ready at the time and I started a new job where I spent most of my time in KS3 and KS4 and my Flotilla kit lay neglected.

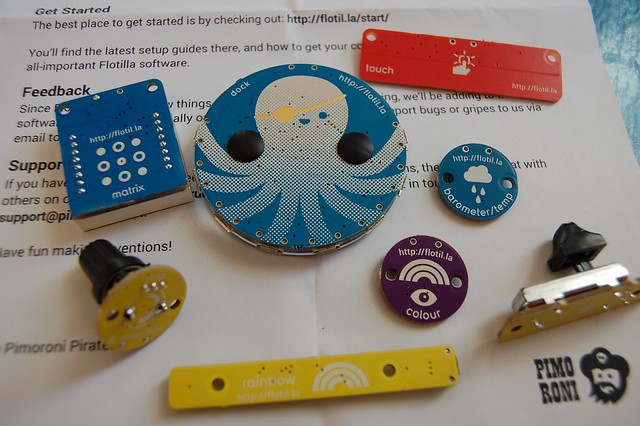
Flotilla comes into home port!

I’m about to start a new job as a primary school digital learning co-ordinator, and so I dug out my Flotilla bits as I they might be useful teaching physical computing in a simple way with attractive modular components.

First I updated firmware by using the excellent installation script on a fresh Raspberry Pi with up-to-date Raspbian:
curl https://get.pimoroni.com/flotilla | bash
This process updated the firmware on the Flotilla ‘dock’ – the main hub all the tentacles and sensors and output devices plug into, and it also installs all the software.

Setting sail with Flotilla

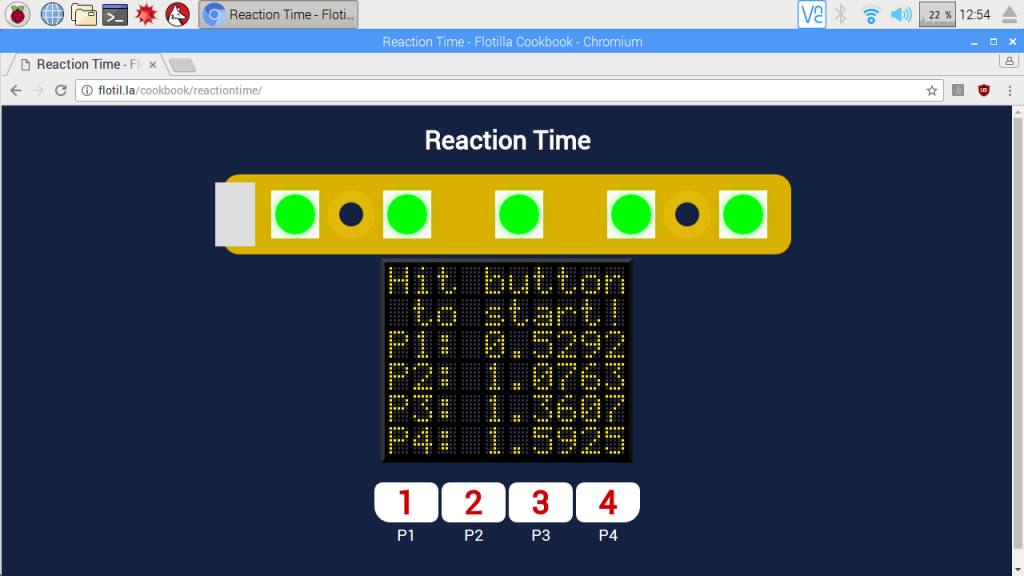
There are three main routes into doing things with your Flotilla. The first, and simplest, is the Cookbook: http://learn.flotil.la/cookbook. This appears to be written in Javascript and requires an internet connection but allows younger, or inexperienced, children to explore Flotilla’s modules using web-based games and activities. You do need all the right bits for each project though. My early large starter kit had the required modules for the Balance, Bat & Ball, Marble Maze, Moodlight, Reaction Time, and Virtual Pet games. Annoyingly I don’t have a light module I can’t run the weather station nor the Noise Maker despite having the plastic engraved plates for it.

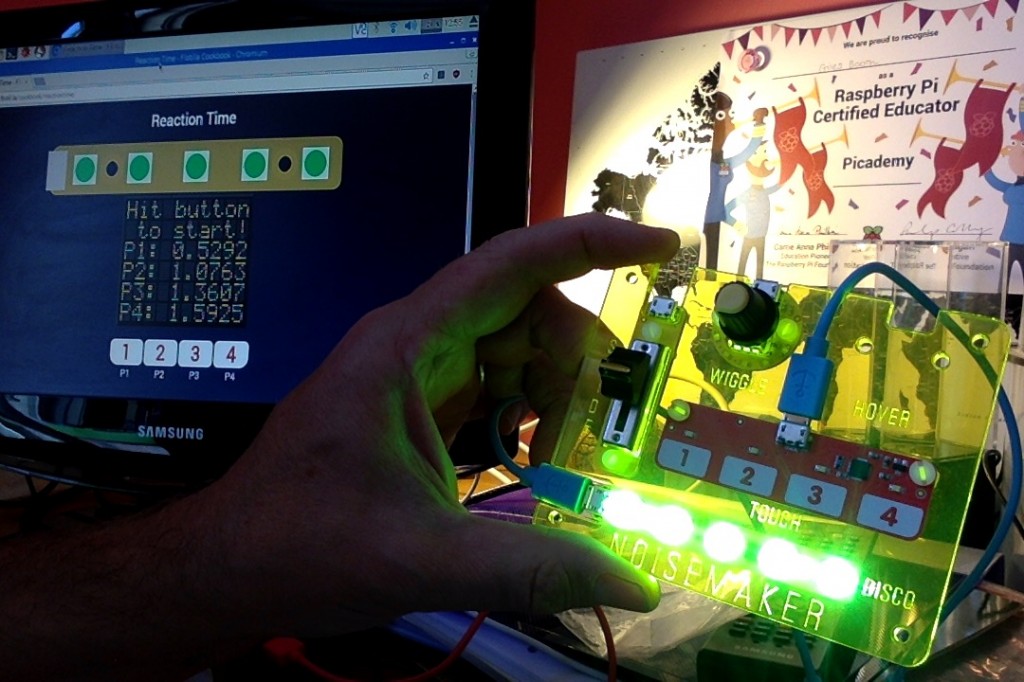
The Reaction Time game is one of the simplest to set up and worked really well. The Rainbow LED lights change colour after a pause and up to 4 players compete to press their button first.

I really enjoyed the Marble Maze – tilt to guide a ball round a maze. Nothing you can’t do with a BBC Microbit, but the 8×8 matrix display is very bright and there’s something very pleasing about sticking a motion sensor on the back of it with blutak, discovering you have it on back to front and making your own little widget. Bat and Ball (Pong) just using a slider and rotary knob as paddles was surprisingly addictive too.

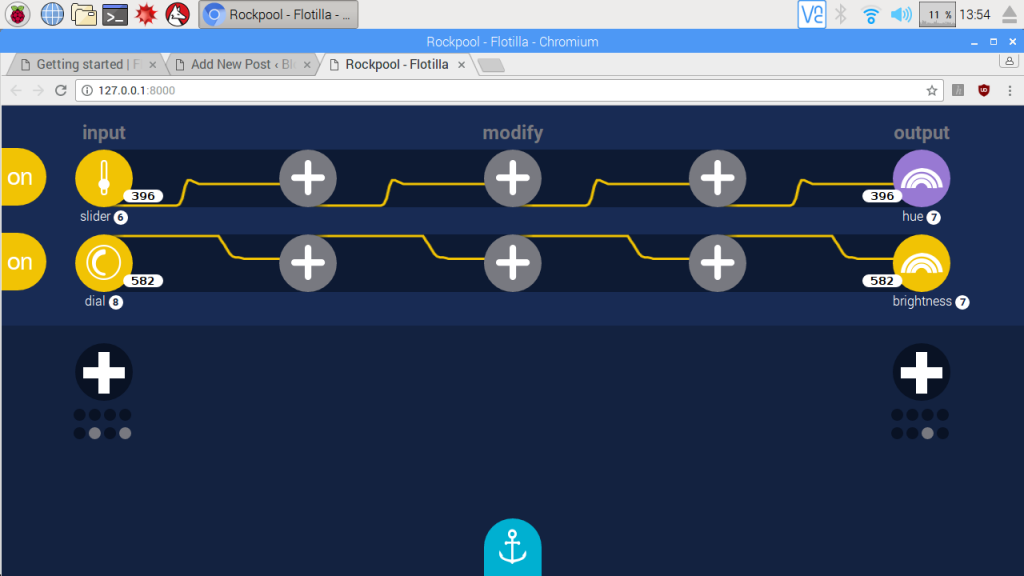
The second way of using your Flotilla is Rockpool – this does not require internet access, it runs as a local service in browser, and appears as under ‘Programming’ and ‘Education’ in the Raspberry Pi start menu.

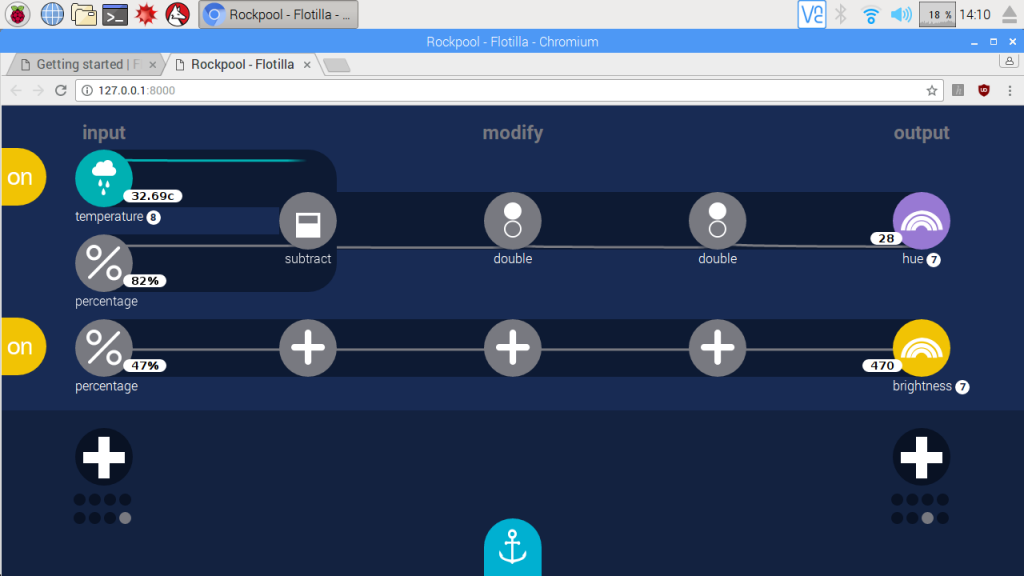
Here you link inputs to outputs using a graphical interface, and you can add random number inputs, sine waves, square waves and modify them in quite sophisticated ways. For example, it’s very easy to wire up a slider to change colour and a dial to modify brightness:

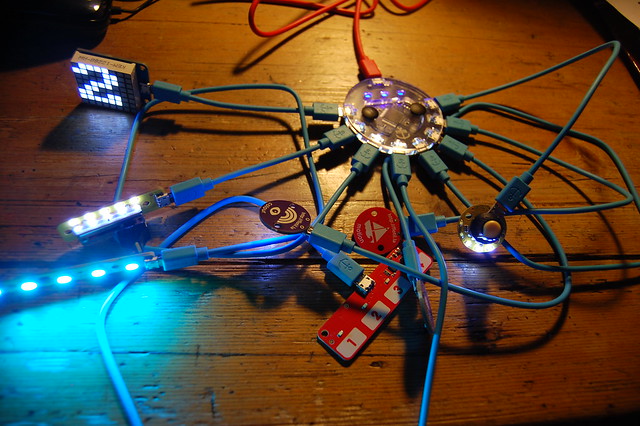
Here I get changes in temperature to change colour of rainbow LED strip:

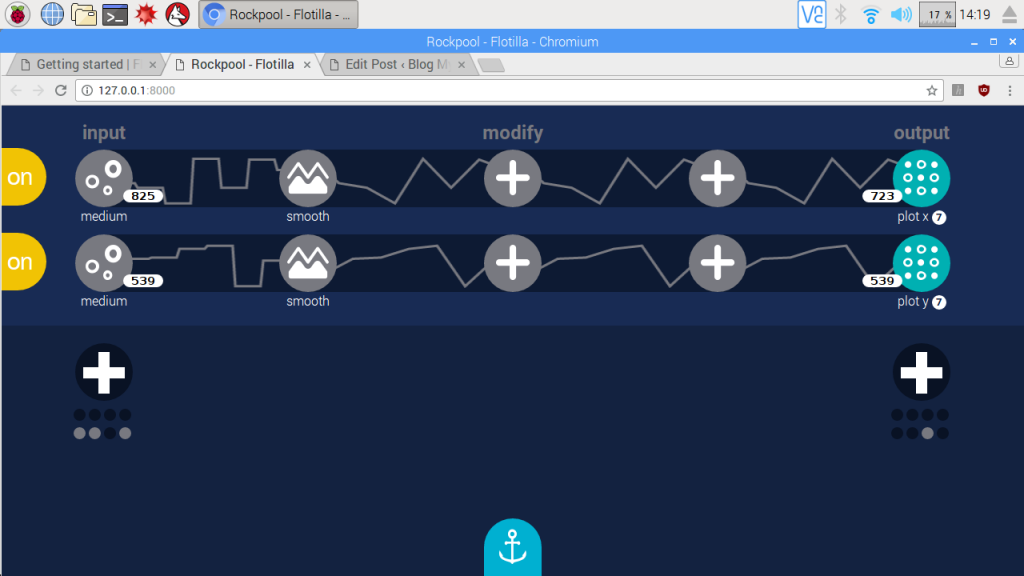
And in this example I made a random wandering pixel roaming around the 8×8 LED display matrix:

I did find that if I took browser focus away from Rockpool it really slowed down, but generally it worked well. You can do a lot here to make machines that work in real time, but – unless I’m missing something – there is no actual ‘programming’ here; you can’t make IF, THEN decisions and as such I don’t think you can create a game in Rockpool. I’m happy to be corrected if I’m wrong. I would love to give these toys to a small group of KS2 children to see what they can make – children are always far more creative and imaginative than me.

The Third Way is to use the Python IDE. I’ve not looked at this yet, but it would clearly address the lack of traditional programming. However, I sense a bit of a problem here. The Flotilla modules are beautifully-designed, highly attractive, tactile and will appeal very much to primary school age children, it will teach them about inputs and outputs, sensors and physical computing devices. – but it does not seem teach them programming in terms of sequence or selection. Python may be beyond the reach of most Primary aged children (although I intend to try to challenge this idea in my own teaching next year).

I think to be truly successful, Flotilla needs some kind of block programming environment (if one doesn’t already exist) to enable Primary aged children to not only make their own physical computing devices but program them in a way that supports the Computing curriculum.

Posted in computers, education, ICT, Raspberry Pi, Raspbian | Tagged , , , | 2 Comments

Raspberry Pi Wiimote Paint

People have done some cool stuff controlling Raspberry Pi robots with Nintendo Wiimotes. Now I don’t have any robot bits, but I do have an old Wii sitting unloved upstairs, so I found the remote, put batteries in it and started to think about what I could do.

I can’t drive a robot, but I can drive a turtle – a virtual Python graphics turtle. So I made a paint program that is controlled using a Wiimote. I based the code on the excellent example on the Raspberry Pi Spy web site – Python code below.

You are in effect driving the turtle, and as such I think this is possibly quite useful for teaching how Python turtles work as you have to think from the Turtle’s point of view: if it’s facing down you need to turn right to go left. I’ve added some code to get readings from the accelerometer to turn left & right as well as using the left & right arrow buttons.

Here’s what I did in order:

  • Found an original Nintendo Wii remote (NOT a Wii U!), put fresh batteries in it.
  • Got a fresh Raspberry Pi 3 (thank you Picademy!) with the current version of Raspbian – this has Bluetooth built in, no dongles needed.
  • Installed the cwiid library by typing sudo apt-get install python-cwiid in the Terminal.
  • Turned on Bluetooth on the Pi using the desktop GUI and making the Pi discoverable. You should not need to pair the Pi and Wiimote using the Bluetooth GUI.
  • Ran the Python code below in IDLE Python 2 – I used Python 2 because that’s what the original code used and the way I installed cwiid only made the library visible in Python 2.

Here’s how to use the program:

  • Run it in Python 2. Press the 1 & 2 buttons at the same time on the Wiimote and wait. If you have problems connecting, try pressing the red button on the back of the Wiimote behind the battery cover.
  • Move your turtle forward and backwards using the up & down arrows.
  • The left and right arrows rotate – but do not move – your turtle in increments of 5 degrees.
  • You can tilt the Wiimote left to turn left, tilt right to turn right.
  • Press A to change colour.
  • Press 2 to make the the line thicker, 1 to make it thinner.
  • Press + for pen up, – for pen down.
  • Press B to toggle ‘turbo’ mode – the turtle moves further with each press.
  • Press the home button to return your turtle to the middle of the screen.
  • Press home and B together to clear the screen (and get a little rumble!).
  • Press – and + together to quit the program (and get a bigger rumble).

Lots could be added to this – using the accelerometer for motion or clearing or changing colour, implement an undo, add background colours, more colours… and I’d really love to be able to have a Jackson Pollock paint spatter mode! Any ideas on how to code that gratefully received.


#!/usr/bin/python
# based on
# wii_remote_1.py
# Connect a Nintendo Wii Remote via Bluetooth
# and  read the button states in Python.
#
# Original Project URL :
# http://www.raspberrypi-spy.co.uk/?p=1101
#
# Author : Matt Hawkins
# Date   : 30/01/2013

# Modified by Giles Booth July 2017 to add paint program
# www.suppertime.co.uk/blogmywiki

# -----------------------
# Import required Python libraries
# -----------------------
import cwiid
import time
import turtle

button_delay = 0.1

print 'Press 1 + 2 on your Wii Remote now ...'
time.sleep(1)

# Connect to the Wii Remote. If it times out
# then quit.
try:
  wii=cwiid.Wiimote()
except RuntimeError:
  print "Error opening wiimote connection"
  quit()

print 'Wii Remote connected...\n'
print 'Press some buttons!\n'
print 'Press PLUS and MINUS together to disconnect and quit.\n'

wii.rpt_mode = cwiid.RPT_BTN | cwiid.RPT_ACC
fred = turtle.Turtle()
distance = 5
turn = 5
colourlist = ['red','orange','yellow','green','blue','purple','violet','black']
ink = 7
width = 1

while True:

  buttons = wii.state['buttons']
  AccVar = wii.state['acc']

  # detect extreme left & right tilt for turning
  if AccVar[0] < 100:
    fred.left(turn)
    print 'tilt left'
    print 'heading',fred.heading()

  if AccVar[0] > 140:
    fred.right(turn)
    print 'tilt right'
    print 'heading',fred.heading()

  # If Plus and Minus buttons pressed
  # together then rumble and quit.
  if (buttons - cwiid.BTN_PLUS - cwiid.BTN_MINUS == 0):
    print '\nClosing connection ...'
    wii.rumble = 1
    time.sleep(1)
    wii.rumble = 0
    exit(wii)  

  # If Home and B buttons pressed
  # together then rumble briefly and clear screen.
  if (buttons - cwiid.BTN_HOME - cwiid.BTN_B == 0):
    print 'Clear screen'
    wii.rumble = 1
    time.sleep(0.5)
    wii.rumble = 0
    fred.clear()

  # Check if other buttons are pressed by
  # doing a bitwise AND of the buttons number
  # and the predefined constant for that button.
  if (buttons & cwiid.BTN_LEFT):
    print 'rotate left', turn
    fred.left(turn)
    print 'heading',fred.heading()
    time.sleep(button_delay)         

  if(buttons & cwiid.BTN_RIGHT):
    print 'rotate right',turn
    fred.right(turn)
    print 'heading',fred.heading()
    time.sleep(button_delay)          

  if (buttons & cwiid.BTN_UP):
    print 'move forward',distance
    fred.forward(distance)
    time.sleep(button_delay)          

  if (buttons & cwiid.BTN_DOWN):
    print 'move backward', distance
    fred.backward(distance)
    time.sleep(button_delay)  

  if (buttons & cwiid.BTN_1):
    width = width - 1
    if width < 1:
      width = 1
    print 'thinner line',width
    fred.pensize(width)
    time.sleep(button_delay)          

  if (buttons & cwiid.BTN_2):
    width = width + 1
    print 'thicker line',width
    fred.width(width)
    time.sleep(button_delay)          

  if (buttons & cwiid.BTN_A):
    ink = ink + 1
    if ink > 7:
      ink = 0
    fred.color(colourlist[ink])
    print 'colour',colourlist[ink]
    time.sleep(button_delay)          

  if (buttons & cwiid.BTN_B):
    if distance == 5:
      distance = 10
      print 'turbo mode'
    else:
      distance = 5
      print 'normal mode'

    time.sleep(button_delay)          

  if (buttons & cwiid.BTN_HOME):
    if fred.isdown():
      fred.penup()
      fred.home()
      fred.pendown()
    else:
      fred.home()
    print 'Home'
    time.sleep(button_delay)           

  if (buttons & cwiid.BTN_MINUS):
    print 'pen down'
    fred.pendown()
    time.sleep(button_delay)   

  if (buttons & cwiid.BTN_PLUS):
    print 'penup'
    fred.penup()
    time.sleep(button_delay)
Posted in computers, education, ICT, Raspberry Pi, Wii | Tagged , , , , | 1 Comment

Robot poetry and storytelling in Scratch

There’s nothing new under the sun, and this is an old idea that went down incredibly well: generating random stories and poems by picking random words from word banks. I am grateful for my former colleague Cassie Wise for suggesting I do this for an interview lesson, which jogged my mind about Seymour Papert’s example in Mindstorms – which I translated into Python last summer:

Anyway, here are two cross-curricular English/Computing activities which would suit KS2 or KS3. I did the poetry in year 6 and the stories in year 5 and they were very engaging indeed. The computing concepts are simple but include random choices, list data structures, sequencing and possible concatenation of strings.

Robot Poetry

Robot storytelling

If you use these resources or have done something similar, I would love to hear your ideas and experiences.

Posted in education, ICT | Tagged , , , | Leave a comment

Simplest Scratch game?

Give a group of Year 9 girls the option to do some coding or watch a film at the end of term, and you think they’d want to watch a film.

Well not the last ever class I taught at my current school! They wanted to do some Scratch, some out of nostalgia because they hadn’t done it for years, and some because they had never done any Scratch coding.

On the spur of the moment I had to come up with what I thought was the simplest possible game I could, but keep it open-ended enough to challenge those who’d done some Scratch before. It was a fascinating lesson for me, and here’s the game I came up with. Use the mouse to help hungry bear eat the flying tacos, avoid the ladybirds! (Requires Flash).

It would clearly work with children much younger than year 9 (I did something similar with a year 4 class) but it was fascinating to see how something so simple kept Year 9s engaged for a double lesson. I’d love to know what you think!

Click here for a PDF of step-by-step instructions.

Posted in education, ICT | Tagged , , , | Leave a comment

Picademy top tips and takeaways

I was incredibly lucky enough to get a place on Picademy in London this month. What is Picademy? It’s the best CPD I have ever had. They bring together teachers and educators for two days of shared learning about technology, based around, but not limited to, the Raspberry Pi computer. They run periodically all over the UK and in the US as well.

Over the two days you have talks, do some physical computing workshops and then get into groups on day two to design and make some sort of physical computing project.

I thought I’d brain-dump a few quick thoughts and things I will be taking away from the course. In no particular order…

  • If you teach Computer Science to young people, you seriously need to consider attending Picademy, even if you have no interest in (or experience of) the Raspberry Pi computer. Did I mention that this is the best CPD I have ever had? Better than courses my school has paid hundreds of pounds for. And Picademy is FREE.
  • Bring a small paper notebook. Desk space may be limited, I didn’t have room for my laptop and you may want to take notes. Bring a phone too for taking photos, videos, tweets – and possibly controlling robots!
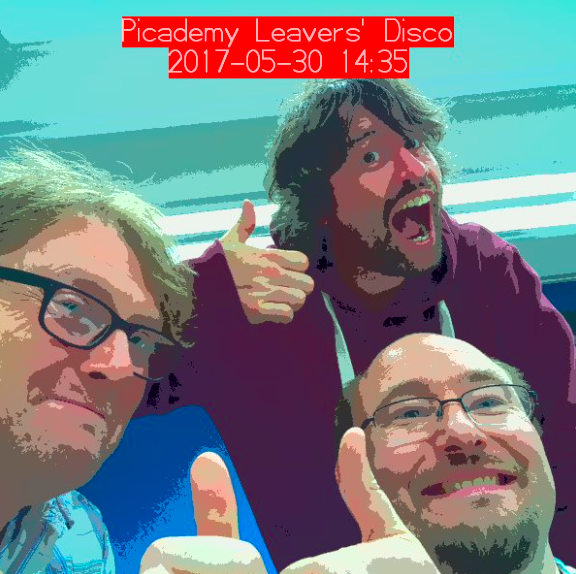
  • Don’t worry about the project too much. I honestly think I could have joined ANY one of the projects the group worked on and I would have found the experience very rewarding. At the end of day 1 I thought I was going to do something controlling Sonic Pi from the environment, on day 2 I actually joined a group building a photo booth for a school disco. Some of the ideas from other groups evolved hugely during their makes and they were all inspirational in very different ways.
  • Collaborate! I really recommend working with others on your project. I’ve made quite a few Raspberry Pi projects before, but never in 2 hours with 2 other people I had only just met. Learning each other’s strengths and dividing up the work was an immensely valuable  experience, akin to what we expect children to do in group work in class.
  • No matter how experienced you are, the workshops put you in the position of a learner – an invaluable experience. Think you know how to light an LED using Python? Try building it in real time following a teacher giving you instructions on a screen and a short deadline, and experience the frustrations first hand of not getting every element working in the time allowed. This happens in lessons all the time, and yet it was an eye-opener to me to find myself not being able to complete some tasks.
  • Learning though play – I am inspired to do what we did in class: give a group some basic tools and then set them free to play and do what they will with it. In our group’s project were able to build on a few lines of code from day 1 and by the end of day 2 we had a photo booth that would let you choose different filters and tweet a photo with a timestamp and caption, all controlled from 2 buttons and some simple Python code we wrote from scratch.
  • Consider making a makerspace – move the desks if you can, make clusters, make it less formal. (My desks in my current school’s ICT room are bolted to the floor in rows, but I will find a way round this!)
  • If you only have 1 or 2 Raspberry Pis, but them on a network & get the children to explore Linux and the command line by SSH.
  • Do something small first, show it off to SLT, get funding for more kit saying ‘this is what we can do’.
  • Making teaching more like coding. This was one of many excellent points made by James Robinson – coders share code, and we all benefit. Why not do the same with teaching resources? Why do we guard them so jealously? Publish them, get feedback from people who’ve used them, iterate, improve, collaborate. We’ve all pinched ideas and resources from other teachers – now give something back!
  • Keep in touch with fellow Picademicians (!?), share, get help, help others – personally I think Twitter is by far the best tool for this. Join today if you’re not already on it and you join a huge community.
  • If you want to understand something, emulate it. This was a point made by Pete Lomas about his time at college when instead of doing readings from an electronics experiment, he wrote an emulator which yielded him perfect results – but more importantly, gave him a deeper understanding of how the thing worked. It reminded me of the time I struggled to understand the Monty Hall Problem – until I wrote a Python program to emulate it.
  • Happiness through sharing your knowledge. One small moment was the absolute highlight of my two days. We’d all finished, given our presentations about our projects, about to pack away and I wandered over to another group whose project I really admired (hello @misskteague!). They were stuck sending radio messages between microbits, and I knew I’d done something similar a few months ago and was able to find my write-up (see, writing stuff up is important!), they copied a few lines of Python code, it worked! High-fives and smiles all round and I (selfishly, but it’s a good kind of selfish) felt utterly filled with happiness.
  • It’s intense. I didn’t get a whole lot of sleep, and not just because of the thunderstorm on Sunday night. There was a thunderstorm going off in my mind for 2 days. The day after I lay down in the afternoon and slept deeply for an hour. Be prepared to have your mind blown!

Thank you so much to all my fellow course members for your kindness, generosity of ideas – and what great ideas you all have! Thank you to The Museum of London for being perfect hosts and taking us on a tour round the exhibits. And a huge thank you to the folk from the Raspberry Pi Foundation who made these two days so special: James Robinson (@LegoJames), Laura (@CodeBoom), Marc Scott (@Coding2Learn), Lauren Hyams – fellow Wittertainee! –  (@lauren_hyams), Dan Fisher (@fluffywyvern), Ben Nuttall – GPIO guru –  (@ben_nuttall), and last but not least, Pete Lomas (@PeteLomasPi) who presented us with our certificates and gave an inspirational talk about how technology shaped his life, from a boy who hated school to being one of the co-founders and inventors of the Raspberry Pi.

I leave Picademy inspired, happy and well fed in body and mind!

Foo Fighters Tribute Band’s new album

Posted in education, ICT, microbit, Raspberry Pi | Tagged , , | Leave a comment