Interfacing Scratch and Python


Hello to Jason Isaacs is the new ‘hello world’.

I decided it might be cool to knock up a simple Scratch interface for the MonkMakes Robot Rover – a bit like the block coding game I made for Year 1 but also controlling a real robot in the real world.

The GPIO commands needed to control the robot directly were going to be a bit heavy and involved, so I decided to see if I could use Scratch to interact with a Python program using the library supplied with the MonkMakes robot. Turns out it’s pretty easy to do this. I’ll write up the robot code later, but here’s a simple example of Scratch interacting with Python.

First I installed scratchpy with
sudo pip install scratchpy

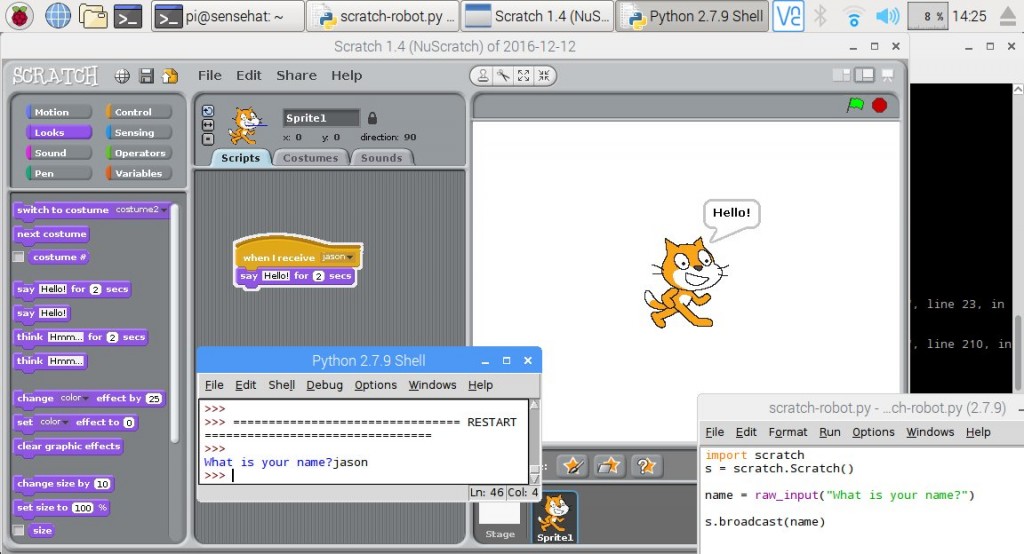
I then opened Scratch and made a very simple program where Scratch cat waits for the message ‘jason’ and replies by saying ‘Hello’. Then I enabled remote sensor connections in Scratch by right-clicking on the () Sensor Value block, found in the sensing category. I then selected the “Enable remote sensor connections” option.

In Python/IDLE 2 I then ran a very simple program to ask your name and broadcast the answer to Scratch. If you replied ‘jason’ you are rewarded with a ‘hello’ back from Scratch cat.

import Scratch
s = scratch.Scratch()
name = raw_input("What is your name? ")
s.broadcast(name)

It’s also possible to respond in Python to messages from Scratch, which I’ll explain next time when we look at the Scratch project to drive a robot round the screen – and a real one round your floor.

Posted in computers, Raspberry Pi | Tagged , , | 1 Comment

MonkMakes RasPi Robot Rover Kit review

If you want to cut to the chase, at about 22 minutes in the robot starts moving – much to the surprise of my dog Ellie.

I really liked the Monk Makes RFID Clever Card Kit, so I was delighted when they invited me to review another of their products. The Raspberry Pi Robot Rover kit was an obvious choice as – oddly – I’ve never done any robotics with any of my many Raspberry Pis, and I know this could be a great way to engage young minds.

It currently sells for just under £40 for which you get two pretty tough motors, a tough clear plastic chassis, lots of nuts and bolts, two chunky wheels, a wifi dongle, screwdrivers, battery holder, an ultrasonic distance measuring device – and Monk Makes’ own board which sits on top of a Raspberry Pi’s GPIO pins to control LEDs, the motors and which can also take sensor inputs from switches and the distance sensor.

It took me a couple of hours to assemble the kit – bear in mind I was filming the process which made it much slower. Children would need adult help as some of the steps are quite fiddly, such as bolting the Pi to the chassis and connecting the motors and battery pack to the board requires careful concentration to get the polarities right. Assembly is explained in videos on the Monk Makes web site, though I’d really like to see some written assembly instructions too.

It comes with some sample Python programs. The first ones are projects involving the ‘squid’ button and LED, including a really impressive one where you control the colour of the light by sending tweets. I’m not sure what these have to do with the robot kit, however and I wonder what they are doing in the kit and the manual – perhaps this could be an appendix?

The bespoke board to control the robot is brimming with pins and makes connecting sensors and switches very easy. It’s great to see that the GPIO pins are all carried through, so unlike with many HATs which block off other pins you might still want to use in a project. I suspect this neat little board has many potential uses beyond making a simple robot – anything that needs sensors, switches and requires motors to be powered and controlled in software.

I very much like the way that the robot can be powered from batteries AND the Pi’s USB power supply at the same time, a very good idea for testing and building. If your 6 AA batteries have enough juice you can then disconnect the USB supply and send your robot off into the world on its own.

The programs to control the robot worked well – you can SSH into the robot’s Pi and then control it using arrow keys on another computer. By far the most enjoyable project, however, is the ‘Rover Robot’ program. This sends your robot off exploring its environment and avoiding obstacles using the distance sensor. It worked very well indeed and was great fun to watch.

I’d like to see some explanation of how the core robot Python code works in the manual – I had a quick peek inside and it looked a little opaque, so some more information on how to write your own code to control the robot.

This kit is a good introduction to Raspberry Pi robotics, with plenty of scope for extension activities and I look forward to seeing future iterations of this device and more products from the inventive folk at Monk Makes.

Posted in computers, Raspbian | Tagged , , , , , | Leave a comment

Simple Scratch intruder alarm

Here’s a really simple Raspberry Pi project I’m going to try in my Year 6 Code Club. They’ve used Scratch before but never done any physical computing. Some of them have unused Raspberry Pis at home and this might inspire them to fire them up.

It’s based on the excellent Raspberry Pi education resource Physical Computing with Scratch, and shows you how you could extend this project slightly further to teach a few more design and coding ideas.

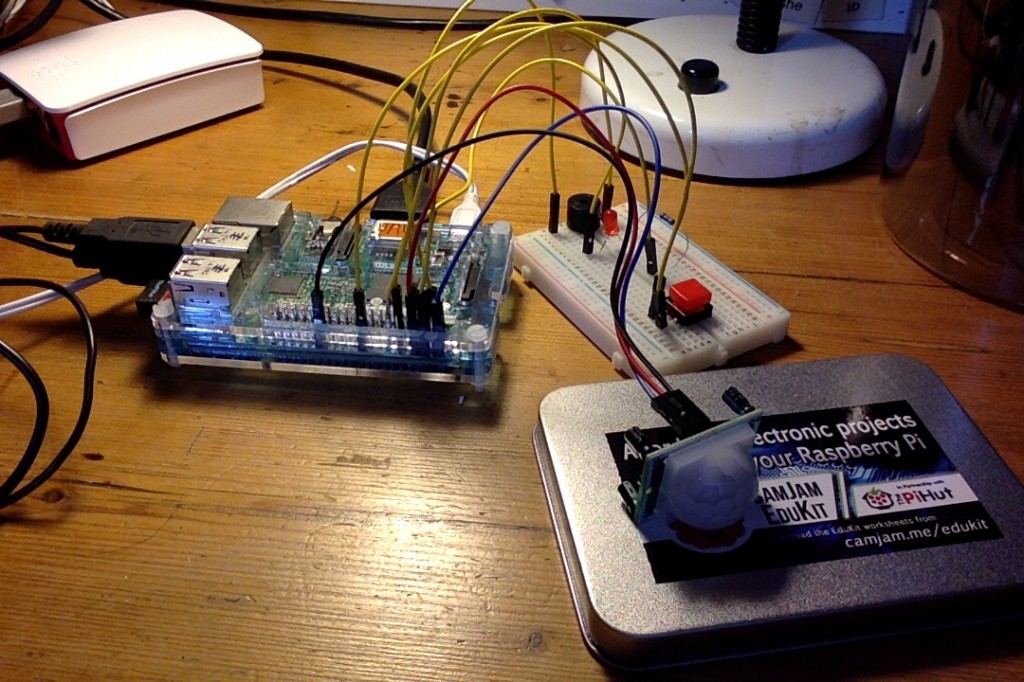
It uses any old Raspberry Pi with Raspbian and some parts you’d find in a CamJam EduKit or similar: an LED, a resistor, a push-button switch, a buzzer and a Passive Infra Red (PIR) movement sensor wired up like this:

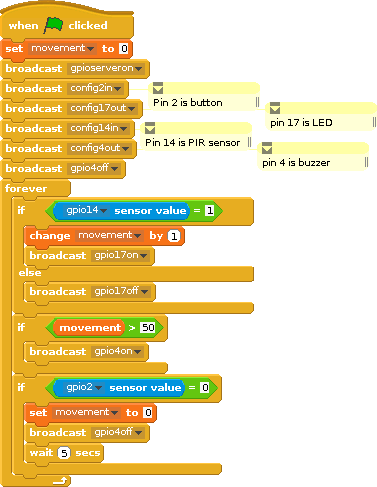
You then create a variable in Scratch called ‘movement’ and assemble blocks like this:

The idea is that you stop the alarm being too sensitive by counting the amount of movement. You can set a threshold (in this case 50) to trigger the buzzer sounding. The LED will light whenever it detects movement, much as the burglar alarm sensors do in your home.

When then alarm triggers, you can reset it by pressing the button – it gives you a generous 5 seconds to get out again! You can vary this and the movement threshold numbers and experiment with positioning the sensor.

Posted in education, ICT, Raspbian | Tagged , , , | Leave a comment

Teaching algorithms in Year 1

There have been many challenges in my new role as a primary school Digital Learning Co-ordinator: teaching Computing to 3 Reception classes in a formal ICT room with desks and PCs designed for adults, adapting and evolving a curriculum on the fly depending on what’s actually working on any given day… and finding the light switch. Seriously, it took me 10 minutes on my first day to find the light switch in my classroom. In my defence it is in a daft place. And it was dark.

I inherited a UK Year 1 (ages 5-6) scheme of work that was all about typing and word processing in the Autumn term. We did do some of that, navigating a QWERTY keyboard labelled in capital letters (why‽) is quite a challenge for those still acquiring reading skills. I wanted to do some coding – but what to use? Scratch is a bit too wordy and fiddly for many in Year 1, ScratchJr requires tablets and I currently only had Windows PCs. We have no Beebots nor the space in the ICT room for a whole class to use them.

I asked on Twitter what web or PC-based resources might get the youngest children assembling some kind of code… and the silence was profound. So I decided to invent my own. In Scratch, of course.

Now this still needs a lot of work, but I taught my first lesson with this today and I have to say it kept a class of Year 1s engaged for almost an hour.

The aim is to navigate an animal towards randonly-placed food by giving the computer sets of instructions in the form of directions. Don’t like dinosaurs? Click on the animal until you find one you do like.

The yellow blocks are the instructions. Click on the 1st column blocks to make get arrows in different directions and click the ‘go’ button.
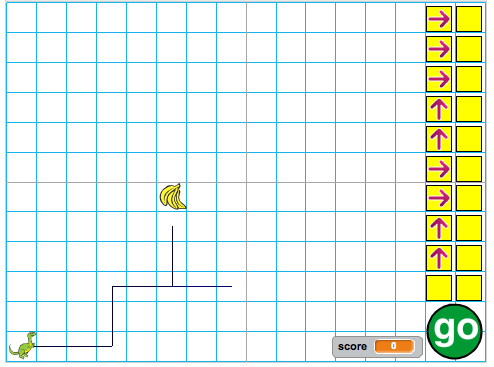
Didn’t reach the target? Click on the blocks in the right-hand column to add numbers of steps in each direction:
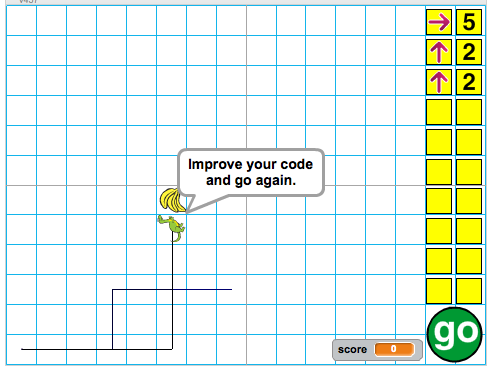
When you reach your target, you are rewarded with a point, a round of applause and a new random food to catch. You can press D to display the date, N to enter their name and screenshot & print for evidence of progress.

Before we started, I explained the lesson and one 5 year old girl said ‘are we going to teach the computers?’ – I could have punched the air. Another, unprompted, talked about sat navs helping us find our way round – another example idea I hadn’t thought of. But he was 6 years old.

I was worried this simple activity would not last 20 minutes, let alone an hour, but they were really engaged with it for the whole lesson, I had to tear some away from their screens. Scores varied from 0 to the high 20s. The pupil who got 0 admitted to being frustrated – she found manipulating the adult-sized mouse difficult but she got tantalisingly close to the target at the end of the lesson – with some support she did not give up and was happy to tell the rest of the class how challenging it was. Another pupil scored only 4 but I was immensely proud of him for sticking with one challenge that was driving him, literally, round in circles. He was so proud when he finally cracked it, and we had a class discussion about there being many ways of solving problems which can be different but all valid. Sound familiar? Look at Stack Overflow. Actually, kids, don’t.

They came up with lots of great ideas for improvements: more choice of animals (specifically velociraptors and bush babies!), a ‘clear’ button, more targets you have to reach in order, making the coloured lines more distinct, speed the game up (click ‘go’ too soon and it goes a bit crazy). About half the class liked my idea of maze-type levels, but I think the freedom to plough your own route leads to a fascinating diversity of route solutions from the children and the possibility of challenging them to produce more efficient routes with fewer blocks of code.

Year 1 came into my class today asking if they were going to do some more typing. They left having begun to understand of of the fundamental ideas behind programming, giving computers very simple sets of instructions in order.

UPDATE
A second Year 1 class found this game much more challenging, and the version now embedded at the top of this post has been tweaked according to their suggestions. The animal is placed in the middle of the grid (ish), making it in some ways easier (you can reach it in 9 steps up or down) but more challenging and interesting because you may have to go in any direction, not just up and right. Fascinating how two classes in the same school, not setted or streamed, can react completely differently to the same task.

UPDATE TO THE UPDATE
The latest version of this project (embedded at the top of this page) is further improved with ideas from more Year 1 children. Five year olds are way better at designing these things than grown-ups, and I really wish I’d been able to cook up a multi-player version – one day, one day. But this new version 3 has added maze levels. Get 5 points, you get a maze, 10 points a new maze, and 15 points you get yet another. I’ve also changed the behaviour so that the arrows won’t move the animal unless they have numbers associated with them. There are often still different ways of reaching the target, but this should be much more fun to play.
Posted in computers, education, ICT | Tagged , , , , | Leave a comment

Getting to grips with the mouse

I’ve recently found myself with the challenge of teaching Reception age children Computing not in their own classroom, but in a traditional ICT suite with desks, PCs, keyboards and mice that actually aren’t even designed for Year 6 children, they are designed for adults.

The curriculum I inherited has them using Paint, but I soon discovered little hands cannot grip the mouse well – learning to hold it at the top and press the left button, not the right, no not the right, no not the wheel, the LEFT button… is Quite Hard.

I took inspiration from one of my favourite books: Stephen Levy’s Insanely Great, the story of the creation of the original Mac computer in the early 1980s. Some users struggled with the (one button!) mouse. Someone hacked a game with flies popping up round the screen. Use the mouse to swat the flies. Go.

So here are two very simple, but I hope effective, resources I made to help KS1 children with tiny hands get to grips with adult mice. I made them in Scratch, of course. I tested them with Year 1 to get feedback (“it’s boring!” – young kids are refreshingly honest), and made some tweaks before unleashing them on Reception next week.

In the first game, you move the mouse round the screen and click on the food to get points. Every 10 points the food and the backdrop changes. Get 100 and you become a Mouse Master. You can assess ability by noting scores at the end of a timed period.

The second game is a bit more complex. It requires the children to click on arrow buttons to guide the caterpillar around the screen to eat fruit. There are points and levels, the fruit gets a bit harder and on the last level there are unhealthy foods to avoid as they lose points. Year 1 loved this and got very competitive.

I’ve used Scratch many times for making teaching resources – including teaching binary and logic in KS3 – I really recommend it. And getting young learners to be your beta testers.

Posted in computers, education, ICT | Tagged , , , | Leave a comment