Microbit treasure hunt

The sublime Detectorists. Photo: BBC

This is a much-simplified version of the MakeCode Hot/Cold game using Python. You hide beacons, players have to find them.

You will need:
- 2 or more micro:bits with battery packs
- a computer with which to program them
- optional: headphones or micro:bit speakers

You can hide as many beacons as you want. Using Mu or the online Python editor you put the following Python program on the beacons, changing the ID number so each is unique. Beacons constantly transmit their ID numbers as a string and show their ID number on their displays:

from microbit import *
import radio
id = "1"
display.show(id)
radio.config(power=0) # low power so you must get close
radio.on()

while True:
    radio.send(id)

In the very simplest version of this game (which should work with the online Python editor or current releases of the Mu Python editor) the players use the following program. This displays an X until a signal is received from a beacon – it should show the beacon’s number for half a second every time it gets a signal. Even though the beacon is set to transmit on low power, it will still get a signal if you are a metre or two away, so this is best played over a large area:

from microbit import *
import radio
radio.on()

while True:
    message=radio.receive()
    display.show(Image.NO)
    if message:
        display.show(message)
        sleep(500)

Players should see how many beacons they can find in an allotted time. This simple player code doesn’t log them, it just relies on memory and trust!

WORK IN PROGRESS: More sophisticated versions of player code showing signal strength below require Beta version of Mu 1.0.0 beta 15 or higher

This next version of the player code ignores the ID but displays a number from 1 to 5 showing how strong the signal is. X means no signal received. You could use this to play the game in a smaller area, and you could still use multiple beacons but their IDs are not shown to the player – until they find the beacon of course, when they can read its own display!

from microbit import *
import radio
radio.on()

while True:
    message=radio.receive_full()
    if message:
        strength = message[1]+100
        displaystrength = (int((strength/10)+1))
        display.show(str(displaystrength))
        sleep(200)
    else:
        display.show(Image.NO)

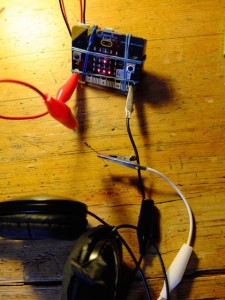
Microbit attached to headphones via 3K ohm resistorNow to be a bit more like a metal detector, it would be nice to have some audio feedback. This next program will play a short note when it receives a signal. The stronger the signal, the higher the pitch, so you can use this to find the beacon.

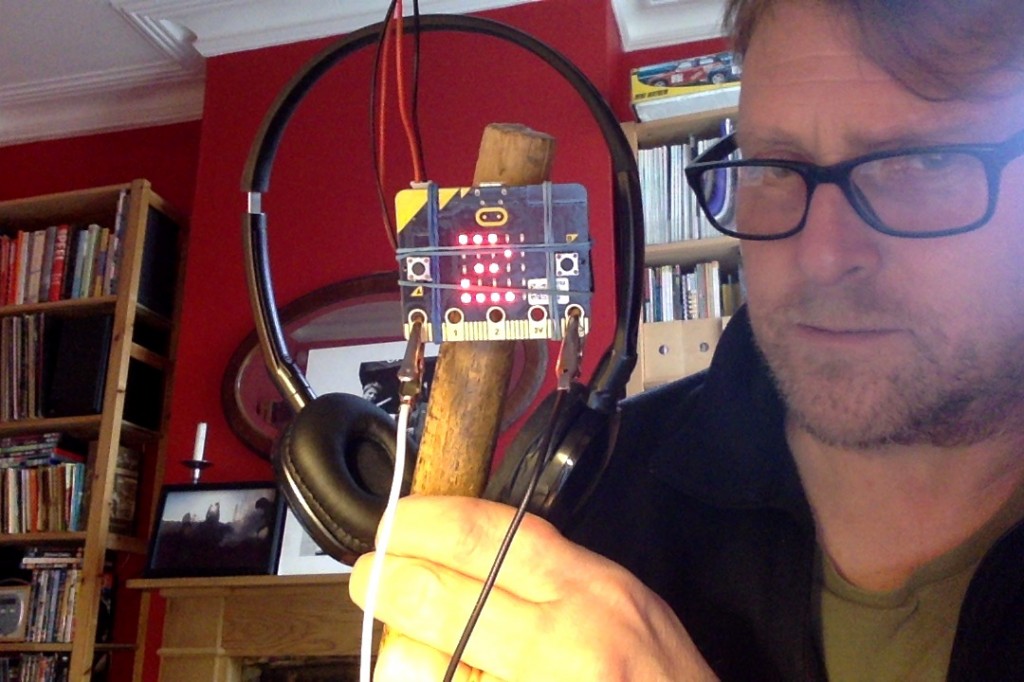
Attach a micro:bit speaker to the GND and 0 pins. CAUTION: if you attach normal headphones DO NOT WEAR THEM, just put them round your neck just like Lance and Andy in the photo at the top of this page – the sound is very loud. Or put a 3K ohm resistor between pin 0 and the headphones.. You could have some fun making a ‘metal detector’ as I did in the picture above with an old broom handle and some rubber bands.

Here’s the program for the noisy version. As before, this currently needs a beta version of Mu to flash this to your microbits.

from microbit import *
import radio,music
radio.on()

while True:
    message=radio.receive_full()
    if message:
        strength = message[1]+100
        displaystrength = (int((strength/10)+1))
        display.show(str(displaystrength))
        music.pitch(strength*50,100)
    else:
        display.show(Image.NO)

If you try this out and have ideas for improvements, please let me know!

To do:
- Add logging of beacon numbers and some visual feedback on players’ micro:bits when all beacons found.

Posted in computers, microbit | Tagged , | Leave a comment

The Flu Game

Inspired by the totally awesome Hannah Fry’s BBC Four programme on pandemic flu and this also awesome micro:bit project, I present: The Flu Game.

You will need:

  • more than 2 micro:bits with battery packs
  • a way of flashing Python code (or hex files) to the micro:bits – this can be Mu, the online editor or, in the case of the hex files, pretty much any computer.
  • 1 human being per micro:bit

This is a very much simplified version of the Microsoft make code Infection project. Simplified for two reasons: I wanted it to be cross-platform, not just Windows.* And I want to use it in my primary school Code Club, so the code should be easier to understand and quicker to type in.

[* CORRECTION: I am grateful to my correspondent who points out that MakeCode is cross-platform - I was getting muddled because some of the MakeCode projects do require the Windows app, but the Infection game does not.]

Get a bunch of kids or adults in a reasonably large space. Flash the program on to all the microbits, unplug from the computer, connect the battery packs and they should all see smiley faces. The person running the game asks to ‘check’ some of the micro:bits and sneakily presses A and B together on one of them. This becomes PATIENT ZERO. Get everyone to run, move around, have a chat, interact in whatever way seems normal.

Patient Zero is contagious but does not know it – their micro:bit still shows a smiley face – but they are now transmitting the word ‘virus’ by radio, but at a very low power. You need to be quite close to them to catch the virus – about a metre away when I was testing in my kitchen. (You can uncomment a line in the code to show a confused face when you are contagious which is useful for debugging, checking distances etc but I suspect the game will work better if you don’t know you are contagious. Or you could keep 1 micro:bit showing the confused face so you know someone is infected.)

After 100 seconds (1 minute and 40 seconds) of being contagious you become sick. Your micro:bit now shows a sad face. Your players won’t necessarily realise this, but when you are sick you are actually no longer contagious. This will actually reward players who stick with the sick, but it would be interesting to see if this actually happens in practice.

After another 100 seconds of being sick, you die – your screen shows a skull and the program stops. You could of course set a time limit on the game, depending on how many players you have and how big an area you have to move around in. Stop the game after 5 minutes and see who is dead, sick or still happy. Or give the micro:bits to random people in different parts of the building and see how long it takes in a normal working or school day for everyone to get sick (though you’d probably need to increase the timings. (Timer == 1000 tests for 100 seconds – I picked short durations to fit a few games of this into a lesson or single 45 minute Code Club).

For extensions you could add a master controller that stops the game and displays everyone’s true status. But I quite like the fact that this code is simple and everyone has the same code on their micro:bits.

You could also have people wearing their micro:bits like badges and see how people react to them depending on their displayed status (this reminds me of both Doctor Who and Black Mirror for some reason!) You might even get a PSHE lesson off the back of this.

You can download the hex file here. Here’s the Python program:

from microbit import *
import radio

#health 3=healthy, 2=incubating/infectious, 1=sick, 0=dead
timer = 0
health = 3
radio.config(power=0) # low power so you must get close
radio.on()

while health != 0:
    display.show(Image.HAPPY)
    if health == 2:
        radio.send('virus')
#        display.show(Image.CONFUSED)
# uncomment line above for debugging - you should not know if you are infectious!
    message = radio.receive()
    if message == 'virus' and health == 3:
        health = 2
    if health == 2:
        timer += 1
    if timer == 1000:
        health = 1
        display.show(Image.SAD)
    if health == 1:
        timer += 1
    if timer == 2000:
        health = 0
    if button_a.was_pressed() and button_b.was_pressed():
        health = 2
    print(timer)
    sleep(100)

display.show(Image.SKULL)
radio.off()

I’ve not tried this out yet – going to give it my KS2 Code Clubbers next term to see what they make of it. If you use this or have ideas for improving it, please let me know,

Posted in computers, microbit | Tagged , , , | Leave a comment

piPlay

A simple Raspberry Pi audio playout system with GUI for radio or theatre. It runs from one Python 3 program (code on Github) on a vanilla Raspberry Pi running Raspbian and requires no other software or libraries to be installed. It could be useful for school, student or community radio. (If you have access to a Windows computer – XP or later – I would strongly recommend using CoolPlay instead).

What is it?

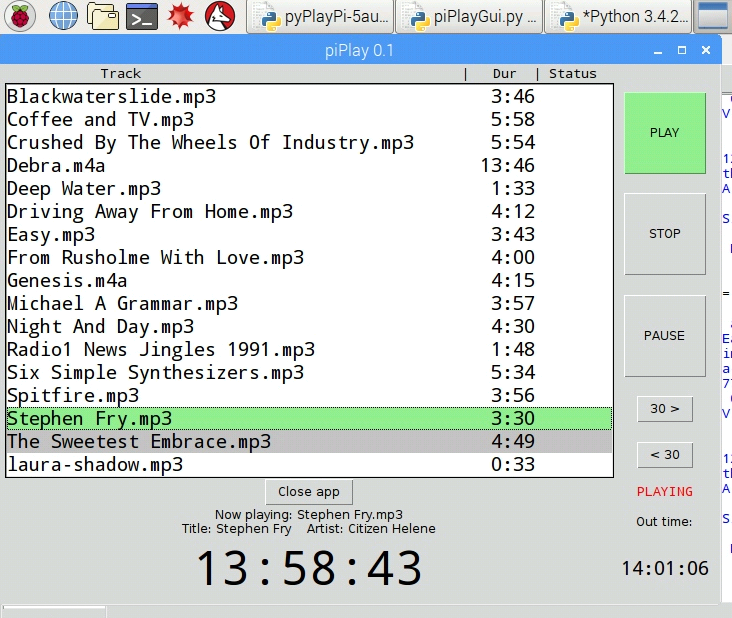
It plays audio files. One track at a time. Then stops. This may not sound like a big deal, but most GUI-front ends for audio players play though a playlist without stopping. If you work in radio or theatre, this is not what you want. You want to play 1 track at a time under your control.

The idea is based entirely on CoolPlay, a Windows app which does the same thing far better. CoolPlay was widely used in BBC Radio News a few years ago in BBC World Service and also, I believe, in Radio 1 Newsbeat, Radio 5 Live and some Radio 4 programmes as well. I designed the splash screen for BBC News CoolPlay (and possibly some of the help files) but none of the actual code.

How do I use it?

Put this Python 3 program in the same directory as a bunch of audio files and run it. If you don’t aldeady have an M3U-format playlist in the folder, it will make one for you with the tracks in alphabetical order. Highlight the track you want to play and press the PLAY button. It will tell you what time it will end if it carries on playing and if there is metadata with artist and tarck title information this appears below the tracklist. There is a large clock with the current time constantly displayed. Currently playing tracks are highlighted in green, the next track to be played in grey. Tracks that have been played in full turn blue.

It will cue-up the subsequent track (shown in grey) by default, but you can click on any track you like to line it up to be played next.

How does it work?

Inside, it is like a sausage. You do not want to know how it works, what it is made of.

No, really, how does it work?

It is based on PyPlay, a command-line Python program I wrote for Mac OS X that does a similar thing. The GUI PiPlay you see here is a cut-and-shunt job and a horrible piece of programming that already needs a re-write from the ground up.

It is a simple GUI-wrapper written using Tkinter for omxplayer. Omxplayer has some advantages: it can play almost any kind of audio file and allows extraction of metadata. But it’s slow to start: there will be a short delay between pressing ‘play’ and the audio starting. I used aplay instead of omxplayer in my Raspberry Pi cartwall for this reason, but that only supports WAV files.

It scans the folder it’s in and makes an M3U-format playlist file if it doesn’t find one. It reads the filenames into an array along with the filename padded to a fixed length, its duration in seconds and its duration for display in minutes and seconds format. When you play a track it requests metadata for artist and track title info, but this probably should be part of the array with other track info.

To-do list

Everything, really.

  • Add keypress controls for play, stop etc.
  • GPIO control for play/stop/up/down. You could connect these to buttons on a mixing desk or fader start etc.
  • End preview to play last 5 seconds or so of a track.
  • Fix support for ampersands and brackets in filenames.
  • Some sort of visual warning that a track is about to end.
  • A progress bar. Probably beyond me.
  • Some way of re-ordering / editing the playlist. If I can’t do drag’n'drop then use up/down buttons?


Posted in computers, radio, Raspberry Pi | Tagged , , , | Leave a comment

Fip Now Plays

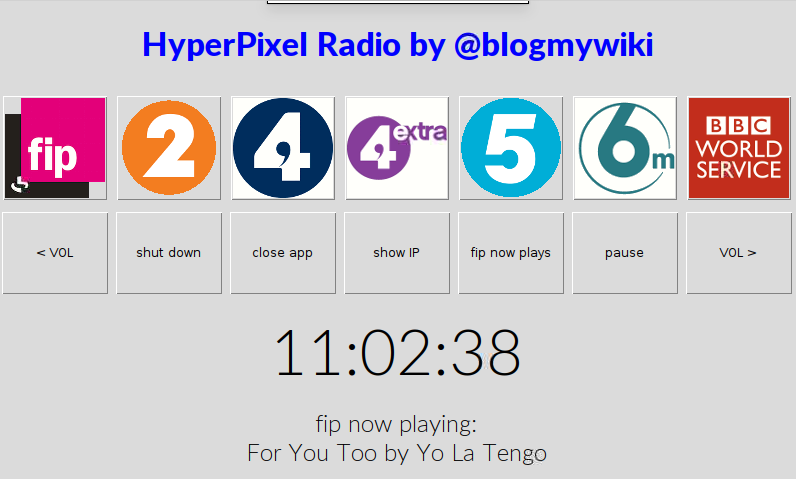
I’ve been tweaking my touch-screen Raspberry Pi radio. It’s optimised for the Pimoroni HyperPixel display, but it would work with any touch-screen, although it may need scaling for different sized screens.

Aside from the mpd/mpc music player and adding some radio stations, it doesn’t need any other libraries installing and should run on vanilla Raspbian. You’ll need some GIF images of logos, the ones I used are on the page for the old version of this program.

I’ve tidied up the display a bit, added a button to shut the system down and added a button that shows the track that is currently playing on Fip, my favourite radio station. This is actually rather useful as Fip’s music is famously eclectic and sometimes you just have to know what that achingly cool Belgian techno-influenced rockabilly-jazz tune is and who recorded it.

I can’t, it seems, easily do this for BBC radio, alas. France’s state broadcaster syndicates its ‘now playing’ track info as a JSON feed and I had a huge amount of, er, ‘fun’ working out how to parse this. Turns out you have to ‘drill down’ quite far in the data:
key = feed['levels'][0]['items'][3]
to extract a UUID number that you then need to use to look up the track name. And sometimes the ‘performer’ field is missing for some reason, so I added an exception for that. But at least it’s there. Unlike BBC radio.

And I learned a bit about handling JSON in Python.

I made a really cool Raspberry Pi radio a few years ago that you controlled from a web page that had ‘now playing’ info for Fip (culled from a twitter account) and from the BBC via Last.fm. It looks like the Last.fm kludge doesn’t work any more, and the BBC seems to have closed the ‘Backstage’ operation which provided API access to its ‘now playing’ data for independent websites like https://dyl.anjon.es/onradio/1 – which, oddly, still seems to work. I could screen-scrape that web page, I suppose, but it seems a bit unfair on Mr Jones. It is very frustrating the BBC doesn’t seem to do this any more – if anyone knows different I’d be grateful. Fip doesn’t even require an API key.

Anyway, here’s the Python program. It only fetches the Fip JSON data when you press the ‘fip now plays’ button so it doesn’t update all the time, and also does not bombard Fip’s servers with data requests.

#!/usr/bin/env python3
from tkinter import Tk, Label, Button, PhotoImage
import os, time, subprocess, json
from urllib.request import urlopen

def get_jsonparsed_data(url):
    response = urlopen(url)
    data = response.read().decode("utf-8")
    return json.loads(data)

url = ("https://www.fip.fr/livemeta/7/")
time1 = ''

IP = subprocess.check_output(["hostname", "-I"]).split()[0]

class MyFirstGUI:
    def __init__(self, master):
        global fiplogo
        self.master = master
        master.title("HyperPixelRadio")

        fiplogo = PhotoImage(file="/home/pi/Desktop/HyperPixelRadio/fip100.gif")

        self.label = Label(master, text="HyperPixel Radio by @blogmywiki", font=('Lato Heavy',25), fg = 'blue')
        self.label.grid(columnspan=7, pady=20)

        self.fip_button = Button(master, image=fiplogo, command=self.fip, height=100, width = 100)
        self.fip_button.image = fiplogo
        self.fip_button.grid(row=1, pady=10, padx=4)

        r2logo = PhotoImage(file="/home/pi/Desktop/HyperPixelRadio/radio2.gif")
        self.r2_button = Button(master, image=r2logo, command=self.r2, height=100, width = 100)
        self.r2_button.image = r2logo
        self.r2_button.grid(row=1, column=1, padx=4)

        r4logo = PhotoImage(file="/home/pi/Desktop/HyperPixelRadio/radio4.gif")
        self.r4_button = Button(master, image=r4logo, command=self.r4, height=100, width = 100)
        self.r4_button.image = r4logo
        self.r4_button.grid(row=1, column=2, padx=4)

        x4logo = PhotoImage(file="/home/pi/Desktop/HyperPixelRadio/4extra.gif")
        self.x4_button = Button(master, image=x4logo, command=self.x4, height=100, width = 100)
        self.x4_button.image = x4logo
        self.x4_button.grid(row=1, column=3, padx=4)

        r5logo = PhotoImage(file="/home/pi/Desktop/HyperPixelRadio/5live.gif")
        self.r5_button = Button(master, image=r5logo, command=self.r5, height=100, width = 100)
        self.r5_button.image = r5logo
        self.r5_button.grid(row=1, column=4, padx=4)

        r6logo = PhotoImage(file="/home/pi/Desktop/HyperPixelRadio/6music.gif")
        self.r6music_button = Button(master, image=r6logo, command=self.r6music, height=100, width = 100)
        self.r6music_button.image = r6logo
        self.r6music_button.grid(row=1, column=5, padx=4)

        wslogo = PhotoImage(file="/home/pi/Desktop/HyperPixelRadio/bbcws.gif")
        self.ws_button = Button(master, image=wslogo, command=self.ws, height=100, width = 100)
        self.ws_button.image = wslogo
        self.ws_button.grid(row=1, column=6, padx=4)

        self.down_button = Button(master, text="< VOL", command=self.down, height=5, width=10)
        self.down_button.grid(row=2)

        self.up_button = Button(master, text="shut down", command=self.shutdown, height=5, width=10)
        self.up_button.grid(row=2, column=1)

        self.close_button = Button(master, text="close app", command=self.close, height=5, width=10)
        self.close_button.grid(row=2, column=2)

        self.ip_button = Button(master, text="show IP", command=self.ipaddr, height=5, width=10)
        self.ip_button.grid(row=2, column=3)

        self.ip_button = Button(master, text="fip now plays", command=self.nowPlaying, height=5, width=10)
        self.ip_button.grid(row=2, column=4)

        self.stop_button = Button(master, text="pause", command=self.stop, height=5, width = 10)
        self.stop_button.grid(row=2, column=5)

        self.up_button = Button(master, text="VOL >", command=self.up, height=5, width=10)
        self.up_button.grid(row=2, column=6)

        self.nowPlayingLabel = Label(master, text=" ", font=('Lato Light',18), fg = 'black')
        self.nowPlayingLabel.grid(row=4, columnspan=7, pady=0)

    def ipaddr(self):
        self.label.config(text=IP)

    def nowPlaying(self):
        feed=get_jsonparsed_data(url)
        # Get UUID of song now playing so we can look it up
        key = feed['levels'][0]['items'][3]
        title = feed['steps'][key]['title']
        try:
            artist=feed['steps'][key]['performers']
        except KeyError:
            try:
                artist=feed['steps'][key]['authors']
            except KeyError:
                artist="Artist unknown"
        nowPlayingText = 'fip now playing:\n'+title.title()+' by '+artist.title()
        self.nowPlayingLabel.config(text=nowPlayingText)

    def fip(self):
        print("fip!")
        self.label.config(text='fip - France Inter Paris')
        os.system("mpc play 1")

    def r4(self):
        print("BBC Radio 4 FM")
        self.label.config(text='BBC Radio 4 FM')
        os.system("mpc play 2")

    def x4(self):
        print("BBC Radio 4 Extra")
        self.label.config(text='BBC Radio 4 Extra')
        os.system("mpc play 7")

    def r6music(self):
        print("BBC 6music")
        self.label.config(text='BBC Radio 6Music')
        os.system("mpc play 3")

    def ws(self):
        print("BBC World Service News Stream")
        self.label.config(text='BBC World Service News')
        os.system("mpc play 4")

    def r2(self):
        print("BBC Radio 2")
        self.label.config(text='BBC Radio 2')
        os.system("mpc play 5")

    def r5(self):
        print("BBC Radio 5 Live")
        self.label.config(text='BBC Radio 5 Live')
        os.system("mpc play 6")

    def stop(self):
        print("stop MPC player")
        self.label.config(text='-paused-')
        os.system("mpc stop")

    def close(self):
        os.system("mpc stop")
        root.destroy()

    def up(self):
        os.system("mpc volume +30")

    def down(self):
        os.system("mpc volume -30")

    def shutdown(self):
        print("shutting down system")
        os.system("sudo shutdown now")

root = Tk()

#root.configure(background='cyan3')
root.configure(cursor='none')
root.attributes('-fullscreen', True)
my_gui = MyFirstGUI(root)

time1 = ''
clock = Label(root, font=('Lato Light', 48, 'bold'))
clock.grid(row=3, columnspan=7, pady=15)
def tick():
    global time1
    # get the current local time from the PC
    time2 = time.strftime('%H:%M:%S')
    # if time string has changed, update it
    if time2 != time1:
        time1 = time2
        clock.config(text=time2)
    # calls itself every 200 milliseconds
    # to update the time display as needed
    # could use >200 ms, but display gets jerky
    clock.after(200, tick)
tick()

root.mainloop()
Posted in radio, Raspberry Pi | Tagged , , , , , | 3 Comments

Making calculators with microbits

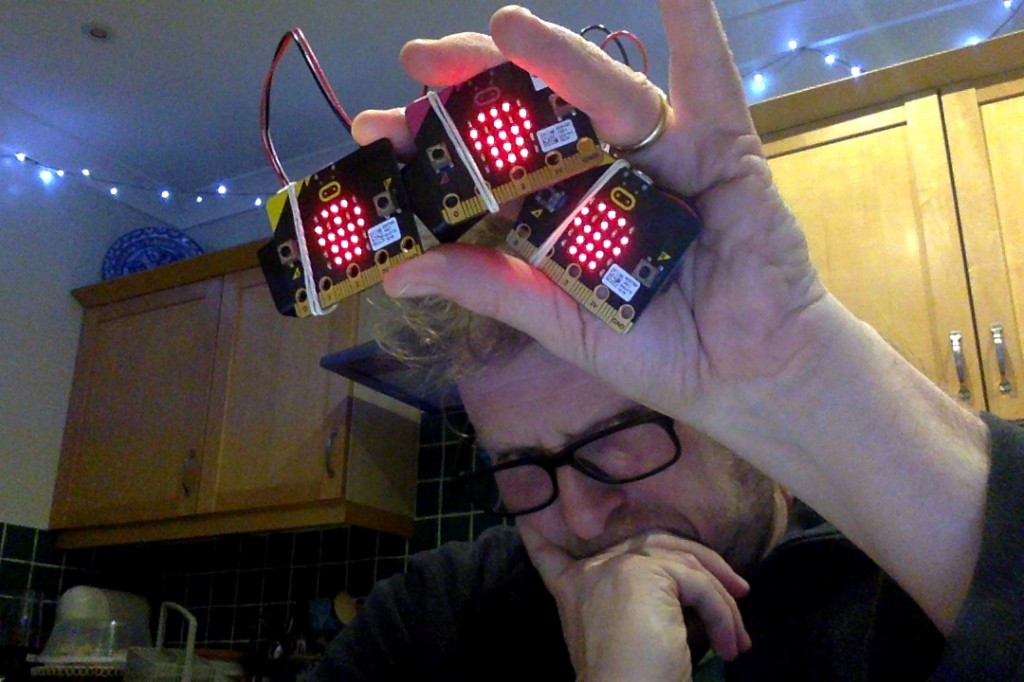
Well, making a calculator with THREE micro:bits really. This is, I admit, a bit of a mad project but I’ve been fascinated by calculators since childhood. I can remember cheap pocket calculators being invented and, like digital watches, I still think they are a pretty neat idea.

Inspired by Philip Meitiner’s keypad micro:bit calculator, I wondered if I could make one just using micro:bits. My first sketch used NINE micro:bits in a grid, which I then decided was utterly bonkers, so I cut it down to three (though you could do this project with two, but I like three. It’s the magic number, don’t you know?)

This was quite a pleasant Easter Sunday intellectual diversion, and I have a new-found respect for designers of humble adding machines: it’s harder than it looks.

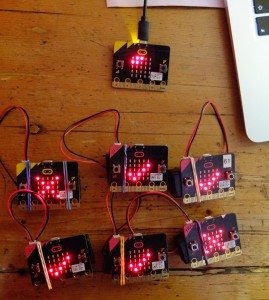
Here’s how it works. The top micro:bit is the display which shows entered numbers and operators. The left button A is the clear button. The right button B is the ‘=’ button (equals, calculate, evaluate, work it out!)

Underneath it are two more micro:bits. The one on the left does numbers, the one on the right sends operators. Using the A button, you scroll through each possible number (0 through to 9 and . for decimal point) and operators (+,-,/ and *). When you found have the number you want to send, you press button B to transmit it over radio to the display. Press button B on the display micro:bit to calculate the result – if it’s longer than a single digit it scrolls, but you can press button B again if you missed it.

I had to think quite hard about how a calculator’s UI works and how it knows when to perform the actual calculation. My solution doesn’t emulate a real calculator – it doesn’t have a keypad for one thing. It builds up a string of numbers and operations until you press the = button, then it evaluates the string. If there’s no operator, pressing = does nothing. If there is no second number, it does nothing. If there is an operator in the string and 2 numbers it will perform the calculation.

I’m sure the code can be made more elegant but I’m quite pleased with it. It copes with decimal numbers, if you don’t have an operator or a second number it doesn’t error but waits for you to add them. Perhaps you could add more mathematical functions? Error handling for more than 2 numbers or division by zero?

Here’s a short video showing how it works in practice:

This is the program you flash to the number encoder:

from microbit import *
import radio
radio.on()
numbers = ["0","1","2","3","4","5","6","7","8","9","."]
x = 0

while True:
    if button_a.was_pressed():
        x += 1
        if x > 10:
            x = 0
        display.show(numbers[x])
    if button_b.was_pressed():
        radio.send(numbers[x])

This is the program you flash to the operator encoder:

from microbit import *
import radio
radio.on()
operators = ["+","-","/","*"]

x = 0

while True:
    if button_a.was_pressed():
        x += 1
        if x > 3:
            x = 0
        display.show(operators[x])
    if button_b.was_pressed():
        radio.send(operators[x])

And finally, this is the program you flash to the display micro:bit:

from microbit import *
import radio
radio.on()
calc_string = ""

def displayResult():
    result_string = str(result)
    if result_string[-2:] == ".0":    # strip trailing .0 from whole numbers
        result_string = result_string[:-2]
    if len(result_string) == 1:
        display.show(result_string)   # show single digits
    else:
        display.scroll(result_string) # scroll longer numbers

while True:
    incoming = radio.receive()
    if incoming:
        display.show(incoming)
        calc_string = calc_string + incoming
    if button_a.was_pressed():   # clear button
        calc_string = ""
        a = None
        b = None    # destroy b so you can test it exists later
        display.show("0")
    if button_b.was_pressed():   # equals button
        if "+" in calc_string or "-" in calc_string or "/" in calc_string or "*" in calc_string:
            z = 0
            for char in calc_string:
                if char in "+-/*":
                    operator = char
                    a = calc_string[:z]   # a is everthything before the operator
                    b = calc_string[z+1:] # b is everything after the operator
                z += 1
            if operator == "+" and b: # check 2nd number exists before displaying result
                result = float(a) + float(b)
                displayResult()
            if operator == "-" and b:
                result = float(a) - float(b)
                displayResult()
            if operator == "*" and b:
                result = float(a) * float(b)
                displayResult()
            if operator == "/" and b:
                result = float(a) / float(b)
                displayResult()
        else:
            print("no operator")
Posted in computers, microbit | Tagged , , | Leave a comment