Learn how computers scan keyboards and make your own wireless texting machine!
Building on my micro:bit calculator project, which uses a 4×4 membrane keypad attached to a breakout board, I made a simple device so you can send and receive text messages over radio using micro:bits.
One of the problems of sending radio messages with a micro:bit is that it only has two buttons, so you have a few choices: encode the message in the code itself, which means you need a computer or mobile device to change the message; use a clunky user-interface to select each letter using lots of button pushes; or you can use Morse code.
Adding an inexpensive 4 x 4 membrane keypad makes messaging much simpler. 16 keys are not enough for the whole alphabet, but if we use a shift key we have 32 buttons, enough for the alphabet and some punctation. We’ll have to spell numbers out, and we can only have upper case letters (or lower case, but not both).
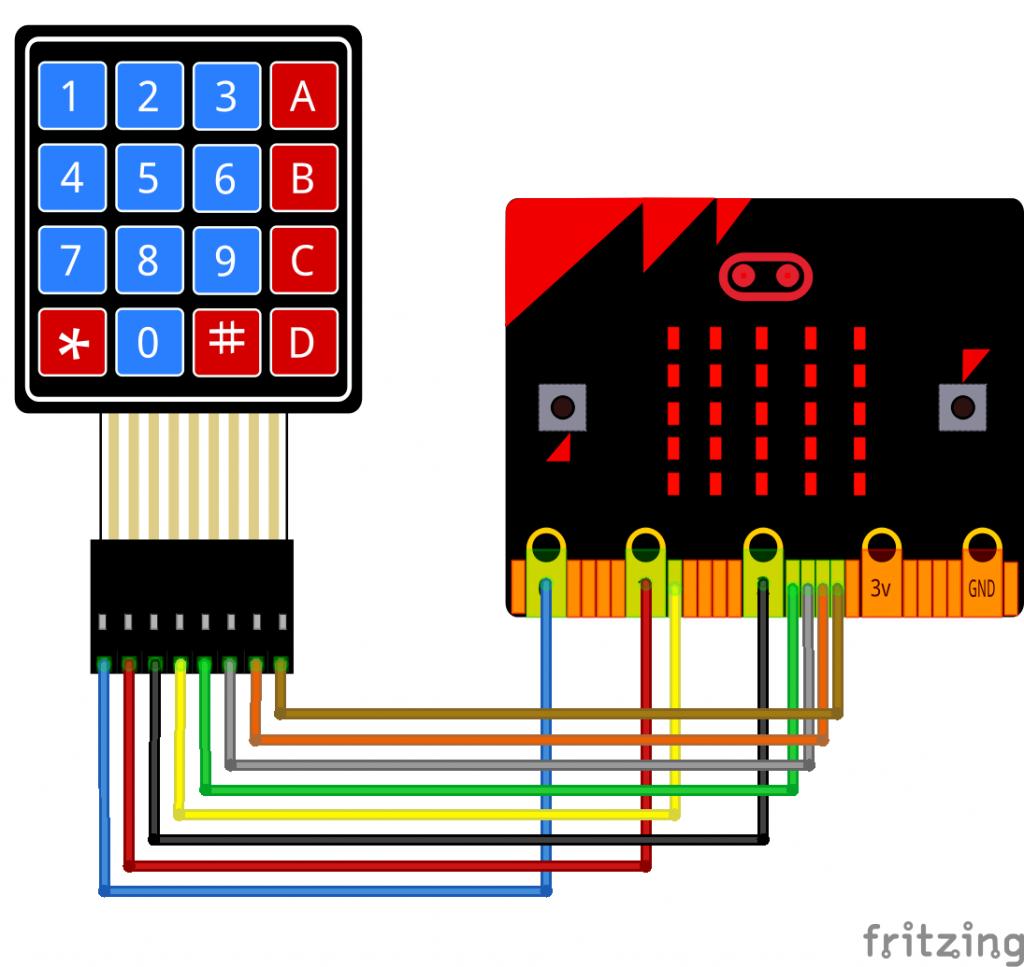
The keypad is attached to the micro:bit via breakout board and some female-make jumper leads like this:
The keypad’s rows, its first 4 connections, are wired to micro:bit GPIO (general purpose input-output) pins 0, 1, 2 and 8. I skipped some pins because some are also used for the display and A and B buttons.
The keypad columns are wired to micro:bit pins 13, 14, 15, 16.
It works by sending out a digital ’1′ signal on each of the row output pins in turn and then reading the inputs from the column pins.
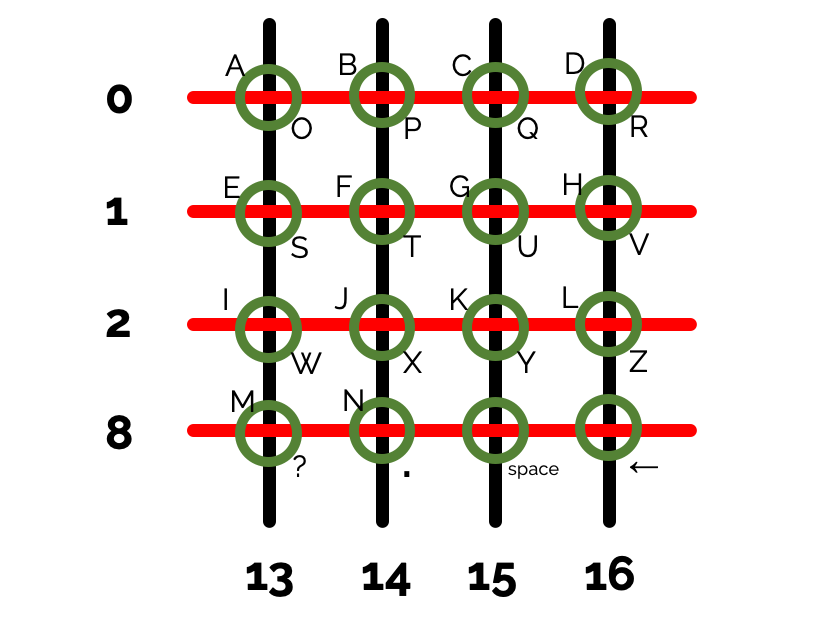
When you press one of the buttons, you complete the circuit and the signal comes back and can be read on the digital input column pins. This is how pocket calculator, and even computer keyboards work: they don’t have a wire connected to every button, instead they arrange keys in a grid (or matrix) like this, which they read by scanning rows and columns just like we do here. If you watch the program running in the MakeCode simulator you may also be able to see the scanning happenning.
Button A on the micro:bit acts as the shift key to swap between letters. I re-labelled the keypad with some masking tape and a Sharpie so I know which button to press, but in case I make a mistake there’s a backspace key and a space key that don’t require any use of shift, they always have the same function. (I could have used something like T9 multi-tap, but I think this is simpler – if you disagree, try coding your own T9-type text entry!)
Pressing button B transmits the message by radio to another micro:bit, on radio channel 23. It could be picked up by any other micro:bit MakeCode program, or by one running exactly the same code as this.
One thing to note is that the main forever loop has a small pause added. This is to allow time for the micro:bit to stop and process the on radio received block.
Let me know if you make one of these – the parts are not expensive, I bought a 5-pack of the keypads for well under £10. It could make a fun multi-player espionage game, perhaps adding some cryptography and code-breaking. Or you could just use it for socially-distanced messaging, as the range of the micro:bit’s radio is very much more than 2 metres!
.
Update: MakeCode extension
I’ve just discovered from @liou_jj in Taiwan that there’s a MakeCode blocks extension for these kinds of keypads: https://github.com/lioujj/pxt-keypad. I’ve not tried it, but it does look useful as it lets you set your own pin numbers so you can use it with other peripherals or avoid the pins used for buttons A and B or the display. I’d still recommend checking out my code above because it allows you to learn how keyboard scanning works, but an extension like this could make it easier to add keypads to your projects.


