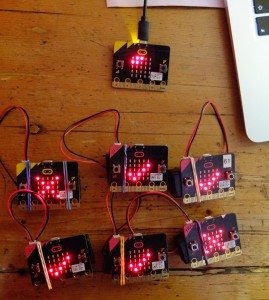
 Up to 25 pupils each has a micro:bit which they can use for voting YES or NO to any question. Pupils press button A to answer ‘no’ to a question, or button B to answer ‘yes’. They can shake their micro:bits to display their ID number and clear the display.
The answers are displayed in a grid on the teacher’s micro:bit’s display – dark/black pixels mean that person has not yet voted, dim ones mean a ‘no’ vote was recorded and bright ones mean a ‘yes’ vote was received from that pupil. The teacher can press button A to clear her micro:bit’s display.
This is based on another MakeCode project, the Voting Machine, again simplified and translated into Python.
Flash this program on to the teacher’s micro:bit:
from microbit import *
import radio
radio.on()

while True:
    message = radio.receive()
    if message:
        id = message[:2]
        vote = message[2:]
        print(id,vote)
        x = int(id[:1])
        y = int(id[1:])
        if vote == "0":
            bright = 4
        if vote == "1":
            bright = 9
        display.set_pixel(x, y, bright)
    if button_a.was_pressed():
        display.clear()
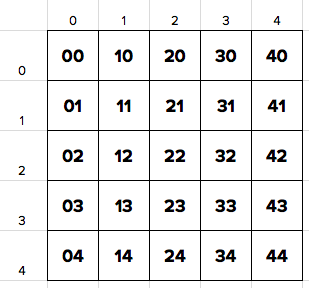
And flash the following program on to the pupils’ micro:bits. The ID numbers need setting according to the diagram above. (It’s the cunning use of these ID numbers that makes the code simpler). You might want to sit the class in a 5 x 5 grid if that’s possible – I do, however, appreciate class sizes are normally more than 25!
from microbit import *
import radio
radio.on()
id = "00"
display.scroll(id)

while True:
    if accelerometer.was_gesture("shake"):
        display.scroll(id)
    if button_a.was_pressed():
        display.show(Image.NO)
        radio.send(id+"0")
    if button_b.was_pressed():
        display.show(Image.YES)
        radio.send(id+"1")
It works by each voter’s micro:bit transmitting a 3 digit string such as
031
This would mean voter ID number 03 has voted ‘yes’. If they voted ‘no’ it would send ’030′. The teacher’s program splits the string up to identify the column (0) and row (3) of the voter, and lights the appropriate pixel bright for a ‘yes’ vote and dimly for a ‘no’.
You could also have fun drawing pictures or perhaps playing games like noughts and crosses with this or use it so pupils can say they need more help with a topic without the embarrassment of putting their hands up.
Version 2: add vote counting
Here’s a more advanced version of the teacher’s program. This one counts the Yes and No votes and displays them on the teacher’s display when button B is pressed, e.g. ‘Yes:2 No:5′. It then clears the display, so only use this when everyone has voted.
from microbit import *
import radio
radio.on()

def countvotes():
    yes = 0
    no = 0
    for column in range(5):
        for row in range(5):
            if display.get_pixel(column, row) == 4:
                no += 1
            if display.get_pixel(column,row) == 9:
                yes += 1
    votes = "Yes:"+ str(yes) + "   No:"+str(no)
    return(votes)

while True:
    message = radio.receive()
    if message:
        id = message[:2]
        vote = message[2:]
        print(id,vote)
        x = int(id[:1])
        y = int(id[1:])
        if vote == "0":
            bright = 4
        if vote == "1":
            bright = 9
        display.set_pixel(x, y, bright)
    if button_a.was_pressed():
        display.clear()
    if button_b.was_pressed():
        display.scroll(countvotes())
Version 3: Allow teacher to clear all screens
This version allows the teacher not just to count the votes cast but also clear pupils’ screens and ask them to vote again. It has slightly different code for both pupils and teacher. The teacher presses button B as before to count up the ‘yes’ and ‘no’ votes, but pressing button A will clear all the pupils’ displays and scroll the word ‘vote!’ across them.
Pupil program version 3:
from microbit import *
import radio
radio.on()
id = "00"

display.scroll(id)

while True:
    if accelerometer.was_gesture("shake"):
        display.scroll(id)
    if button_a.was_pressed():
        display.show(Image.NO)
        radio.send(id+"0")
    if button_b.was_pressed():
        display.show(Image.YES)
        radio.send(id+"1")
    message = radio.receive()
    if message == "vote":
        display.scroll("vote!")
Teacher program version 3:
from microbit import *
import radio
radio.on()

def countvotes():
    yes = 0
    no = 0
    for column in range(5):
        for row in range(5):
            if display.get_pixel(column, row) == 4:
                no += 1
            if display.get_pixel(column,row) == 9:
                yes += 1
    votes = "Yes:"+ str(yes) + "   No:"+str(no)
    return(votes)

while True:
    message = radio.receive()
    if message:
        id = message[:2]
        vote = message[2:]
        print(id,vote)
        x = int(id[:1])
        y = int(id[1:])
        if vote == "0":
            bright = 4
        if vote == "1":
            bright = 9
        display.set_pixel(x, y, bright)
    if button_a.was_pressed():
        radio.send("vote")
        display.clear()
    if button_b.was_pressed():
        display.scroll(countvotes())
It would be cool to add some feedback on a large screen – perhaps have a micro:bit communicating with a program on a computer to display a grid of yes/no answers – or just point a visualiser at the teacher’s micro:bit?

